
Office
Using the Import Function
Morningstar Office Cloud

Morningstar Office Cloud April 2020
© 2019 Morningstar. All Rights Reserved.
Copyright ©2020 Morningstar, Inc. All rights reserved.
The information contained herein: (1) is proprietary to Morningstar and/or its content providers; (2) may not be copied
or distributed; (3) is not warranted to be accurate, complete or timely; and (4) does not constitute advice of any kind.
Neither Morningstar nor its content providers are responsible for any damages or losses arising from any use of this
information. Any statements that are nonfactual in nature constitute opinions only, are subject to change without
notice, and may not be consistent across Morningstar. Past performance is no guarantee of future results.

Morningstar Office Cloud April 2020 3
© 2019 Morningstar. All Rights Reserved.
Contents
Overview . . . . . . . . . . . . . . . . . . . . . . . . . . . . . . . . . . . . . . . . . . . . . . . . . . . . . . . . . . . . . . . . 4
Importing an Investment List . . . . . . . . . . . . . . . . . . . . . . . . . . . . . . . . . . . . . . . . . . . . . . . . . . . 5
Overview . . . . . . . . . . . . . . . . . . . . . . . . . . . . . . . . . . . . . . . . . . . . . . . . . . . . . . . . . . . . . . . . 5
Exercise 1: Import an Investment List from the Import page. . . . . . . . . . . . . . . . . . . . . . . 5
Exercise 2: Creating settings for the list . . . . . . . . . . . . . . . . . . . . . . . . . . . . . . . . . . . . . . . 7
Exercise 3: Map headers. . . . . . . . . . . . . . . . . . . . . . . . . . . . . . . . . . . . . . . . . . . . . . . . . . . 7
Exercise 4: Import the list . . . . . . . . . . . . . . . . . . . . . . . . . . . . . . . . . . . . . . . . . . . . . . . . . . 9
How do I return to an Investment list that I have not yet imported? . . . . . . . . . . . . . . . . 11
Importing a Quick Account . . . . . . . . . . . . . . . . . . . . . . . . . . . . . . . . . . . . . . . . . . . . . . . . . . . . 12
Overview . . . . . . . . . . . . . . . . . . . . . . . . . . . . . . . . . . . . . . . . . . . . . . . . . . . . . . . . . . . . . . . 12
Exercise 1: Import an Excel spreadsheet . . . . . . . . . . . . . . . . . . . . . . . . . . . . . . . . . . . . . 12
Exercise 2: Create settings for the account . . . . . . . . . . . . . . . . . . . . . . . . . . . . . . . . . . . 13
Exercise 3: Map headers. . . . . . . . . . . . . . . . . . . . . . . . . . . . . . . . . . . . . . . . . . . . . . . . . . 14

Morningstar Office Cloud April 2020 4
© 2018 Morningstar. All Rights Reserved.
Importing Investment Lists
OverviewYou can save time in Morningstar Office Cloud by importing items via a Microsoft Excel
spreadsheet, rather than having to create items manually. This guide walks you
through the process of importing the following items into Morningstar Office Cloud:
g .Investment List, and
g Quick Accounts.
This manual contains the following topics and exercises:
g Importing an Investment List (page 5)
g Importing a Quick Account (page 12)
Importing an Investment List Overview
Morningstar Office Cloud April 2020 5
© 2018 Morningstar. All Rights Reserved.
Importing an Investment List
OverviewWhen importing a list of investments, four steps are required to complete the work
flow. In this manual, you will complete the following exercises:
1. Bring in a list of investments
2. Create settings for the list
3. Select the Investments your want to include, and
4. Import the list.
The import functionality in Morningstar Office Cloud supports the .xls and .xlsx file
formats. If you do not have your own file to import, click
here to download a sample
Excel spreadsheet to use in the following exercise. Once downloaded, save the file to
your local drive.
E x e r c i s e 1 : I m p o r t a n
Investment List from the
Import page
The first step is to bring a Microsoft Excel spreadsheet that contains investments into
Morningstar Office Cloud. You can either drag and drop your spreadsheet or navigate
to where it is stored. To bring in an Excel spreadsheet, do the following:
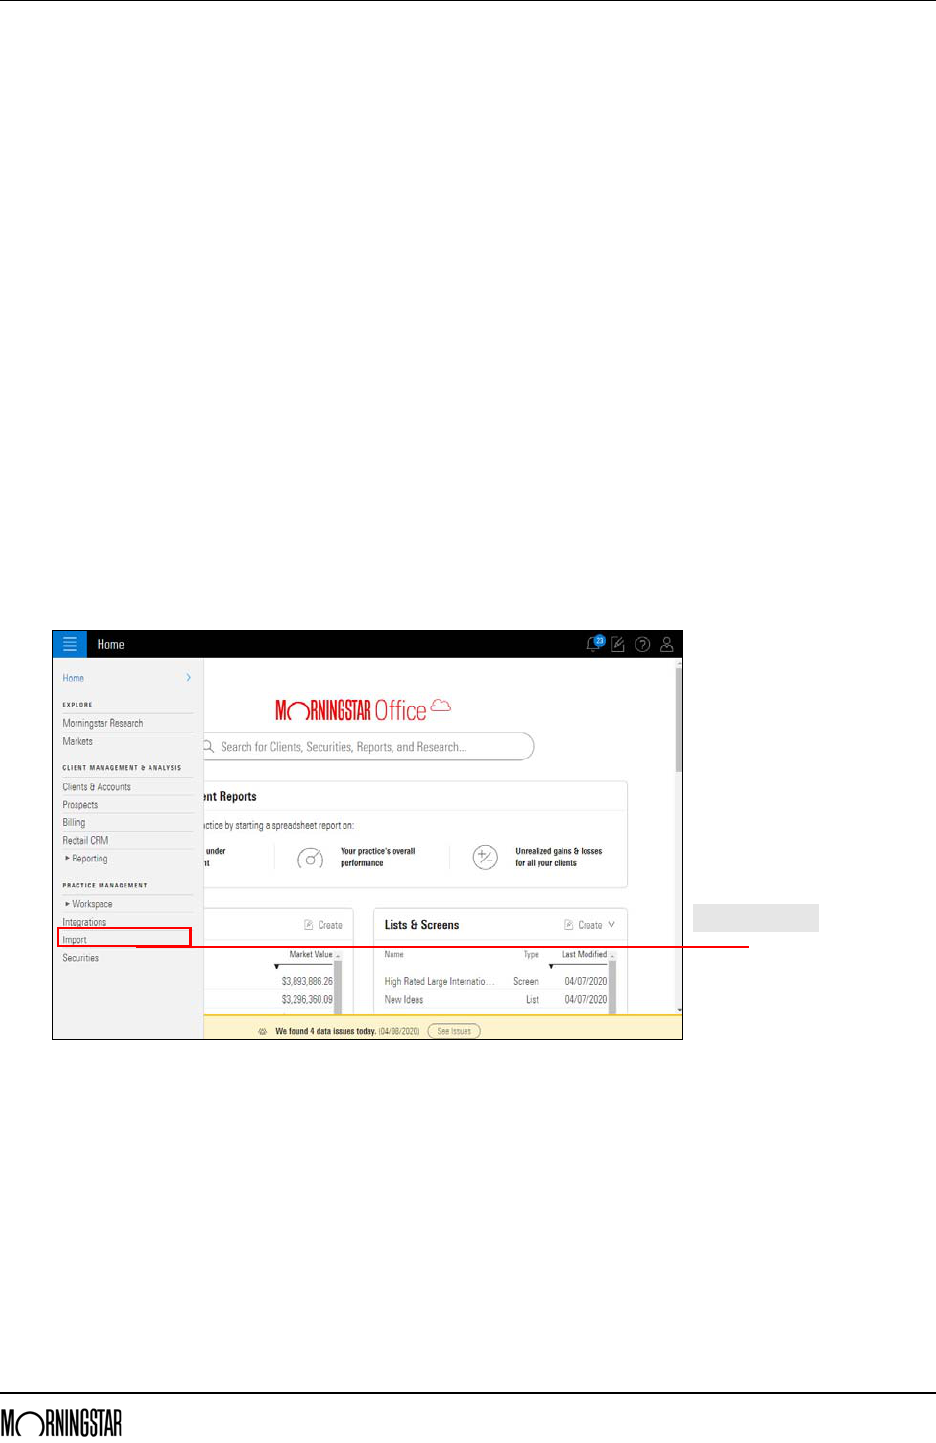
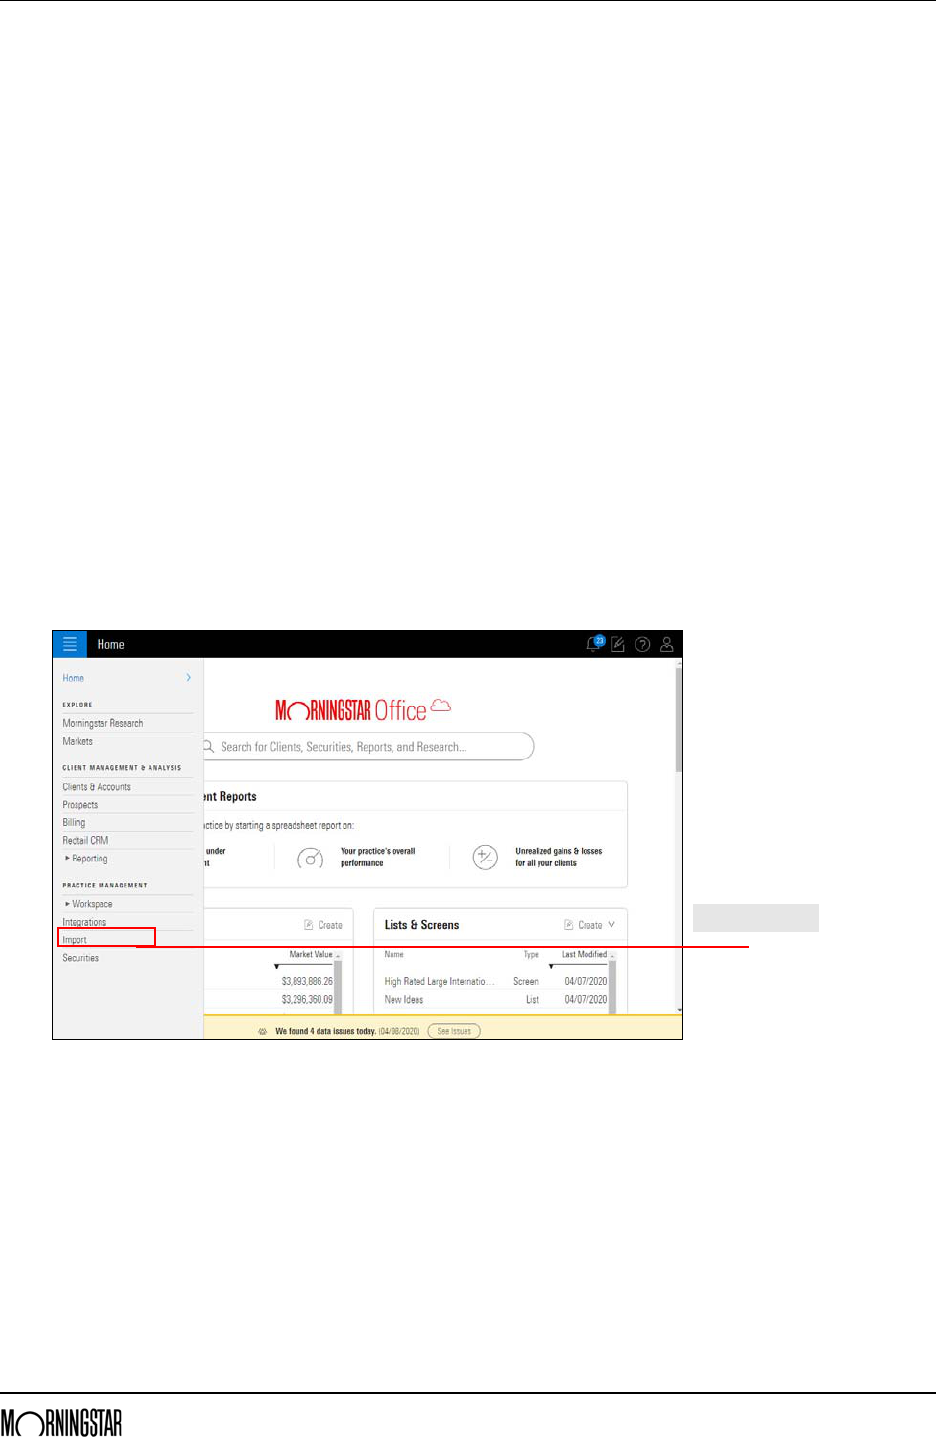
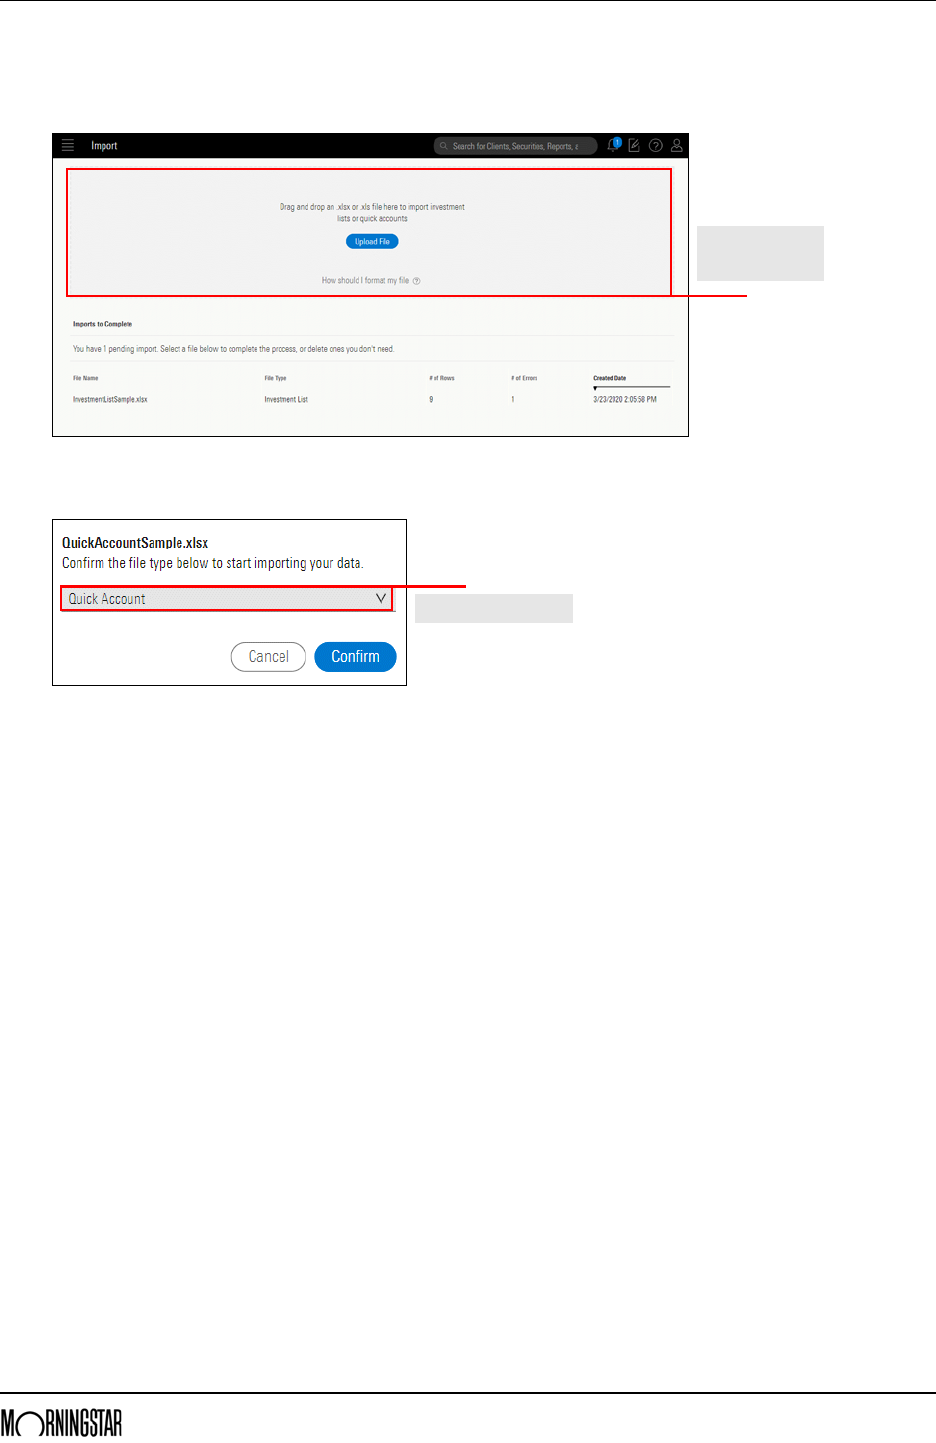
1. From the menu, click Import. The Import page opens.
Click here to start
Importing an Investment List Exercise 1: Import an Investment List from the Import page
Morningstar Office Cloud April 2020 6
© 2018 Morningstar. All Rights Reserved.
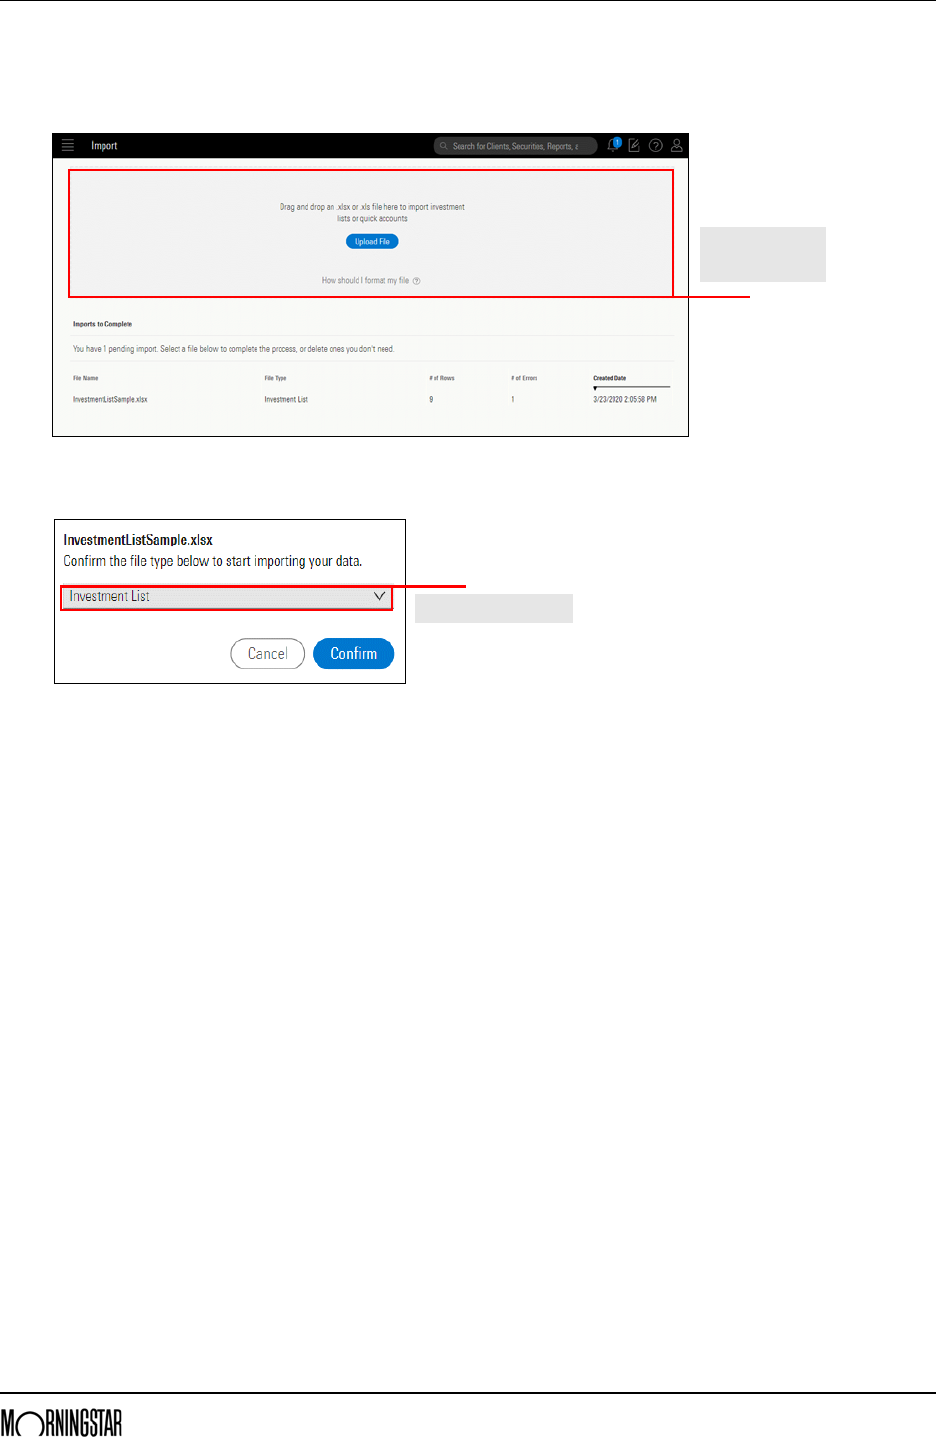
2. In the gray area at the top of the page, drag and drop an Excel spreadsheet into the
space, or click on the Upload File button to navigate to where your Excel Spreadsheet is
stored. The File Type menu opens.
3. From the File Type drop-down menu, select Quick Account.
4. Click Confirm. The Import panel opens.
Drag and drop or
navigate to your
hard drive here
Choose from this menu.
Importing an Investment List Exercise 2: Creating settings for the list
Morningstar Office Cloud April 2020 7
© 2018 Morningstar. All Rights Reserved.
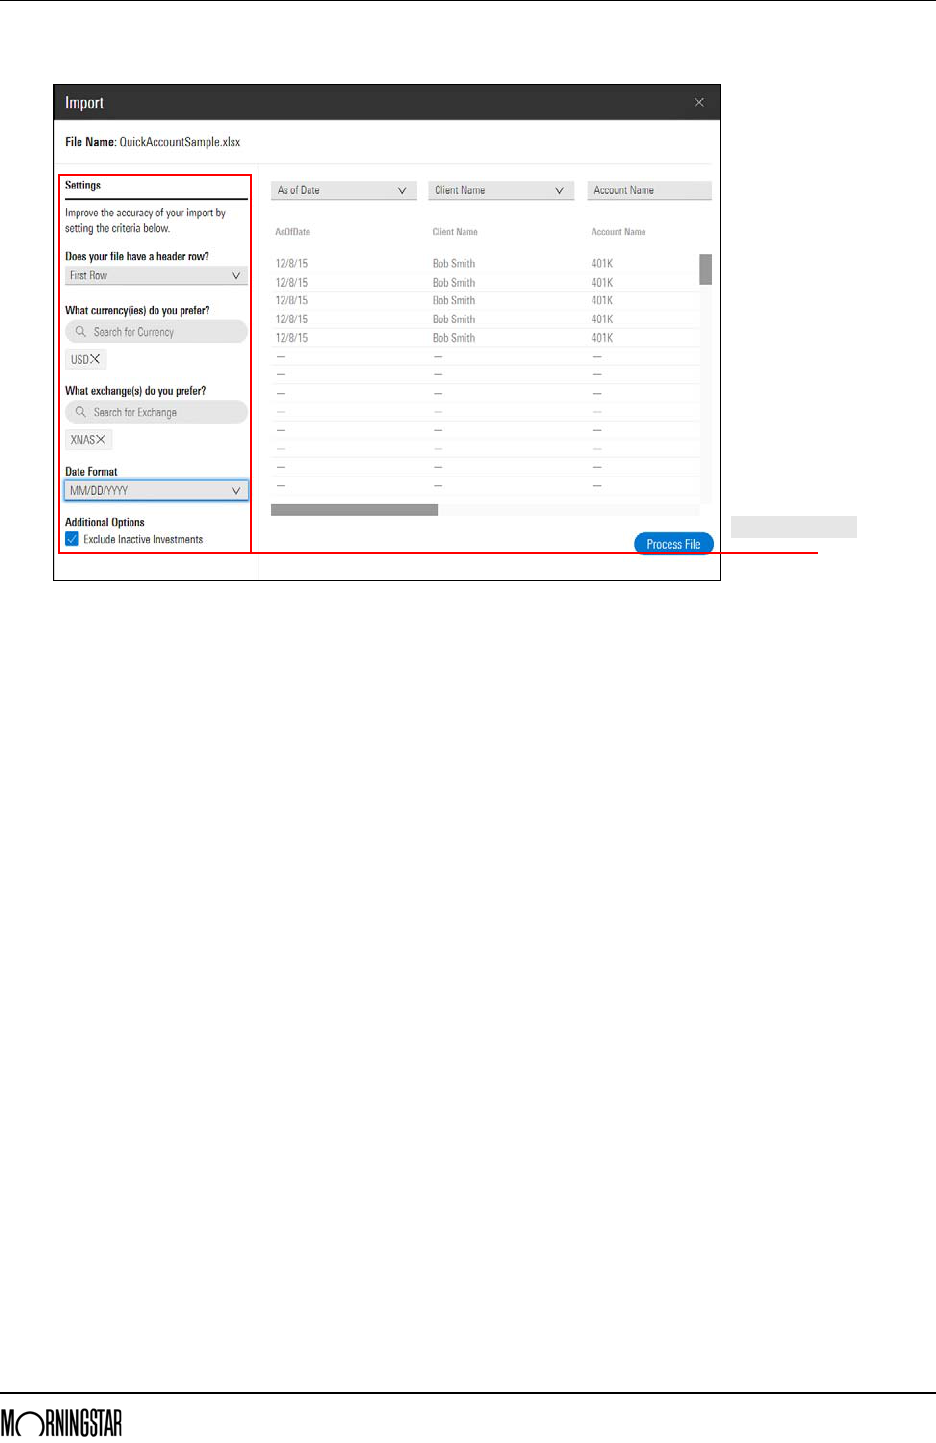
E x e r c i s e 2 : C r e a t i n g
settings for the list
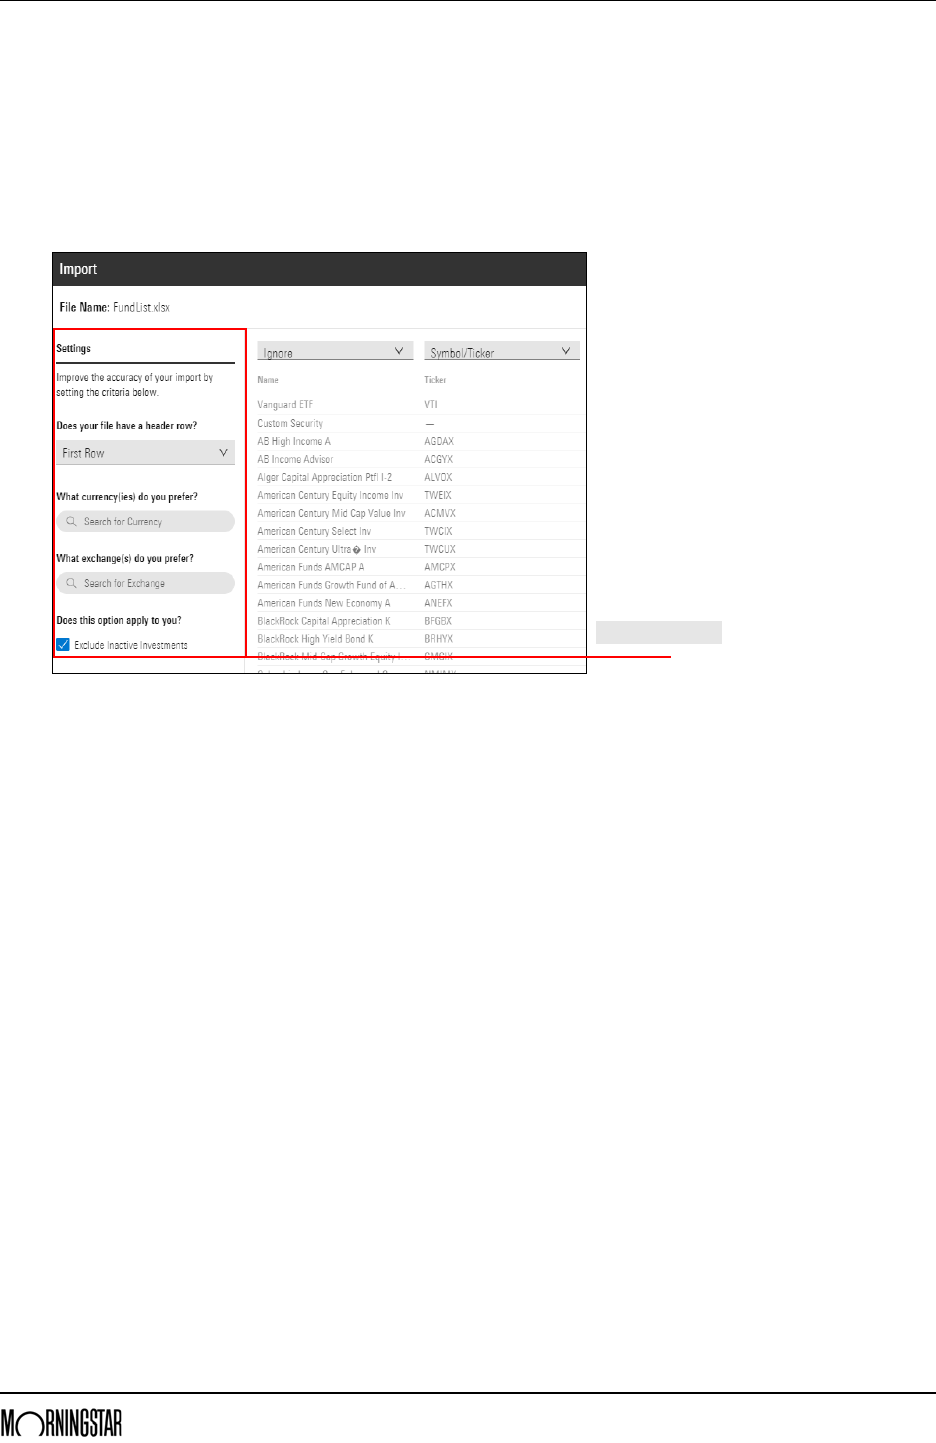
The next step is to assign settings. These settings help Morningstar identify the exact
investment you are attempting to import. Do the following:
1. From the Does your file have a header row? drop-down menu, select First Row.
2. From What currency(ies) do you prefer?, type USD.
3. From What exchange(s) do you prefer? type NASDAQ.
4. Leave the Exclude Inactive Investments box selected. Leave the Import panel open.
Exercise 3: Map headersNow that your settings are entered, map your column headers to select the identifiers
you want to use to map to the columns in your Excel Spreadsheet.
You can select more than one identifier in a single spreadsheet, and Morningstar Office
Cloud matches securities in the following order:
1. Morningstar Performance ID
2. Morningstar Security ID
3. SEDOL
4. ISIN
5. CUSIP
6. Morningstar Fund Id, and
7. Ticker.
Enter Settings here
Importing an Investment List Exercise 3: Map headers
Morningstar Office Cloud April 2020 8
© 2018 Morningstar. All Rights Reserved.
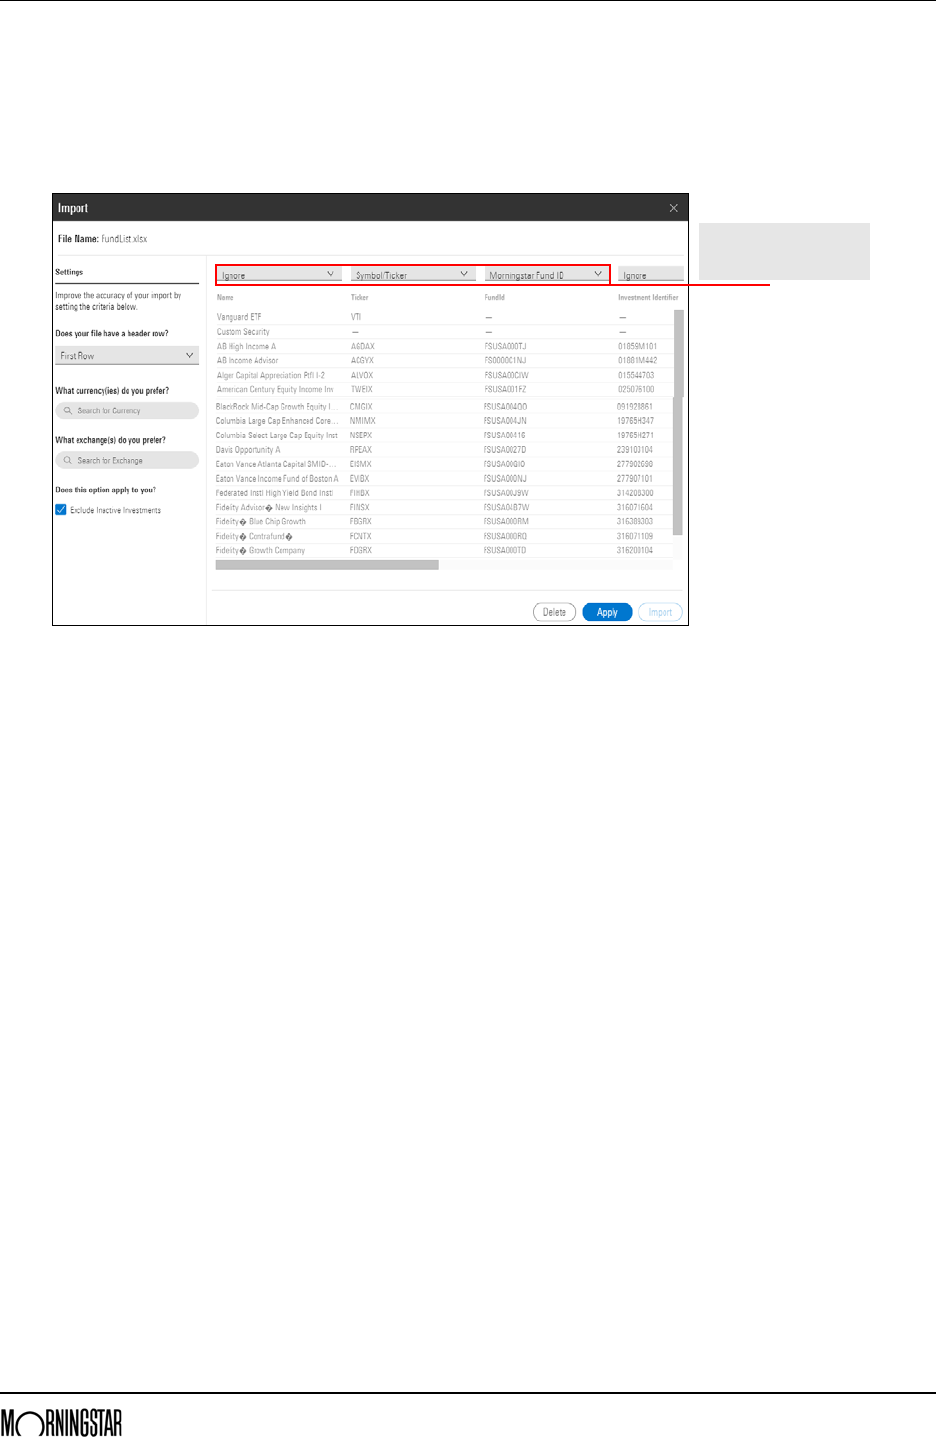
Do the following:
1. Using the drop-down menu above each column, select the identifier you want to map
each Excel column with.
Note: Select Ignore for any columns you do not want to use to map securities.
2. Click Apply. Leave the Import panel open.
Map the columns here with
your spreadsheet using
these drop-down menus
Importing an Investment List Exercise 4: Import the list
Morningstar Office Cloud April 2020 9
© 2018 Morningstar. All Rights Reserved.
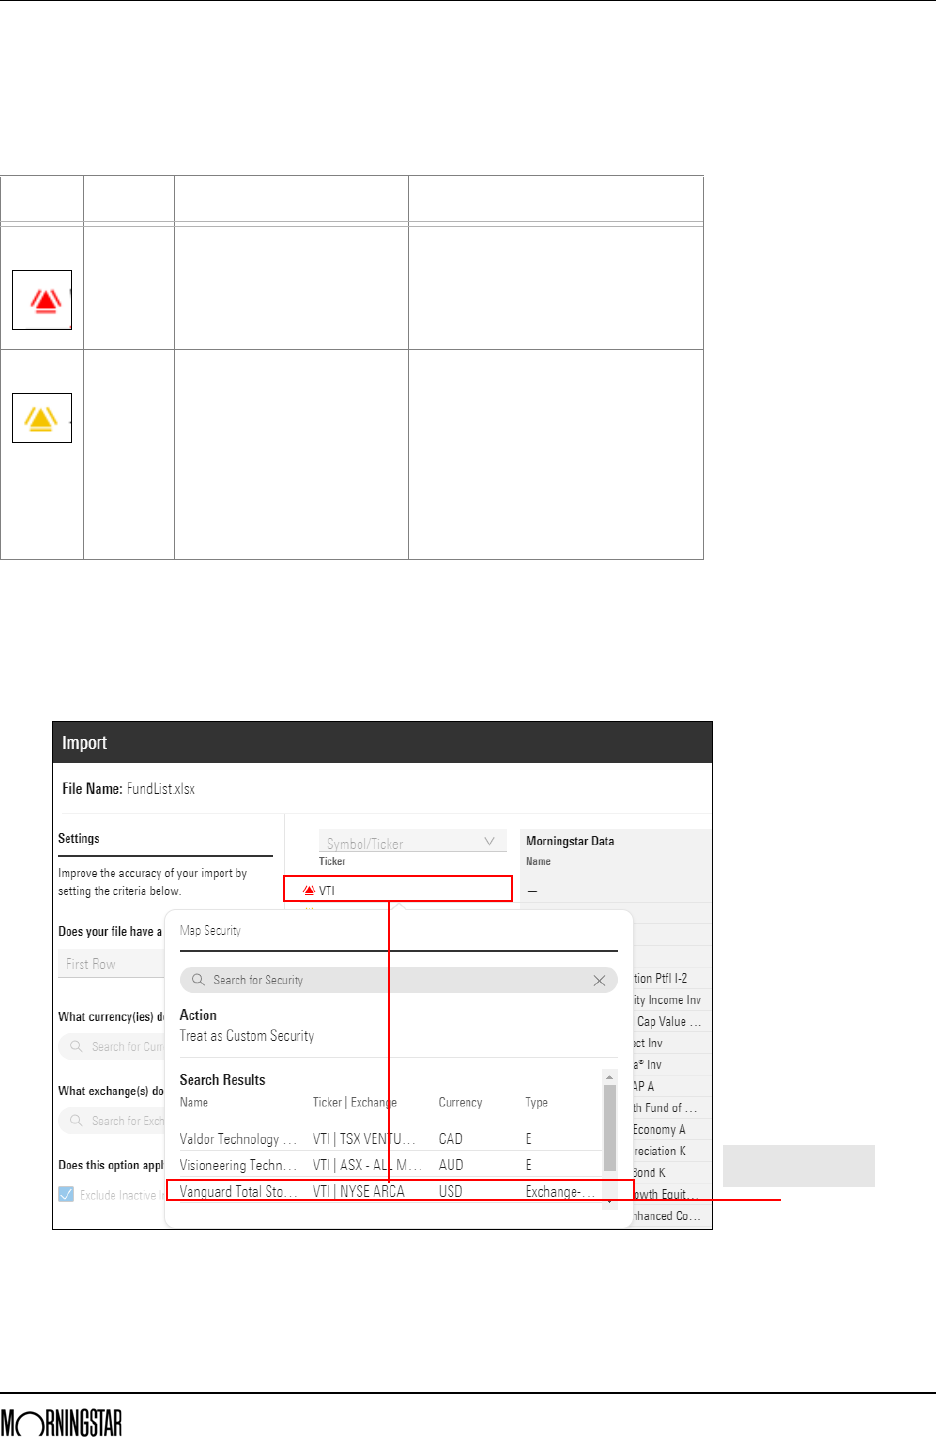
Exercise 4: Import the listAfter mapping your column headers, Morningstar Office Cloud will attempt to match
the investments in your list with investments within Morningstar databases. During
this process you may encounter a security that fails to match. The following table
describes how to resolve it:
Do the following:
1. From the Import panel grid, click on the security that contains the red error message.
The Map Security menu opens.
2. From the options, select Vanguard Total Stock ETF VTI|NYSE-ARCA.
Symbol Type Description Action
Error We have found multiple
matches in the Morningstar
database for the security
identifier provided.
You must select the specific listing
you want to use before moving
forward.
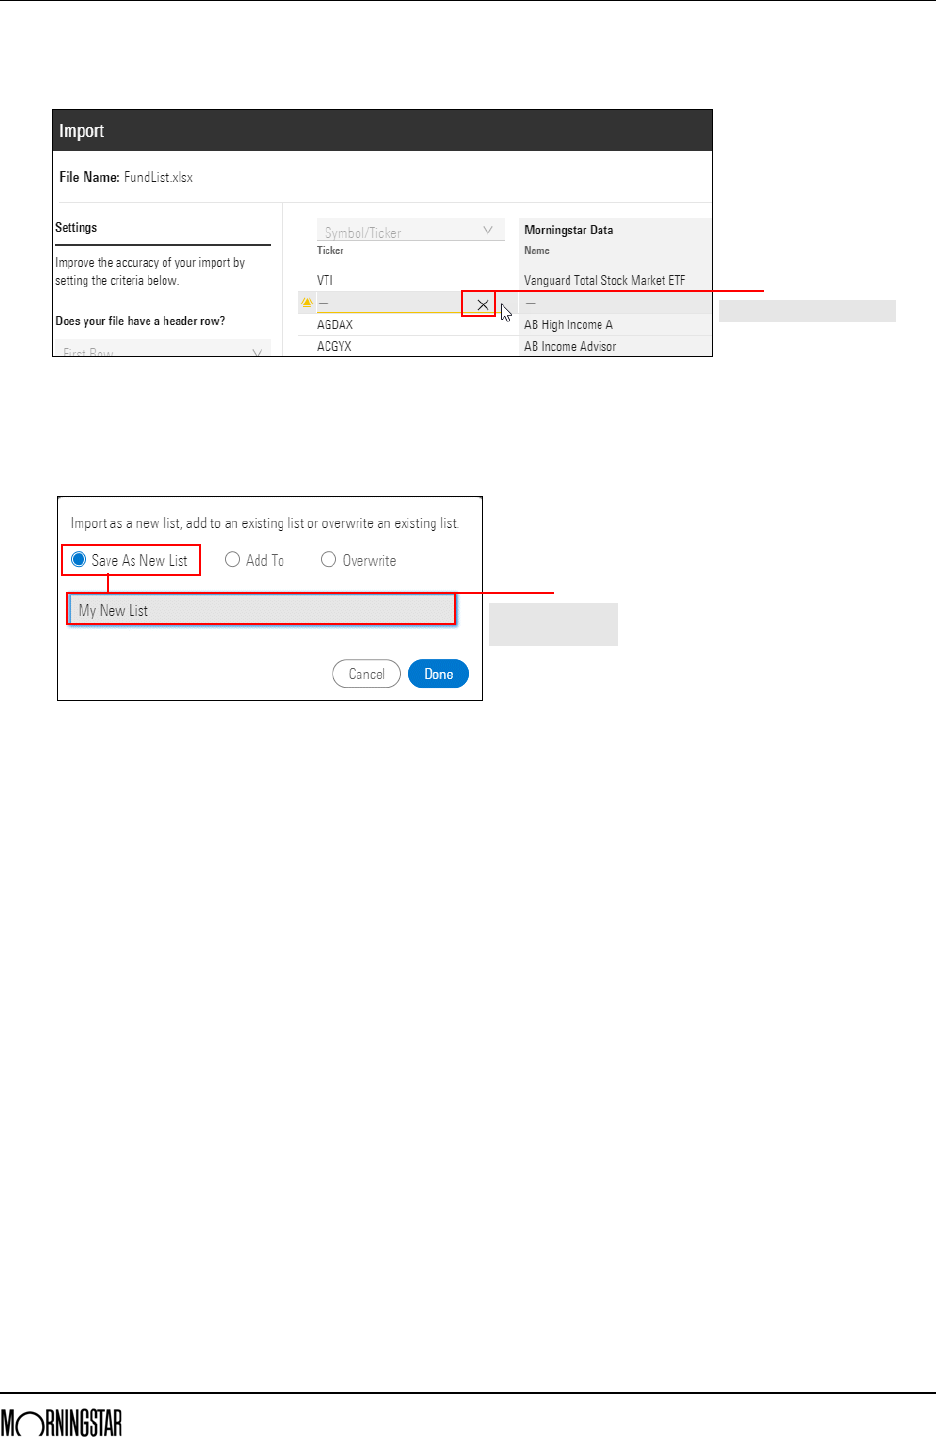
Warning We cannot find a matching
security in the Morningstar
database.
It is optional to select the specific
listing before moving forward. If a
listing is not selected, it will be
treated as a custom security.
Note: When treated as a custom
security, no data will be available for
the security. Another option is to
delete the security altogether.
Select the correct
investment here
Importing an Investment List Exercise 4: Import the list
Morningstar Office Cloud April 2020 10
© 2018 Morningstar. All Rights Reserved.
3. Hover over the cell that contains the yellow error message. Then click the X icon to
delete it.
4. Click the Import. A box opens.
5. Select Save As New List.
6. In the Type List Name box, type My New List.
7. Click Done. Remain on the Import page.
Click here to delete an entry
Select this option to
create a new list
Importing an Investment List How do I return to an Investment list that I have not yet imported?
Morningstar Office Cloud April 2020 11
© 2018 Morningstar. All Rights Reserved.
How do I return to an
Investment list that I
have not yet imported?
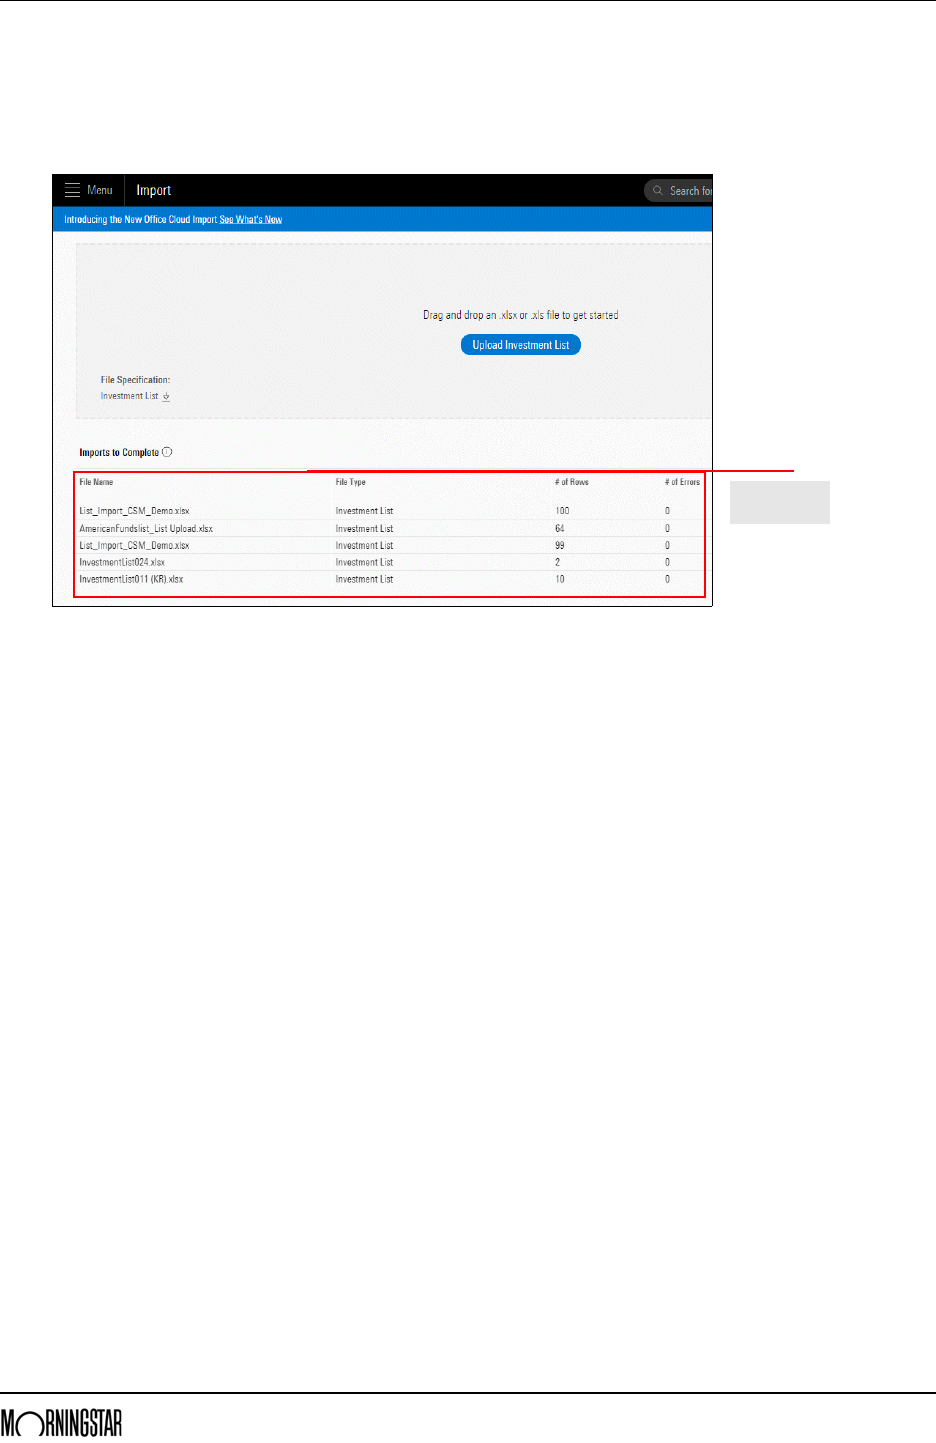
If you are interrupted while importing a list, you can close the Import panel, and return
to your list at a later time to complete the workflow. Do the following:
1. From the Imports to Complete section of the Import page, click on the file you want
to complete.
2. Complete the Import work flow.
Select a list
from here
Importing a Quick Account Overview
Morningstar Office Cloud April 2020 12
© 2018 Morningstar. All Rights Reserved.
Importing a Quick Account
OverviewWhen importing a quick account, four steps are required to complete the work flow. In
this section, you will complete the following exercises:
1. Bring in positions, shares and price
2. Map the columns with the appropriate data
3. Select an existing client, prospect and account (or create a new client and account), and
4. Import the account.
The import functionality in Morningstar Office Cloud supports the .xls and .xlsx file
formats. If you do not have your own file to import, click
here to download a sample
Excel spreadsheet to use in the following exercise. Once downloaded, save the file to
your local drive.
E x e r c i s e 1 : I m p o r t a n
Excel spreadsheet
The first step is to bring a Microsoft Excel spreadsheet into Morningstar Office Cloud.
You can either drag and drop your spreadsheet or navigate to where it is stored. To
bring in an Excel spreadsheet, do the following:
1. From the menu, click Import. The Import page opens.
Click here to start
Importing a Quick Account Exercise 2: Create settings for the account
Morningstar Office Cloud April 2020 13
© 2018 Morningstar. All Rights Reserved.
2. In the gray area at the top of the page, drag and drop an Excel spreadsheet into the
space, or click on the Upload File button to navigate to where your Excel Spreadsheet is
stored. The Import File Type box opens.
3. From the File Type drop-down menu, select Quick Account.
4. Click Confirm. The Import panel opens.
E x e r c i s e 2 : C r e a t e
settings for the account
The next step is to assign settings. These settings help Morningstar identify the exact
holdings you are attempting to import. Do the following:
1. From the Does your file have a header row? drop-down menu, select First Row.
2. In the What currency(ies) do you prefer? text box, type USD.
3. In the What exchange(s) do you prefer? text box, type NASDAQ.
4. From the Date Format drop-down menu, select MM/DD/YYYY.
Drag and drop or
navigate to your
hard drive here
Choose from this menu.
Importing a Quick Account Exercise 3: Map headers
Morningstar Office Cloud April 2020 14
© 2018 Morningstar. All Rights Reserved.
5. Leave the Exclude Inactive Investments box selected. Leave the Import panel open.
Exercise 3: Map headersNow that your settings are entered, map your column headers to select the identifiers
you want to use to map to the columns in your Excel Spreadsheet.
You must select the following column headers before processing your file.
1. Client Name
2. Account Number/Name
3. Holding Name
4. Holding Identifier
5. Share Quantity, and
6. Price.
Enter Settings here

Importing a Quick Account Exercise 3: Map headers
Morningstar Office Cloud April 2020 15
© 2018 Morningstar. All Rights Reserved.
Do the following:
1. Using the drop-down menu above each column, select the identifier you want to map
each Excel column with.
Note: Select Ignore for any columns you do not want to use to map securities.
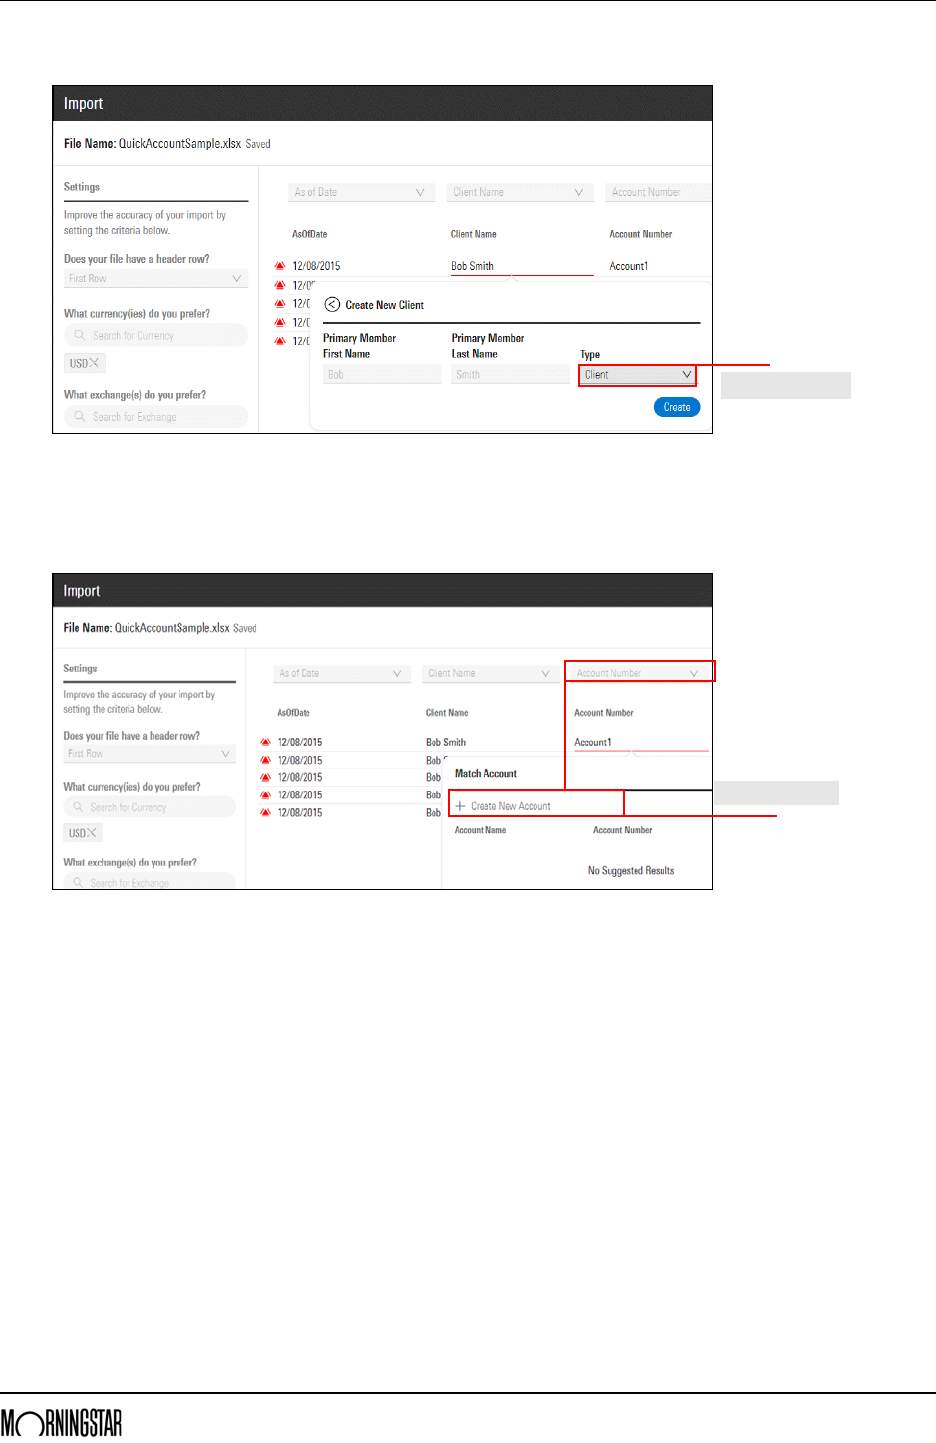
2. Click Process File. If the Client Name/Account cannot be found, a red error appears.
3. Hover and click over the Client Name. The Match Client Name box opens.
4. Click Create New Client. The Create New Client box open.
Note: If the Client or Prospect is already created, select the appropriate option.
Map the appropriate
column header here
Select this button.
Importing a Quick Account Exercise 3: Map headers
Morningstar Office Cloud April 2020 16
© 2018 Morningstar. All Rights Reserved.
5. From the Type drop-down menu, select Client.
6. Click Create.
7. Hover and click over the Account Name. The Match Account Name box opens.
8. Click Create New Account. The Create New Account box open.
Note: If the account is already created, select the appropriate option.
Select this option.
Select this button.
Importing a Quick Account Exercise 3: Map headers
Morningstar Office Cloud April 2020 17
© 2018 Morningstar. All Rights Reserved.
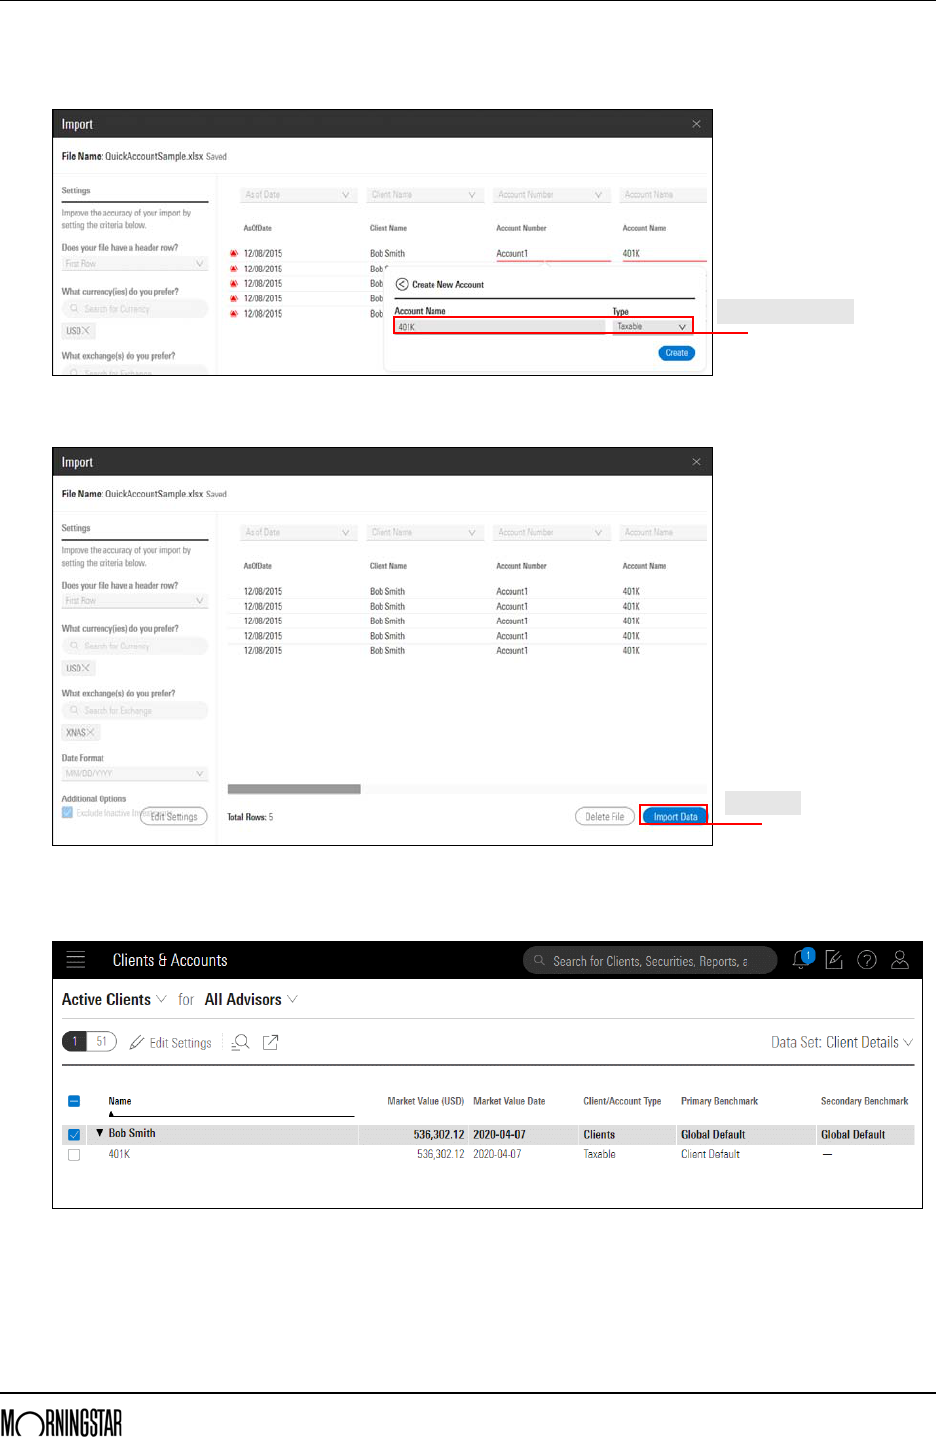
9. In the Account Name field rename the account, if desired. Then select the appropriate
Account type.
10. Click Create.
11. Select Import Data. Once imported, the new Client and Account are available within the
Clients & Account grid.
Select options here.
Click here.
