
Direct
Using the Morningstar
Excel Add-In
Onboarding Guide

Morningstar Direct January 2020
© 2020 Morningstar. All Rights Reserved.
Copyright © 2020 Morningstar, Inc. All rights reserved.
The information contained herein: (1) is proprietary to Morningstar and/or its content providers; (2) may not be copied
or distributed; (3) is not warranted to be accurate, complete or timely; and (4) does not constitute advice of any kind.
Neither Morningstar nor its content providers are responsible for any damages or losses arising from any use of this
information. Any statements that are nonfactual in nature constitute opinions only, are subject to change without
notice, and may not be consistent across Morningstar. Past performance is no guarantee of future results.

Morningstar Direct January 2020 3
© 2020 Morningstar. All Rights Reserved.
Contents
Overview . . . . . . . . . . . . . . . . . . . . . . . . . . . . . . . . . . . . . . . . . . . . . . . . . . . . . . . . . . . . . . . . 4
What basic formulas does the Morningstar Excel Add-In offer?. . . . . . . . . . . . . . . . . . . . . 4
Installing and Configuring the Morningstar Excel Add-In . . . . . . . . . . . . . . . . . . . . . . . . . . . . . 5
Overview . . . . . . . . . . . . . . . . . . . . . . . . . . . . . . . . . . . . . . . . . . . . . . . . . . . . . . . . . . . . . . . . 5
Exercise 1: Install the Morningstar Excel Add-In . . . . . . . . . . . . . . . . . . . . . . . . . . . . . . . . 5
Exercise 2: Log in to the Morningstar Excel Add-In . . . . . . . . . . . . . . . . . . . . . . . . . . . . . . 6
Exercise 3: Change the settings for the Morningstar Excel Add-In. . . . . . . . . . . . . . . . . . 8
Exercise 4: Update the settings for Microsoft® Excel® . . . . . . . . . . . . . . . . . . . . . . . . . . . 10
Retrieving the Members of a Saved List or Search. . . . . . . . . . . . . . . . . . . . . . . . . . . . . . . . . . 11
Overview . . . . . . . . . . . . . . . . . . . . . . . . . . . . . . . . . . . . . . . . . . . . . . . . . . . . . . . . . . . . . . . 11
Exercise 5: Download the sample spreadsheet . . . . . . . . . . . . . . . . . . . . . . . . . . . . . . . . 11
Exercise 6: Retrieve an existing list of investments . . . . . . . . . . . . . . . . . . . . . . . . . . . . . 11
What are the component parts of the MSMEMBER formula? . . . . . . . . . . . . . . . . . . . . . 13
Retrieving Supplementary Data for Investments . . . . . . . . . . . . . . . . . . . . . . . . . . . . . . . . . . . 15
Overview . . . . . . . . . . . . . . . . . . . . . . . . . . . . . . . . . . . . . . . . . . . . . . . . . . . . . . . . . . . . . . . 15
Exercise 7: Retrieve supplementary data points . . . . . . . . . . . . . . . . . . . . . . . . . . . . . . . 15
Exercise 8: Apply a formula to additional investments . . . . . . . . . . . . . . . . . . . . . . . . . . 17
Exercise 9: Retrieve multiple data points at once . . . . . . . . . . . . . . . . . . . . . . . . . . . . . . 19
Retrieving a Historical Series of Data Points for Investments . . . . . . . . . . . . . . . . . . . . . . . . . 20
Overview . . . . . . . . . . . . . . . . . . . . . . . . . . . . . . . . . . . . . . . . . . . . . . . . . . . . . . . . . . . . . . . 20
Exercise 10: Retrieve time series data points. . . . . . . . . . . . . . . . . . . . . . . . . . . . . . . . . . . 20
Exercise 11: Manually modify a formula. . . . . . . . . . . . . . . . . . . . . . . . . . . . . . . . . . . . . . . 23
Exercise 12: Retrieve standard deviation values . . . . . . . . . . . . . . . . . . . . . . . . . . . . . . . . 24
Exercise 13: Add the tracking error. . . . . . . . . . . . . . . . . . . . . . . . . . . . . . . . . . . . . . . . . . . 26
Exercise 14: Add the Sharpe Ratio . . . . . . . . . . . . . . . . . . . . . . . . . . . . . . . . . . . . . . . . . . . 28
Exercise 15: Link formulas to a reference cell . . . . . . . . . . . . . . . . . . . . . . . . . . . . . . . . . . 30
Exercise 16: Retrieve Historical Series data . . . . . . . . . . . . . . . . . . . . . . . . . . . . . . . . . . . . 31
Retrieving a Portfolio’s Holdings. . . . . . . . . . . . . . . . . . . . . . . . . . . . . . . . . . . . . . . . . . . . . . . . 36
Overview . . . . . . . . . . . . . . . . . . . . . . . . . . . . . . . . . . . . . . . . . . . . . . . . . . . . . . . . . . . . . . . 36
Exercise 17: Retrieve portfolio holdings for a fund using the MSHOLDING formula . . . . 36
Exercise 18: Retrieve only the top 10 holdings for a fund . . . . . . . . . . . . . . . . . . . . . . . . . 38
Exercise 19: Retrieve historical positions for a fund. . . . . . . . . . . . . . . . . . . . . . . . . . . . . . 39
Retrieving Ownership Information for an Investment. . . . . . . . . . . . . . . . . . . . . . . . . . . . . . . . 40
Overview . . . . . . . . . . . . . . . . . . . . . . . . . . . . . . . . . . . . . . . . . . . . . . . . . . . . . . . . . . . . . . . 40
Exercise 20: Retrieve ownership data for a stock. . . . . . . . . . . . . . . . . . . . . . . . . . . . . . . . 40
A short note on using Dash Codes . . . . . . . . . . . . . . . . . . . . . . . . . . . . . . . . . . . . . . . . . . . 42
Morningstar Direct January 2020 4
© 2020 Morningstar. All Rights Reserved.
Using the Morningstar Excel Add-In
Overview
The Morningstar
® Excel Add-In allows users to retrieve data points from the Morningstar
databases within Microsoft
® Excel® for further calculation, formatting, or charting.
Think of it as an alternative to exporting data from Morningstar Direct
SM
.
This guide offers information about the Add-In and a series of exercises showing users
how to leverage some of its key features. Note that this tool must be installed separately
from the Morningstar Direct application.
What basic formulas
does the Morningstar
Excel Add-In offer?
The Morningstar Excel Add-In allows users to retrieve data from Morningstar Direct
using the commands described in the following table:
This guide includes the following lessons:
g Installing and Configuring the Morningstar Excel Add-In (page 5)
g Retrieving the Members of a Saved List or Search (page 11)
g Retrieving Supplementary Data for Investments (page 15)
g Retrieving a Historical Series of Data Points for Investments (page 20)
g Retrieving a Portfolio’s Holdings (page 36)
g Retrieving Ownership Information for an Investment (page 40)
Use this
command…
To retrieve this type of data from the
desktop version of Morningstar Direct…
MSMEMBER Investments included as part of a saved list or search
MSDP The current value of a data point
MSTS Historical values for a data point, over a time period you define
MSHOLDING The holdings of a investment’s portfolio
MSDATE Dynamic time periods
Installing and Configuring the Morningstar Excel Add-In Overview
Morningstar Direct January 2020 5
© 2020 Morningstar. All Rights Reserved.
Installing and Configuring the Morningstar Excel Add-In
OverviewBefore using the Morningstar Excel Add-In, it must be installed. Additionally, it will be
worthwhile to spend a few minutes configuring both the settings within the Add-In, as
well as Microsoft
® Excel itself to optimize the use of this tool.
Exercise 1: Install the
Morningstar Excel Add-In
If you do not have installation rights on your computer, work with your firm’s IT
department to have the Morningstar Excel Add-In installed for you. If you do have
installation rights on your computer, you can install it by doing the following:
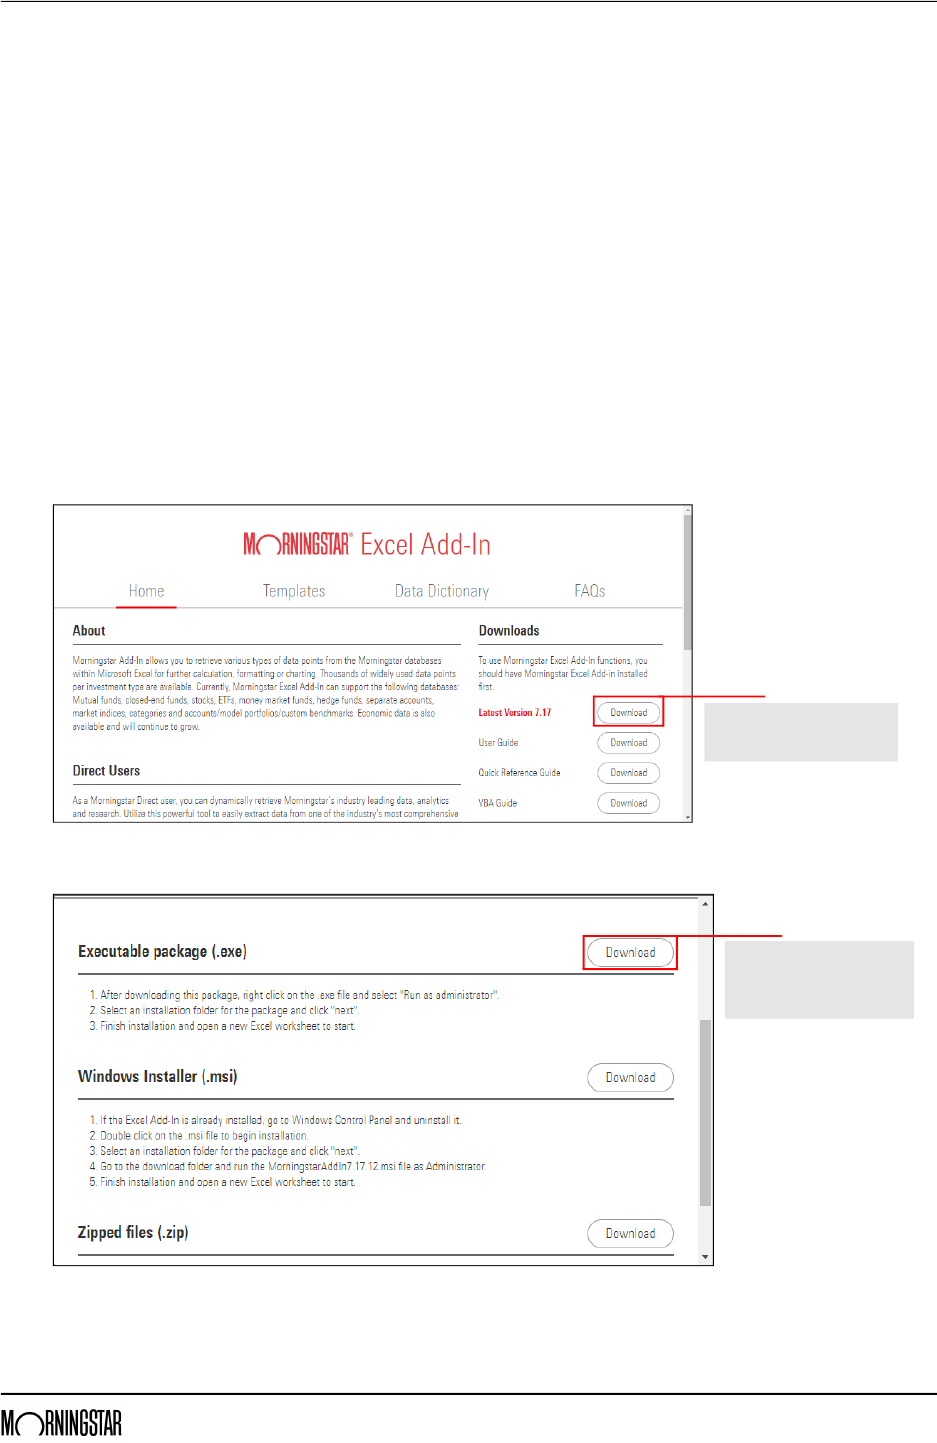
1. Visit http://addin.morningstarcommodity.com/.
2. To the right of the Latest Version, click Download.
Note: Users will need to regularly visit this page to download updated versions of the
application as new features and capabilities are introduced for the Add-In.
3. Under the Executable package (.exe), click Download.
4. Open the .exe file and follow the prompts to install it.
Use this button to access
the download files for
the latest version of the Add-In.
Use this button to download
the installation wizard that will
walk you through adding the
Add-In to Microsoft® Excel®.
Installing and Configuring the Morningstar Excel Add-In Exercise 2: Log in to the Morningstar Excel Add-In
Morningstar Direct January 2020 6
© 2020 Morningstar. All Rights Reserved.
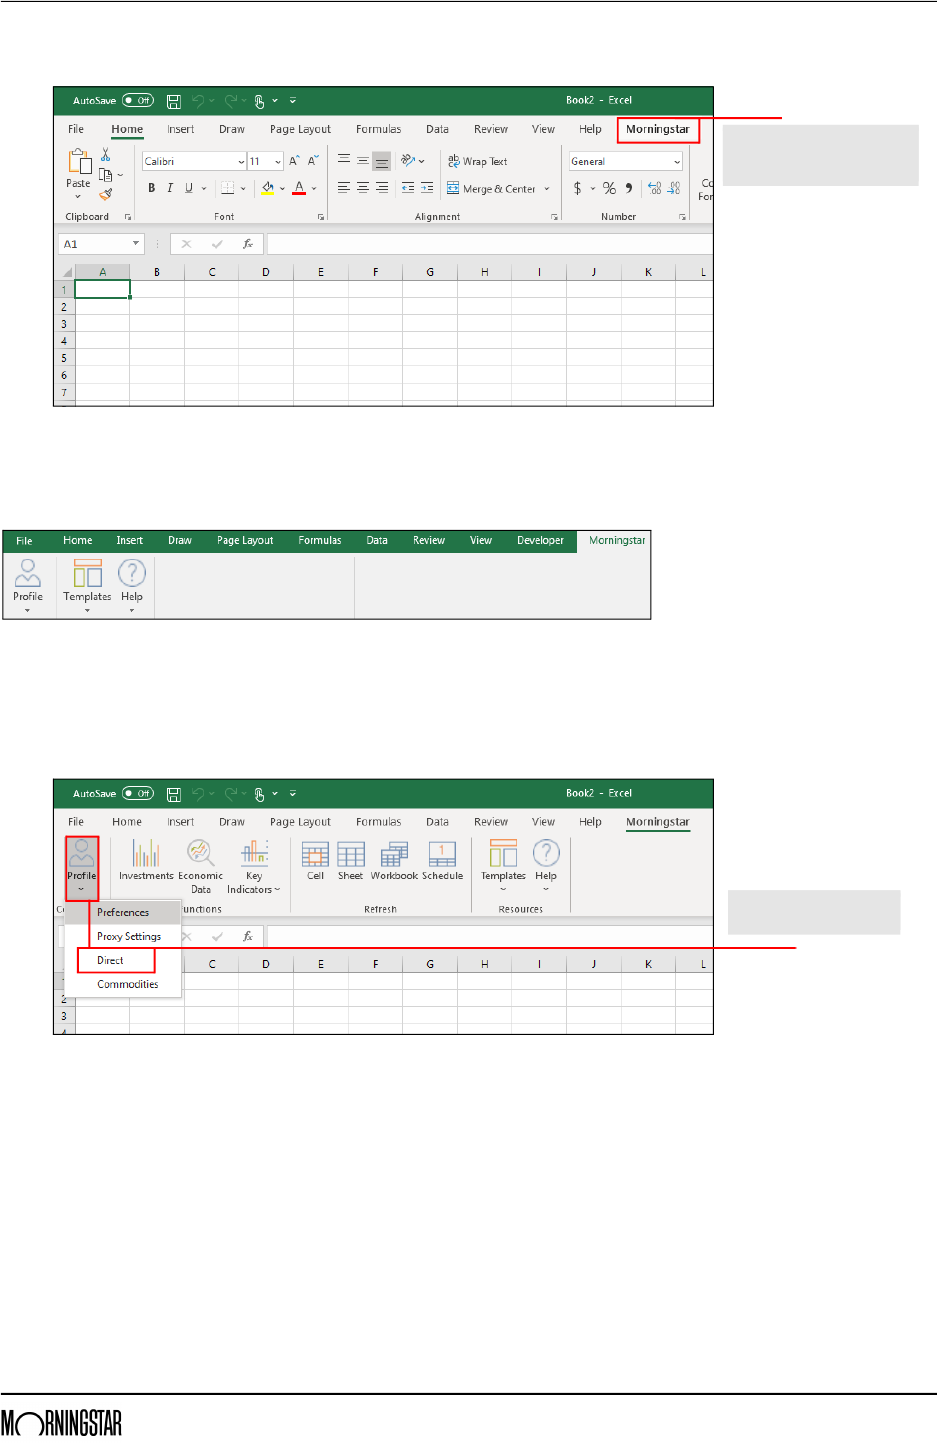
5. To see that the Add-In appears as expected, open Microsoft® Excel®.
Exercise 2: Log in to the
Morningstar Excel Add-In
When accessing the Morningstar Excel Add-In for the first time, only the following
icons are seen under the Morningstar tab:
To use the Morningstar Excel Add-In, users must enter their Morningstar Direct login
credentials. To login, do the following:
1. Under the Morningstar tab, click Profile > Direct. The Morningstar Add-In login dialog
box opens.
Once installed, the Morningstar
Add-In capabilities can be
accessed from this tab.
Select this option to access
the features of the Add-In.
Installing and Configuring the Morningstar Excel Add-In Exercise 2: Log in to the Morningstar Excel Add-In
Morningstar Direct January 2020 7
© 2020 Morningstar. All Rights Reserved.
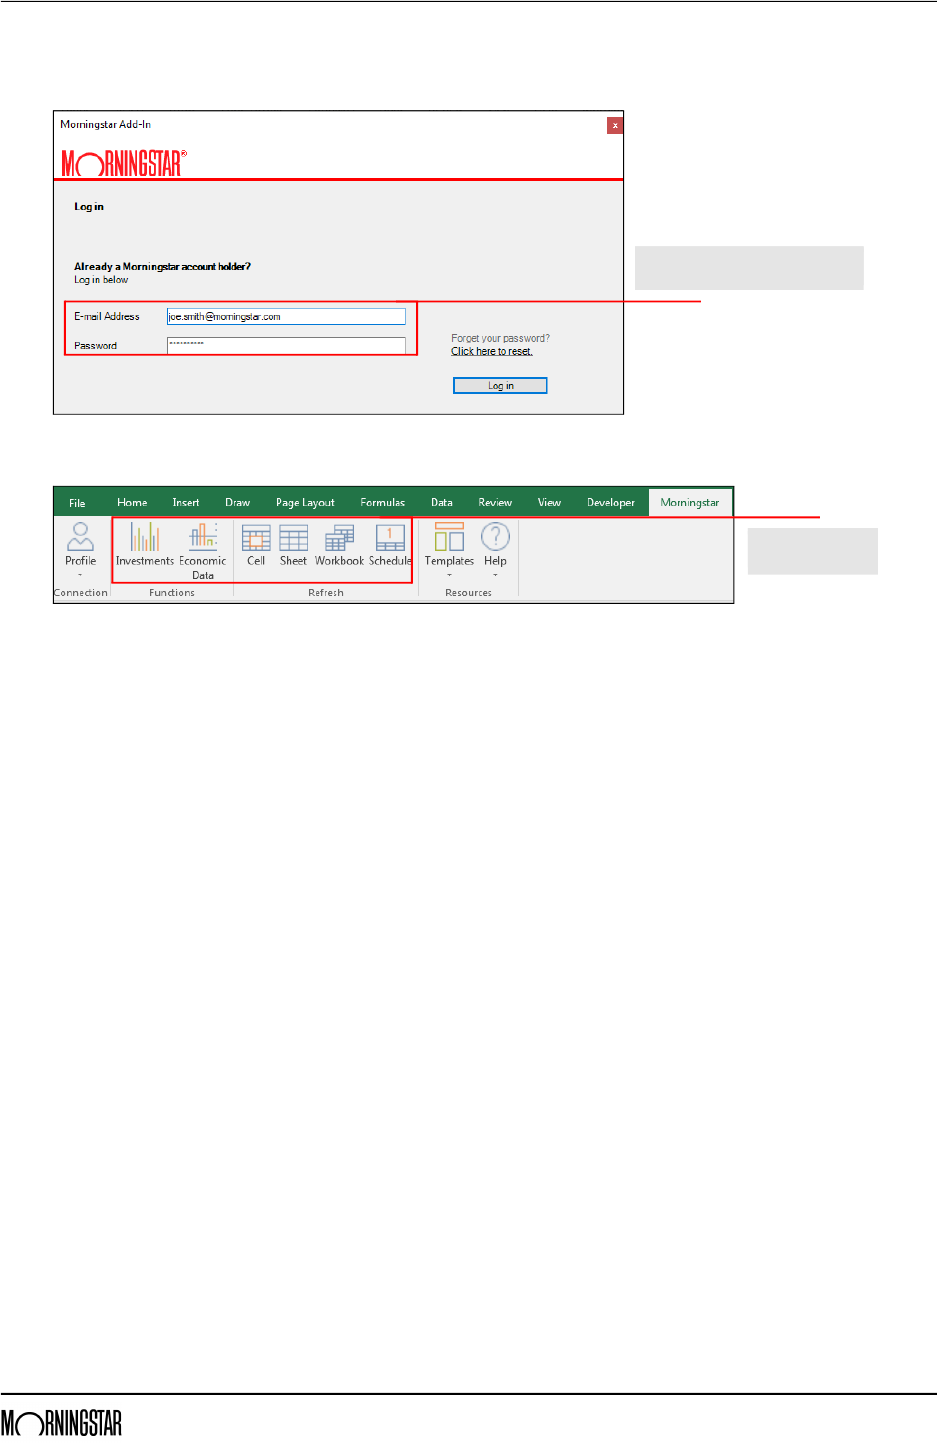
2. Enter the e-mail address and password used to access Morningstar Direct, then
click Log In.
The complete Morningstar Excel Add-In toolbar is now available.
The login details entered here are
saved, and will not be required again.
Note the additional
icons now available.
Installing and Configuring the Morningstar Excel Add-In Exercise 3: Change the settings for the Morningstar Excel Add-In
Morningstar Direct January 2020 8
© 2020 Morningstar. All Rights Reserved.
Exercise 3: Change the
settings for the
Morningstar Excel Add-In
The Morningstar Excel Add-In has its own settings to control the following items:
g What should be displayed when no data or value is available for an item?
g When the Morningstar Rating and Morningstar Style Box are displayed, should
they appear as symbols, or numbers?
g How do you want to save data in your computer’s memory when using the
Morningstar Excel Add-In for the sake of optimizing performance?
g When a change is made to a formula in a worksheet, do you want the tool to
automatically recalculate values, or do you want to manually control this update?
To configure these settings, do the following:
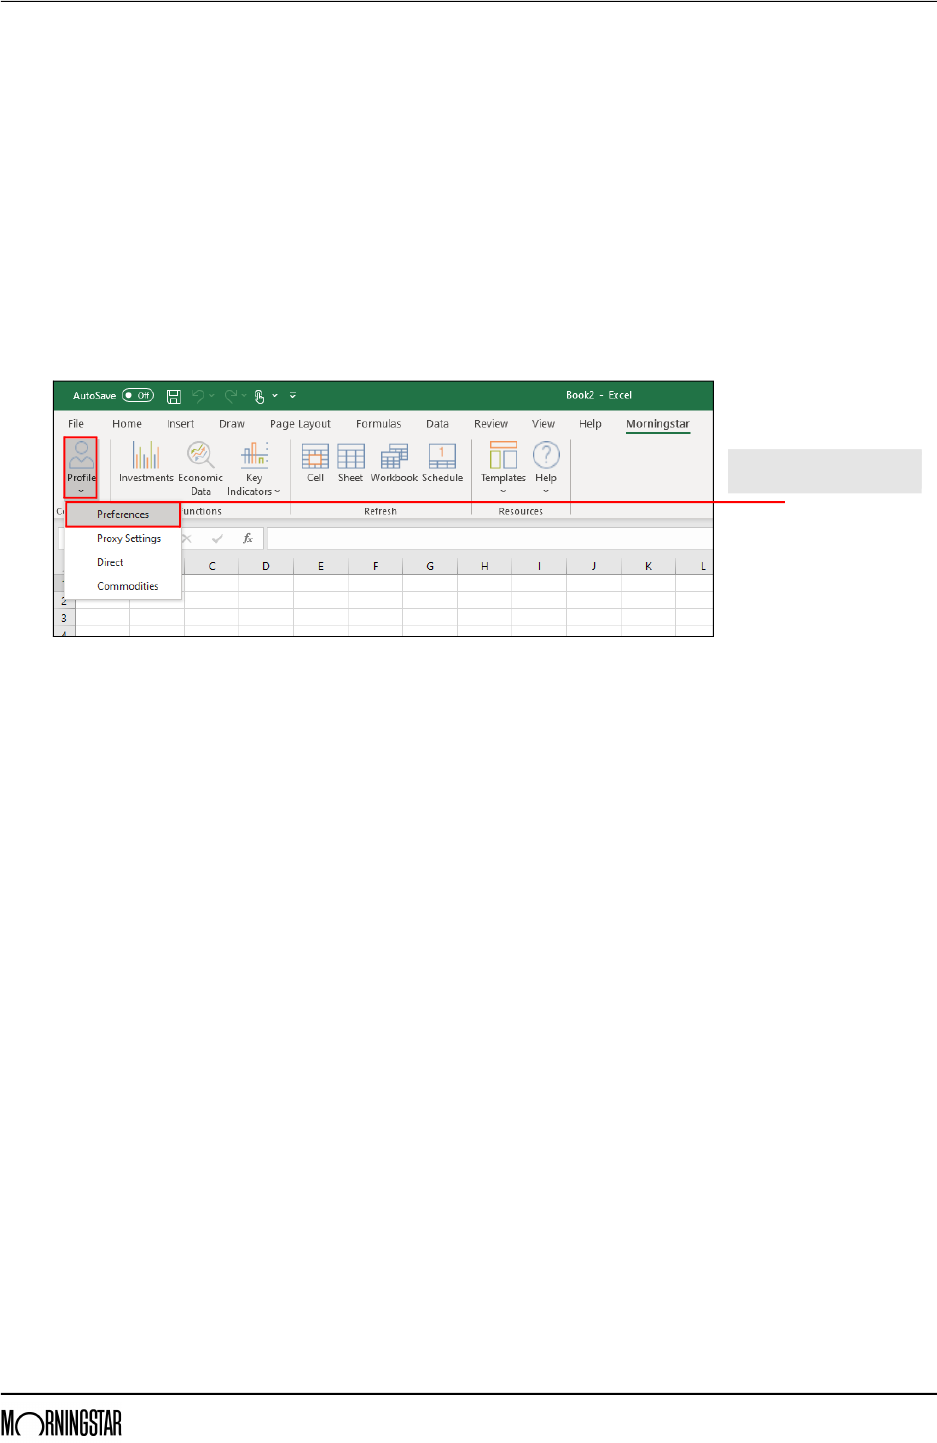
1. From the Morningstar tab, click Profile > Preferences. The Morningstar Add-In dialog
box opens.
Select this option to configure
certain aspects of the Add-In.

Installing and Configuring the Morningstar Excel Add-In Exercise 3: Change the settings for the Morningstar Excel Add-In
Morningstar Direct January 2020 9
© 2020 Morningstar. All Rights Reserved.
2. Under No Value Displayed, choose one of the following options:
g N/A to show N/A when data is not available
g Blank to show a blank cell when data is not available, or
g – to fill a cell with a dash when data is not available.
3. Under the Morningstar Ratings and Style Box section, choose whether to display the
data as number or text or as a symbol.
4. Under the Data Retrieval Settings section, leave these settings unchanged.
Note: Leaving the box for Enable Local Cache checked allows for faster performance and data
retrieval by saving data in your computer’s local memory.
5. To automatically recalculate all data when a formula is changed or added, leave the
Auto calculate box selected. To manually control when data in the spreadsheet is
updated, de-select this checkbox. Think about the impact of this option if you plan to use
other fields/cells in Microsoft
® Excel® with your own formulas, which would also be
impacted by this setting.
6. Click OK.
Set what options you
would prefer to use here.
Installing and Configuring the Morningstar Excel Add-In Exercise 4: Update the settings for Microsoft® Excel®
Morningstar Direct January 2020 10
© 2020 Morningstar. All Rights Reserved.
Exercise 4: Update
the settings for
Microsoft
® Excel®
The Morningstar Excel Add-In allows each user to retrieve 500,000 data points per day;
this daily limit is reset at the end of the day. Setting the formulas you create to Manual
calculation saves your data while creating your work. You can decide to switch back to
Automatic calculation at a later stage from the Formula tab or by going back to File >
Options > Formulas.
To avoid calculating the same data points several times while working on a template,
do the following:
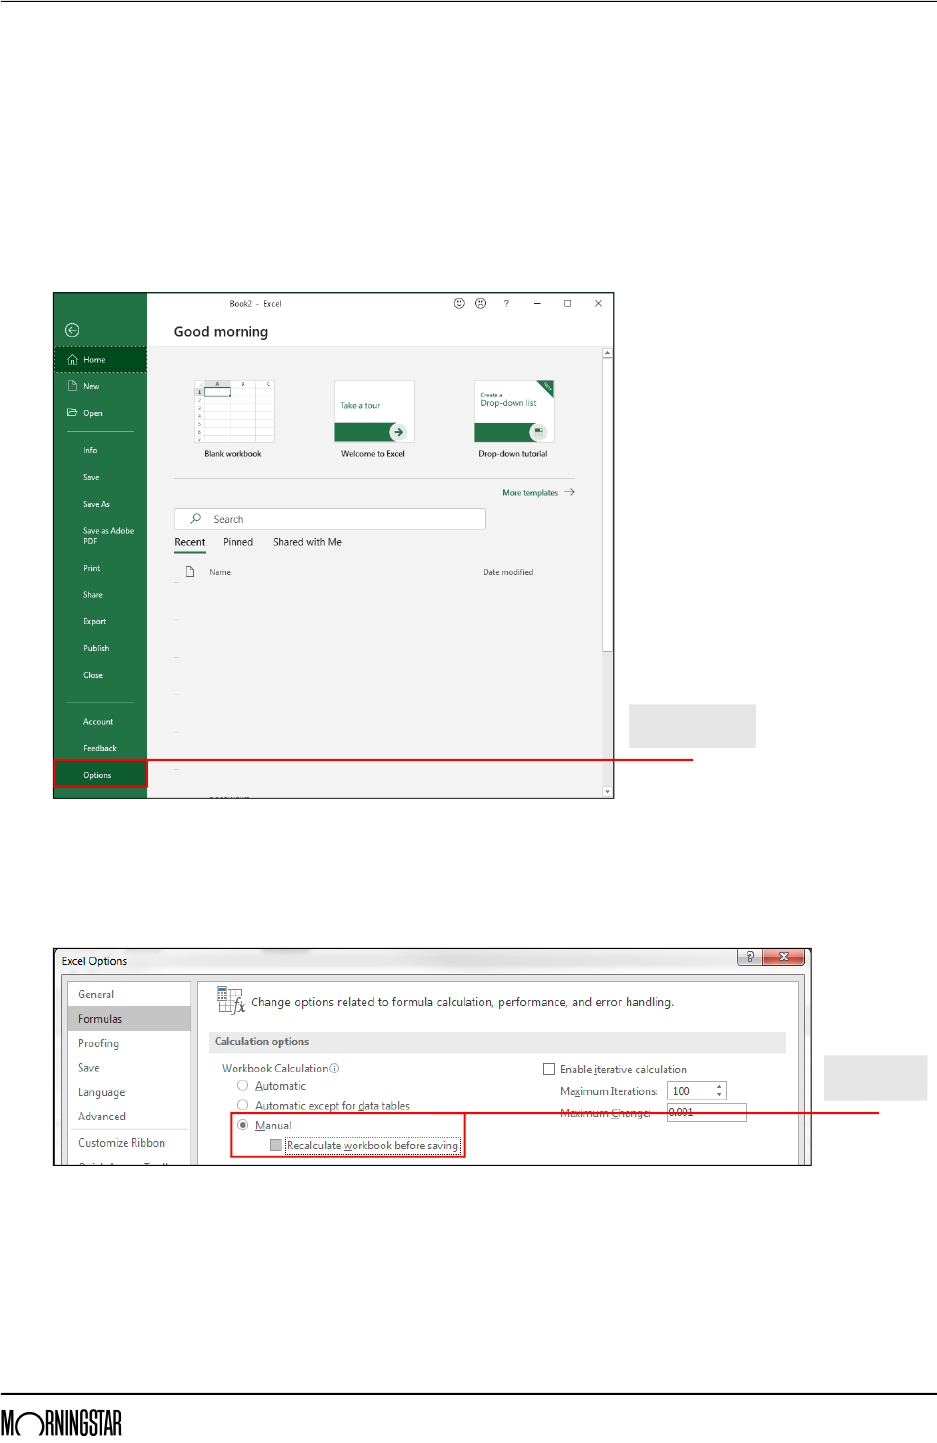
1. In Microsoft Excel select, File > Options. The Excel Options dialog box opens.
2. In the left-hand pane, click Formulas.
3. Under Calculation Options, select Manual.
4. Deselect the Recalculate workbook before saving checkbox.
5. Click OK.
Select this option
from the File menu.
Note the
selections here.
Retrieving the Members of a Saved List or Search Overview
Morningstar Direct January 2020 11
© 2020 Morningstar. All Rights Reserved.
Retrieving the Members of a Saved List or Search
OverviewThis section provides practice for using the MSMEMBER formula in the Morningstar
Excel Add-In. This command allows users to see which investments are included as
part of a saved list or search from the desktop version of Morningstar Direct. This is
often the first step before using other Add-In commands to retrieve additional data
points for these items.
Exercise 5: Download the
sample spreadsheet
Before retrieving data into any spreadsheet, it will help to see one set up with specific
column headers, so you have some perspective on what is being added. Download this
Excel file for use with these exercises, then open it.
Exercise 6: Retrieve
an existing list
of investments
To retrieve the holdings of the saved investment list named Multiple Investments, do
the following in the Excel Add-In Template worksheet:
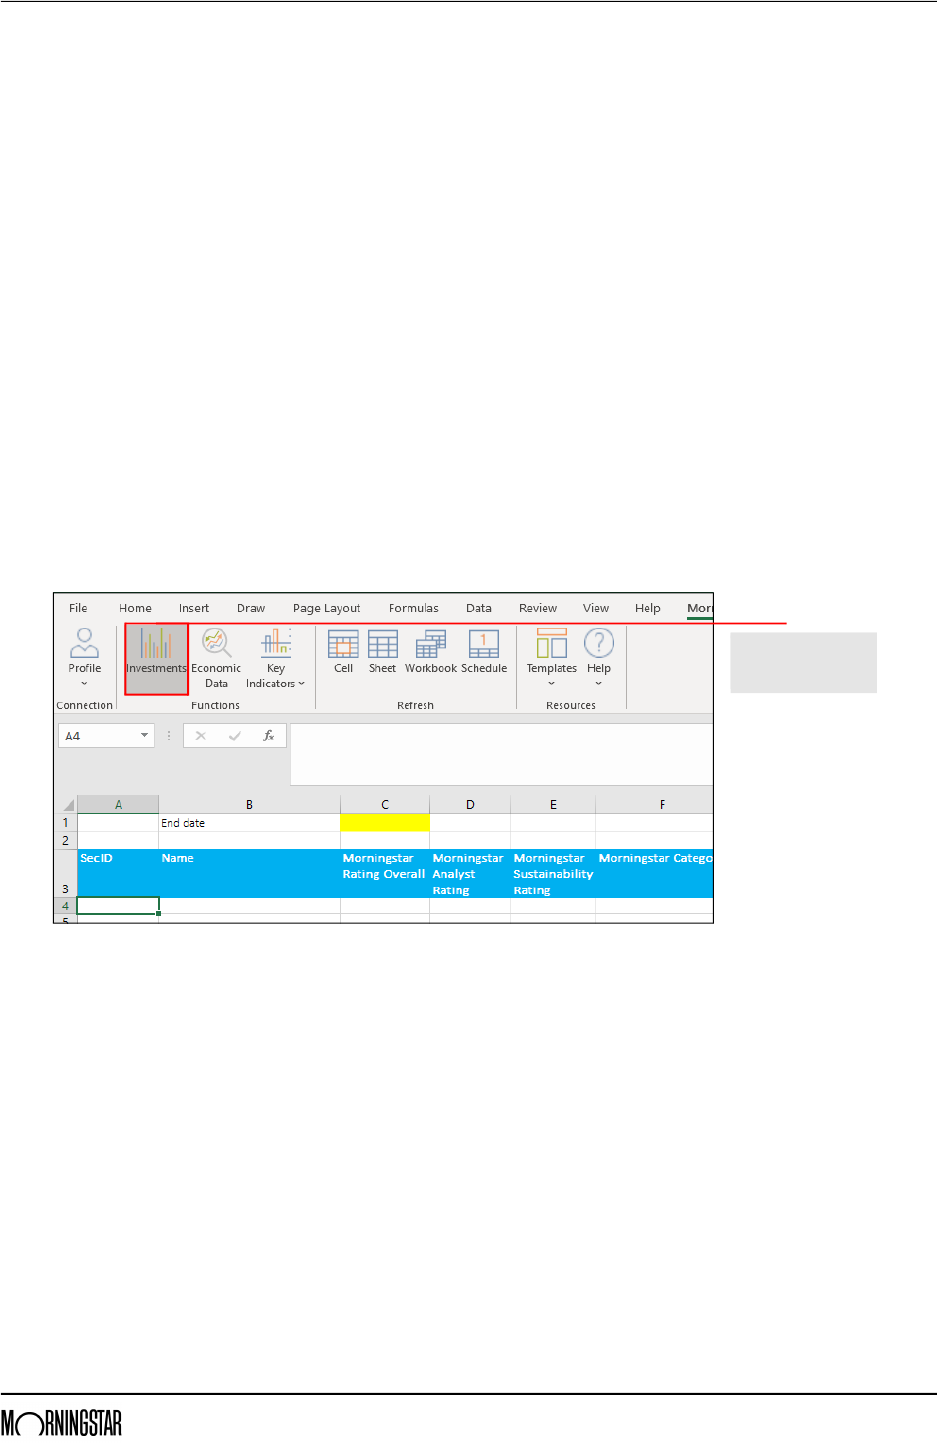
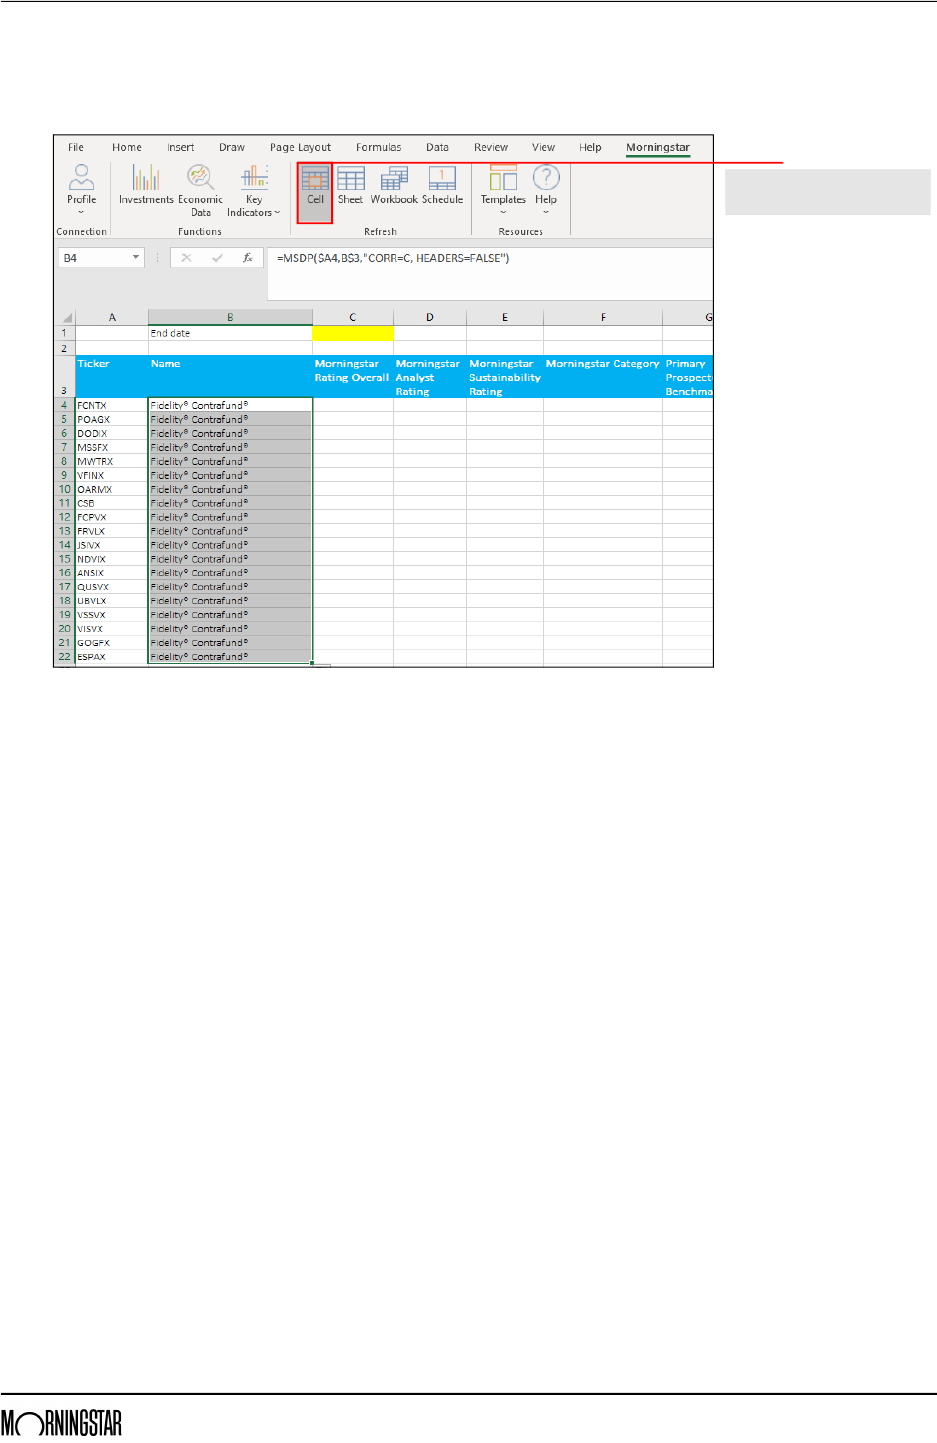
1. On the Data worksheet, select cell A4.
2. On the Morningstar tab, click Investments. The Morningstar Add-In window opens.
Click this icon to begin
designing a formula
for the selected cell.
Retrieving the Members of a Saved List or Search Exercise 6: Retrieve an existing list of investments
Morningstar Direct January 2020 12
© 2020 Morningstar. All Rights Reserved.
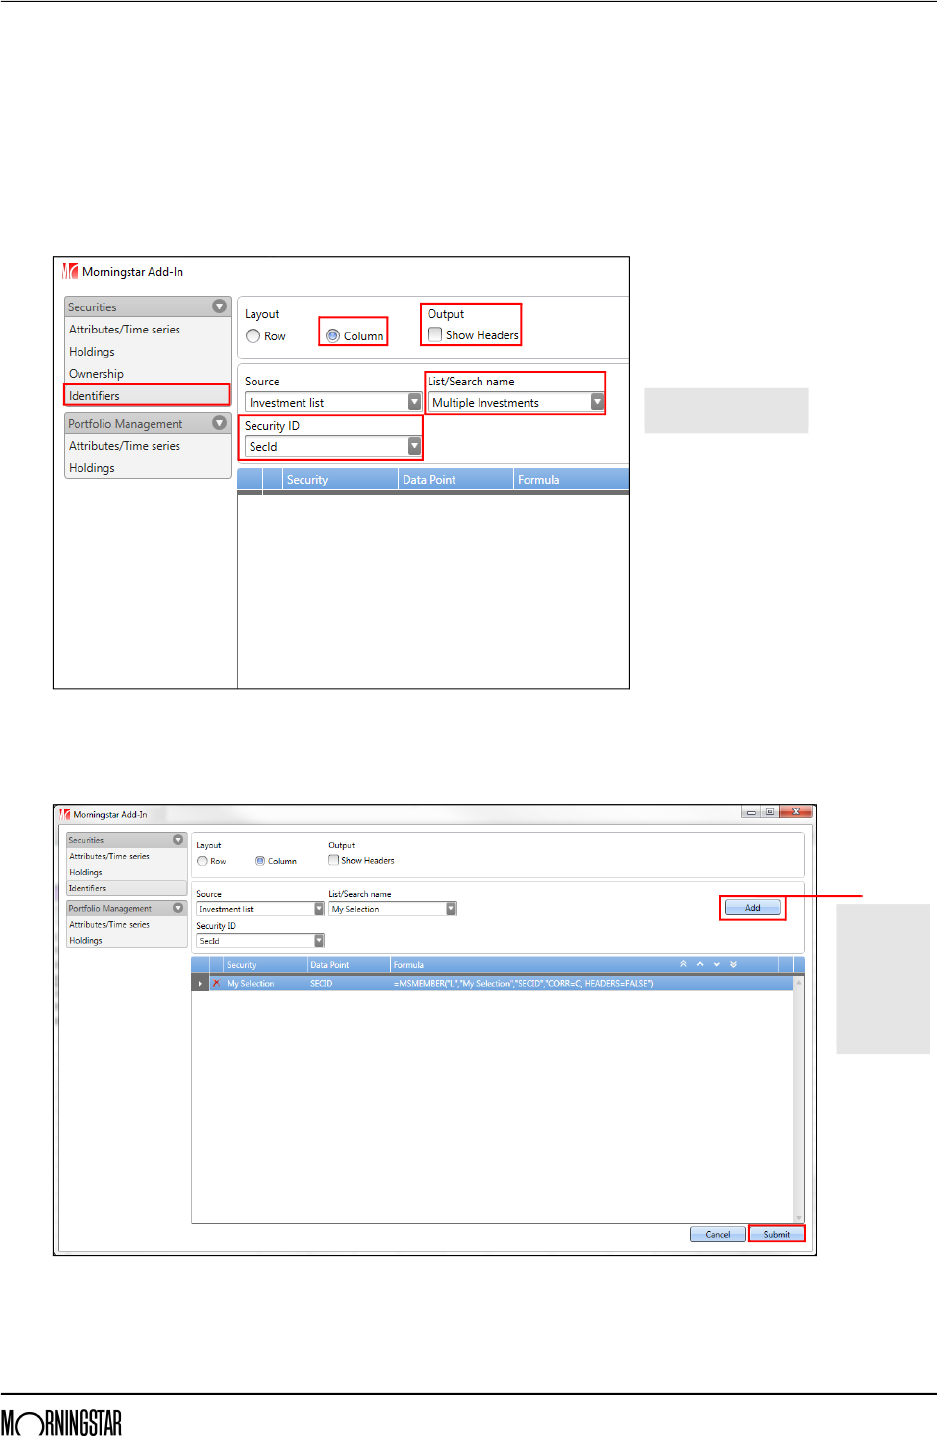
3. Under the Securities options, select Identifiers.
4. Under Layout, confirm that Column is selected.
5. Under Output, deselect the Show Headers checkbox.
6. Ensure the Source drop-down field has Investment List selected.
7. From the List/Search name drop-down field, select Multiple Investments.
8. From the Security ID drop-down field be sure SecId is selected.
9. Click Add.
10. Click Submit.
Note the highlighted
selections for this formula.
When a
formula is
complete,
click Add,
then Submit
to return
to the
spreadsheet.
Retrieving the Members of a Saved List or Search What are the component parts of the MSMEMBER formula?
Morningstar Direct January 2020 13
© 2020 Morningstar. All Rights Reserved.
What are the
component parts of the
MSMEMBER formula?
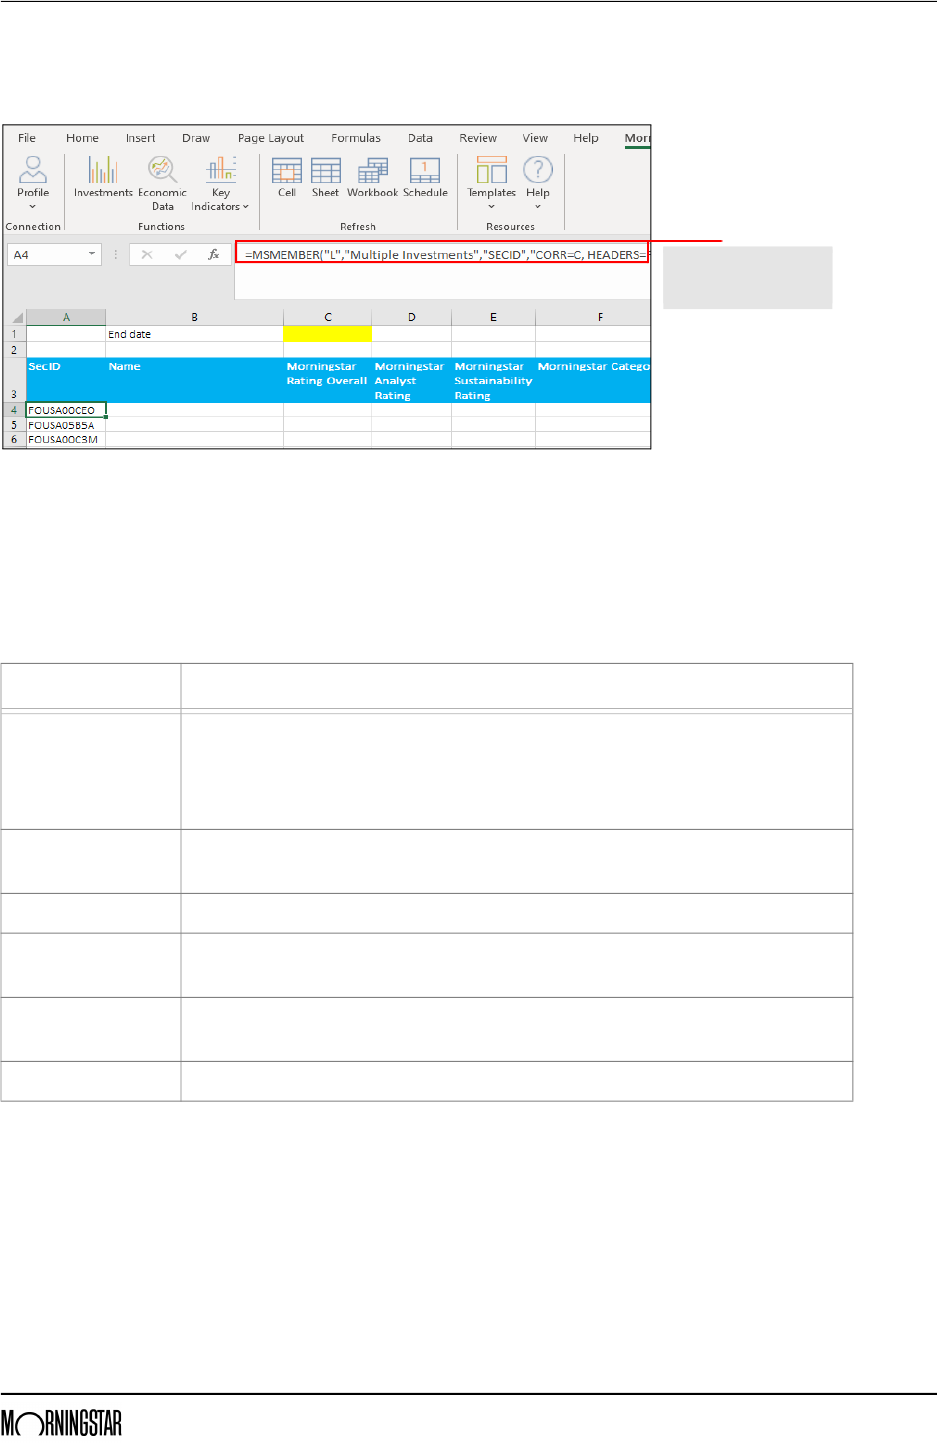
The Add-In formula used in a given cell appears in the Formula bar at the top of the
spreadsheet.
In this case, the following formula is being used:
=MSMEMBER("L","Multiple Investments","SecId","CORR=C","HEADERS=FALSE")
The following table parses each part of this formula:
Note: The structure of other Morningstar Excel Add-In formulas are also similar to this one.
The formula can be seen
here when selecting the
cell where it was designed.
Item Description
MSMEMBER A data retrieval function used to pull members of an investment list or current results of a
search criteria from the desktop version of Morningstar Direct.
Note: Any list created in the web-based version of Morningstar Direct is also available in the
desktop version, so those lists can also be retrieved in the Add-In.
“L” Identifies that an Investment List is being retrieved from the desktop version of
Morningstar Direct. (In contrast,“S” would identify a Search Criteria being retrieved.)
“My Selection” The name of the list.
“SECID” Specifies which security identifier should be displayed. Instead, ISIN or Ticker could be
used.
“CORR=C” Displays the identifiers in a either a column or row. Read this as “C or R = C.” In this
instance, identifiers will be displayed in a column.
“HEADERS=FALSE” Indicates that a header row has been excluded from showing.
Retrieving the Members of a Saved List or Search What are the component parts of the MSMEMBER formula?
Morningstar Direct January 2020 14
© 2020 Morningstar. All Rights Reserved.
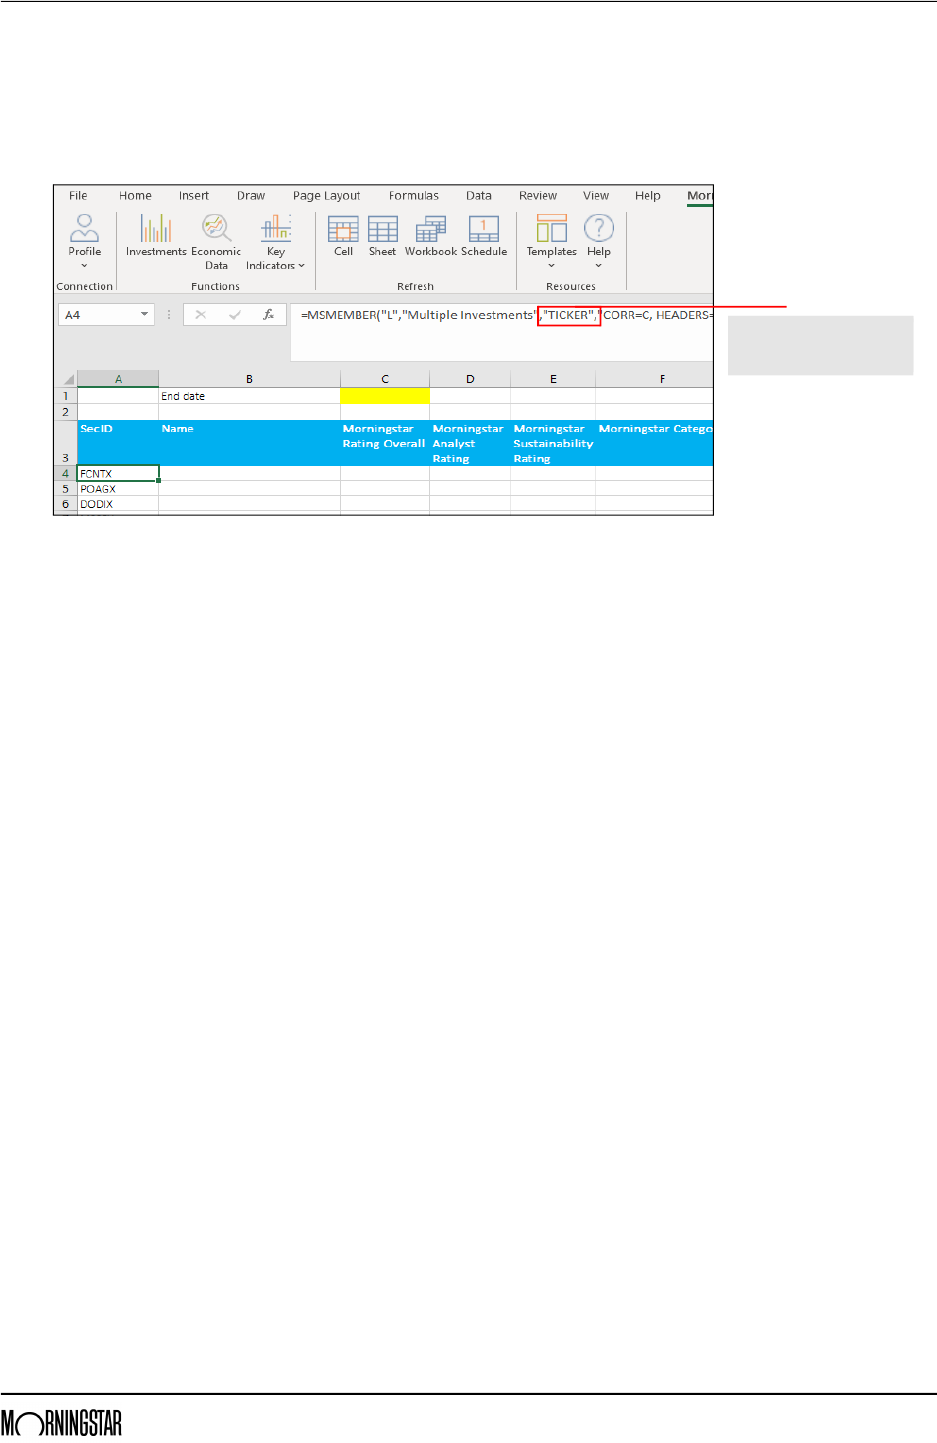
Once the formula is understood, it can easily be modified by selecting the correct cell
and making changes directly in the Formula bar. Do the following:
1. Use the mouse to place the cursor in the Formula bar.
2. Change SECID to TICKER.
3. Press <ENTER>. Note the update to the content in column A.
4. Change the column header for Column A from SecId to Ticker.
5. Save the workbook.
When replacing SECID
with TICKER, be sure to
preserve the quotation marks.
Retrieving Supplementary Data for Investments Overview
Morningstar Direct January 2020 15
© 2020 Morningstar. All Rights Reserved.
Retrieving Supplementary Data for Investments
OverviewThe MSDP (Morningstar Supplementary Data Point) formula is designed to retrieve
current data points such as fund name, Morningstar Category, and so on. It requires
the following parameters:
g Security identifier, and
g Data attribute identifier.
Exercise 7: Retrieve
supplementary
data points
To obtain the Ticker for the list of securities, do the following:
1. Copy cell A4.
2. From the Morningstar tab, click Investments. The Morningstar Add-In dialog box
opens.
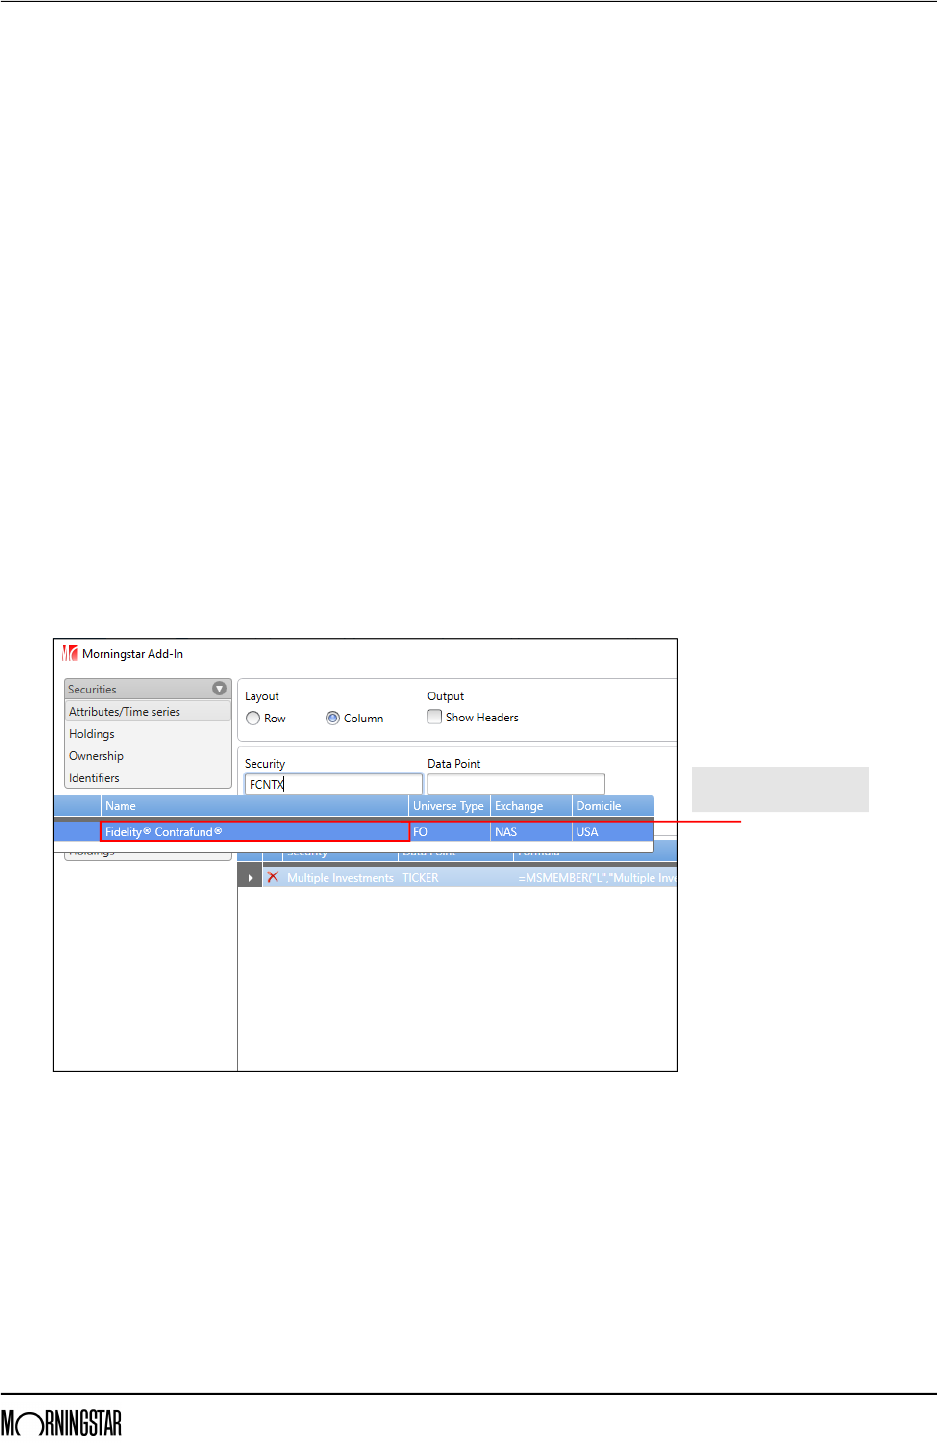
3. Under the Securities options, select Attributes/Time Series.
4. Under Layout, confirm that Column is selected.
5. Under Output, ensure the Show Headers checkbox is deselected.
6. In the Security field, paste the ticker.
7. Click the security name that appears.
When the name of the fund
appears, click it to select it.

Retrieving Supplementary Data for Investments Exercise 7: Retrieve supplementary data points
Morningstar Direct January 2020 16
© 2020 Morningstar. All Rights Reserved.
8. Under Data Point, type Name.
9. Click the data point to select it.
10. Click Add. The resulting formula appears within the dialog box.
11. Click Submit. The security’s name now displays in the Excel table in cell B4.
Click the name of a
data point to select it.
After clicking Add, two data
points should now appear here.
Retrieving Supplementary Data for Investments Exercise 8: Apply a formula to additional investments
Morningstar Direct January 2020 17
© 2020 Morningstar. All Rights Reserved.
Exercise 8: Apply a
formula to additional
investments
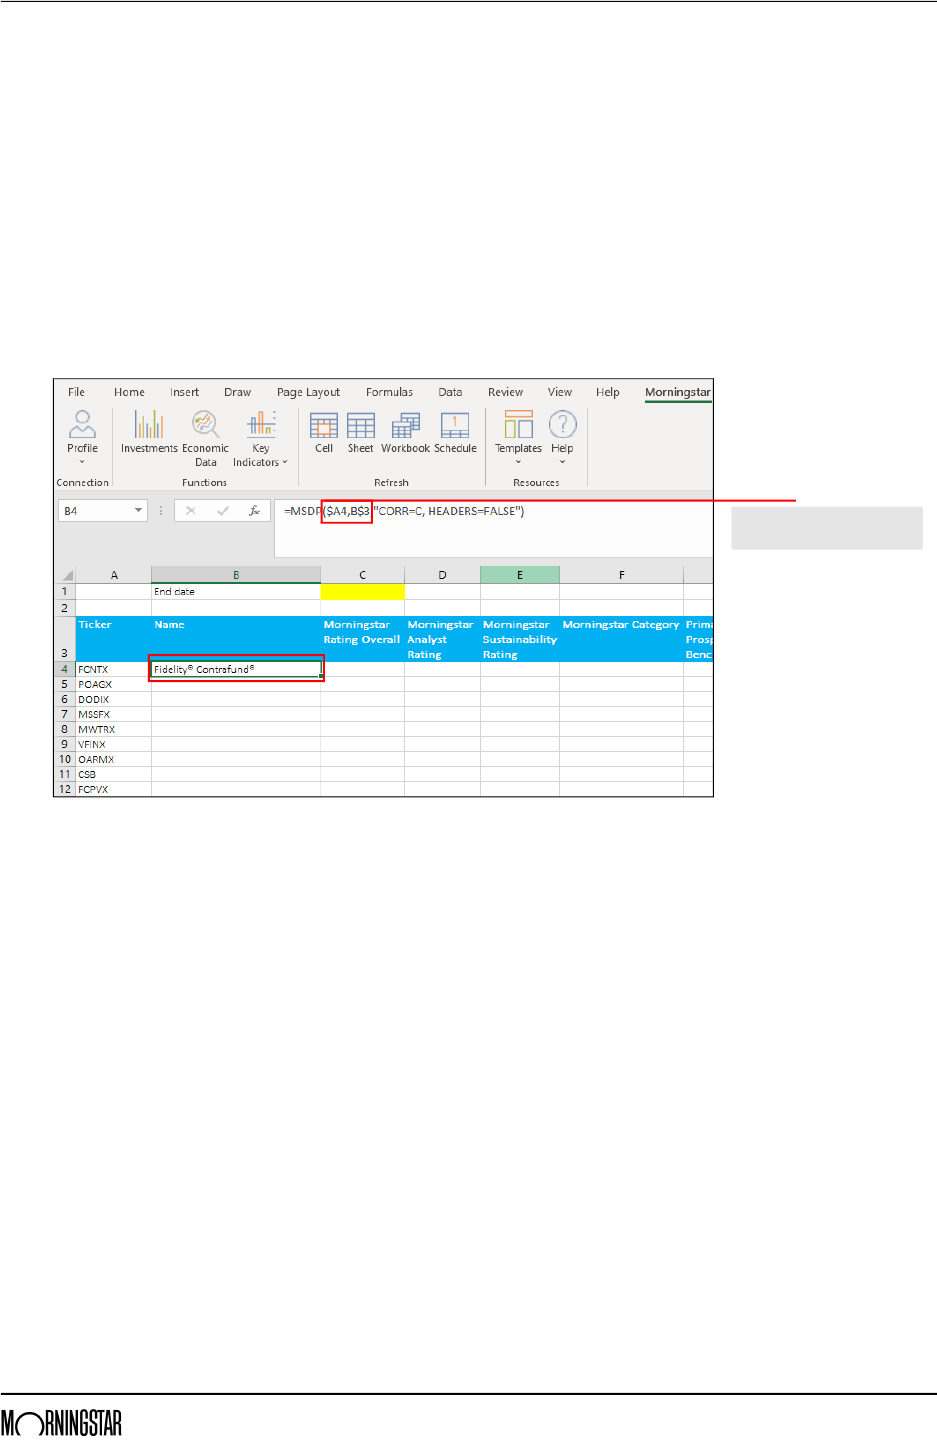
The same formula (in cell B4) should apply to all rows in that column, but before
copying the formula down it will be useful to modify it to ensure the formula copied
serves as a general reference for any security and data point referenced in the formula.
To make these changes, do the following:
1. Select cell B4.
2. In the Formula bar, replace ”NAS:FCNTX” with $A4 to reference the cell containing the
security’s ticker.
Note: Whenever a cell reference is used in a formula, be sure to remove the quotation marks.
3. To reference the discrete data point name in the header, replace “Name” with B$3, then
press <ENTER>.
4. Drag the formula down to the last row the column. Each security’s corresponding ISIN
displays in the table.
Note that a cell reference
does not take quotation marks.
Retrieving Supplementary Data for Investments Exercise 8: Apply a formula to additional investments
Morningstar Direct January 2020 18
© 2020 Morningstar. All Rights Reserved.
5. If you are using Automatic calculation mode, the data points automatically refresh. If you
are using Manual calculation mode, select the cells to be calculated and click Cell from
the Morningstar tab.
6. Save the workbook.
If the spreadsheet needs to be
manually recalculated, click here.

Retrieving Supplementary Data for Investments Exercise 9: Retrieve multiple data points at once
Morningstar Direct January 2020 19
© 2020 Morningstar. All Rights Reserved.
Exercise 9: Retrieve
multiple data points
at once
Per the column headers on the worksheet, the following discrete data points should
also be retrieved:
g Name
g Morningstar Rating Overall
g Morningstar Analyst Rating
g Morningstar Sustainability Rating
g Morningstar Category
g MPT Benchmark, and
g MPT Benchmark ID.
Using these discrete data point names, the same formula from the previous exercise
can easily be used to populate the values for all discrete data point columns at once.
To retrieve values for multiple data points at once, do the following:
1. Select cell B4.
2. Click-and-drag the formula to the right to select the cell in the first row under
the MPT Benchmark ID column.
3. Click-and-drag the formula down to the last row.
4. If you are in Automatic calculation mode, the data points will refresh. If you are in
Manual calculation mode, click Cell from the Morningstar tab.
5. Save the workbook.
Be sure to drag the
formula from cell B4
all the way to H4.
Drag the formula
down to this cell.
Retrieving a Historical Series of Data Points for Investments Overview
Morningstar Direct January 2020 20
© 2020 Morningstar. All Rights Reserved.
Retrieving a Historical Series of Data Points for Investments
OverviewThe MSTS (Morningstar Time Series) formula is designed to retrieve such data points
as historical prices for stocks, NAVs for mutual funds, historical calendar period returns
for securities, or historical portfolio data. Pulling in time series data requires the
following parameters in a formula:
g Security identifier
g Data attribute identifier
g Start date, and
g End date.
Note: When using custom calculations, other parameters are required, such as currency,
benchmark, source, and so on.
Exercise 10: Retrieve
time series data points
To retrieve performance over trailing time periods, do the following:
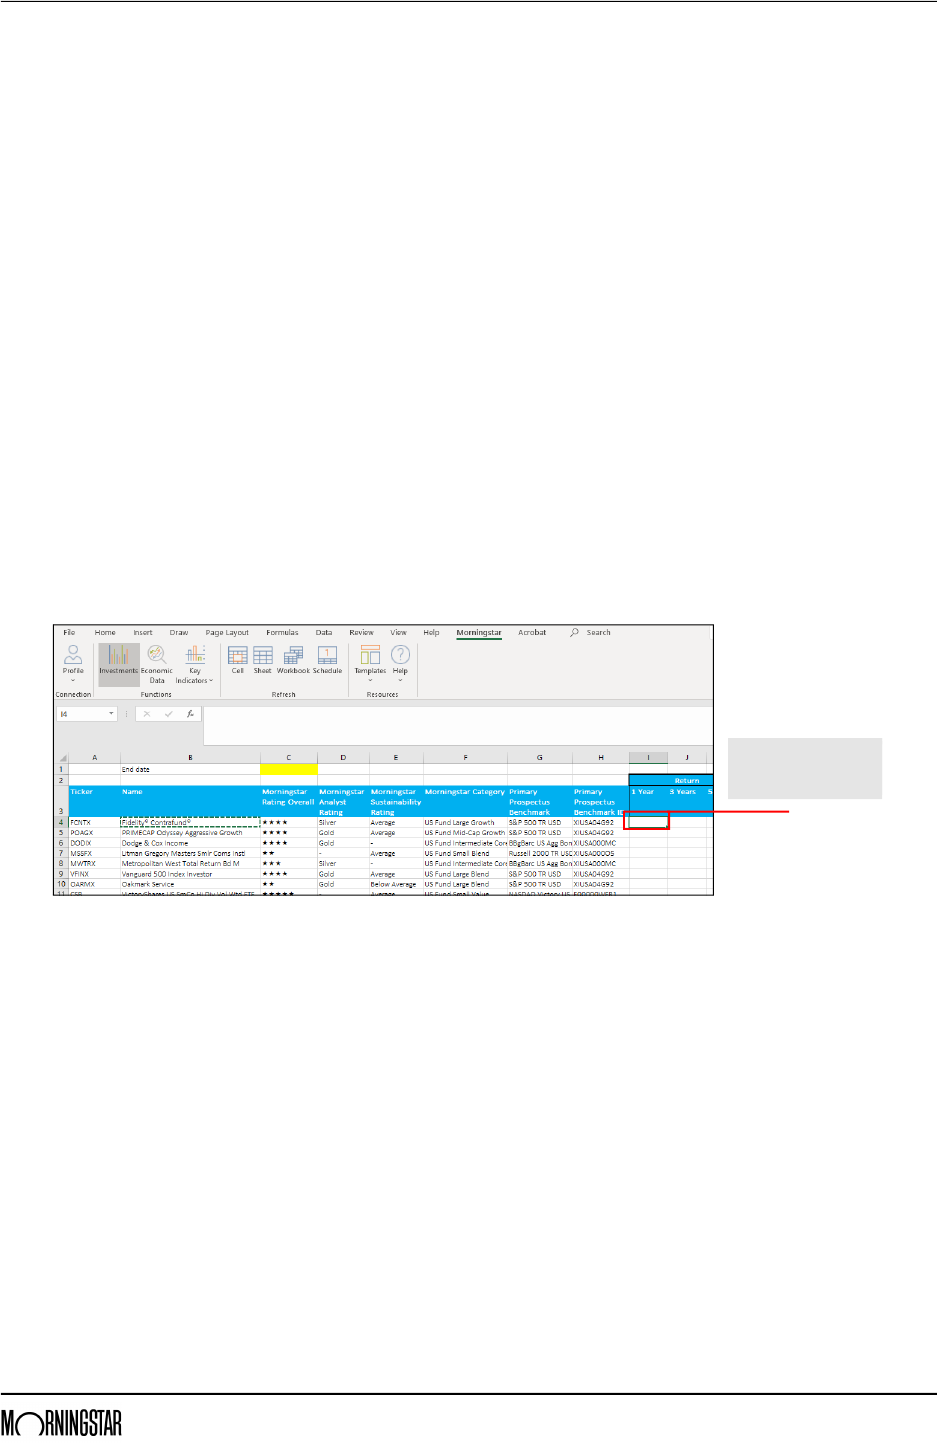
1. Copy cell A4.
2. Select cell I4.
3. From the Morningstar tab, click Investments. The Morningstar Add-In window opens.
Be sure this cell is
selected before clicking
the Investments icon.
Retrieving a Historical Series of Data Points for Investments Exercise 10: Retrieve time series data points
Morningstar Direct January 2020 21
© 2020 Morningstar. All Rights Reserved.
4. Under the Securities options, be sure Attributes/Time Series is selected.
5. Under Layout, confirm that Column is selected.
6. Under Output, ensure the Show Headers checkbox is deselected.
7. In the Security field, paste the ticker, then select the security that appears.
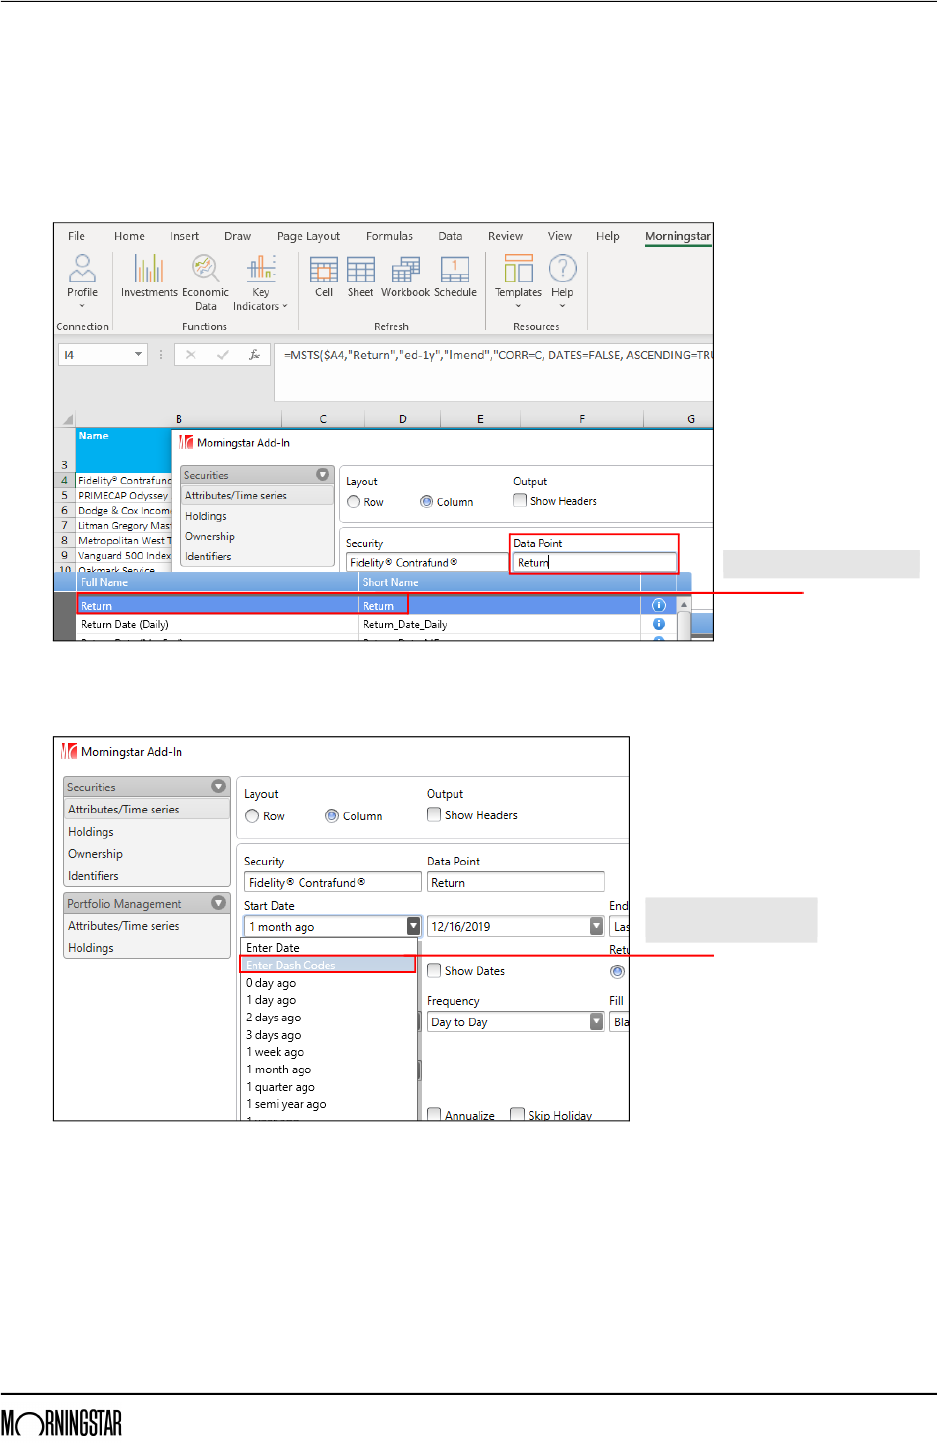
8. In the Data Point field, type Return and select the first choice in the list.
9. To set dynamic dates for the last year from the latest month end, from the Start Date
drop-down field select Enter Dash Codes.
Be sure to select this data point.
Select this option from the
Start Date drop-down field.
Retrieving a Historical Series of Data Points for Investments Exercise 10: Retrieve time series data points
Morningstar Direct January 2020 22
© 2020 Morningstar. All Rights Reserved.
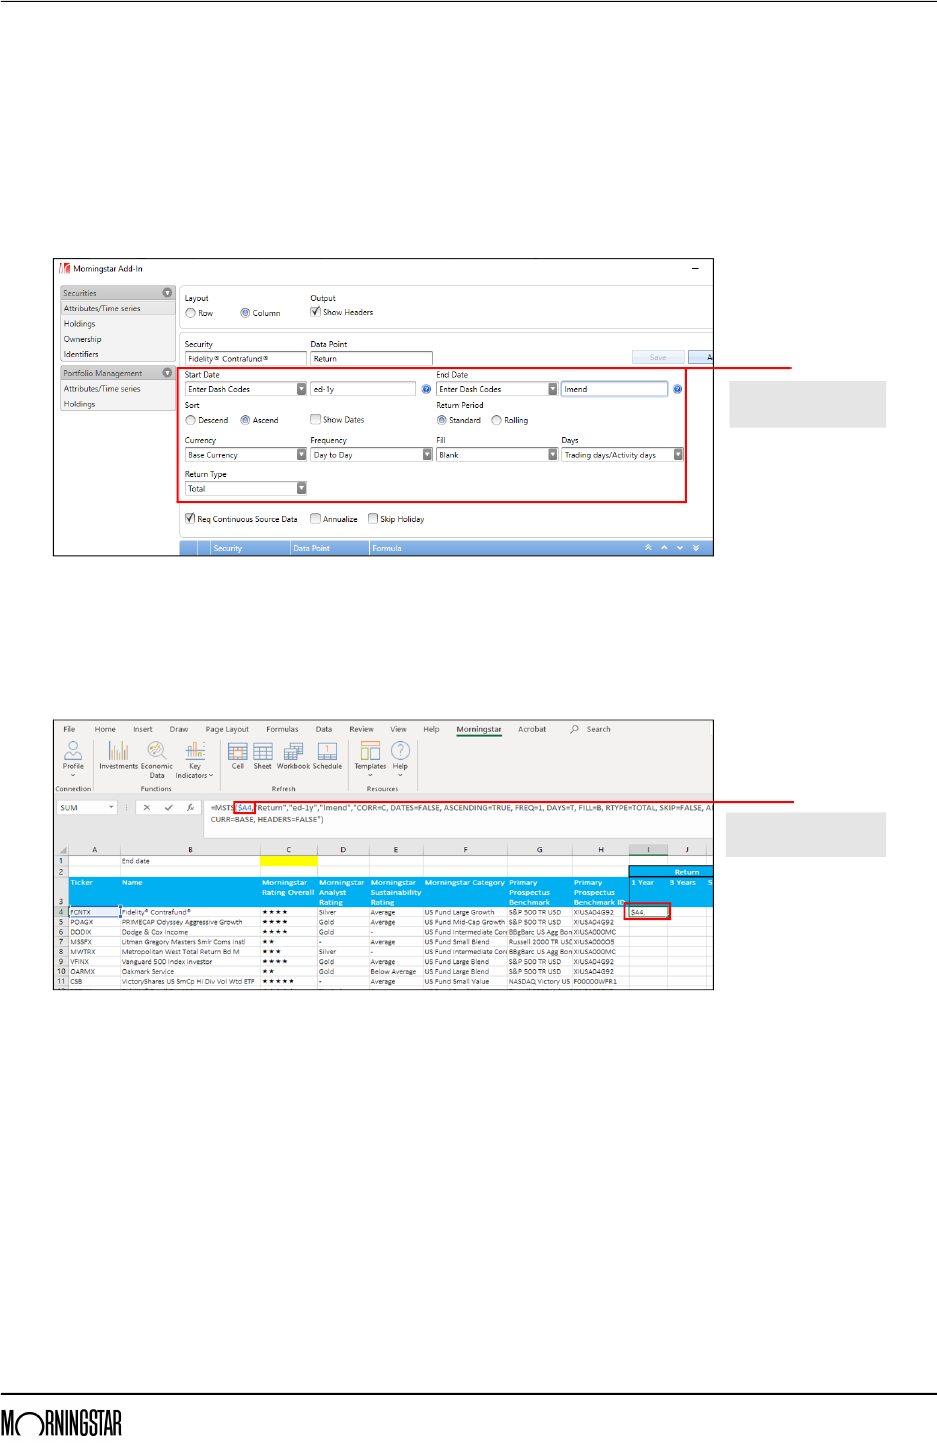
10. In the field to the right, type ed-1y (end date – 1 year).
11. From the End Date drop-down field, select Enter Dash Codes.
12. In the field to the right, type lmend (latest month end).
Note: For more information on using dash codes, see A short note on using Dash Codes on
page 42.
13. From the Return Type drop-down field, be sure Total is selected.
14. Click Add, then click Submit.
15. Select cell I4.
16. As before, in the Formula bar, replace the ticker symbol (including the quotation marks)
with $A4, then press <ENTER>.
17. Click-and-drag the formula down the list to apply the formula to all securities.
18. If needed, click Cell to calculate the values.
Note the selections and
values for these fields.
Replace the ticker with
the correct cell reference.

Retrieving a Historical Series of Data Points for Investments Exercise 11: Manually modify a formula
Morningstar Direct January 2020 23
© 2020 Morningstar. All Rights Reserved.
Exercise 11: Manually
modify a formula
Now that the 1-year return column is set, how can the other return columns be easily
updated? To manually modify a formula via the Formula bar, do the following:
1. Copy cell I4.
2. Paste the value in cell J4. (The first row under the 3-year return column.)
Note: Rather than copying and pasting, you can instead select the cell J4 and simply drag it to
cell K4. If so, be sure only cell K4 is selected before proceeding.
3. In the Formula bar, change ed-1y to ed-3y (that is, end date – 3 years).
4. To ensure the return value is annualized (and not cumulative), change ANN=FALSE
to ANN=TRUE.
5. Press <ENTER>.
6. Drag the formula down the list to apply to all securities.
7. If necessary, click Cell to recalculate the values.
8. Repeat steps 1-7 to set up the 5-year return (change ed-1y to ed-5y here) under
column K.
9. Save the workbook.
Change the values of the two
highlighted parts of the formula.
Retrieving a Historical Series of Data Points for Investments Exercise 12: Retrieve standard deviation values
Morningstar Direct January 2020 24
© 2020 Morningstar. All Rights Reserved.
Exercise 12: Retrieve
standard deviation values
The next step is to retrieve data for the three risk statistics. The first of these is
standard deviation, but all three will be added at once in the Morningstar Add-In
window (via subsequent exercises). Note that while all three risk statistics are for the
trailing three-year period, the following exercises do not call for the use of the data
points specific to that time period (for example, Std Dev 3-Yr (Mo-End)).
Instead, the generic versions of standard deviation, tracking error, and Sharpe ratio will
be used. This allows users to set flexible start and end dates for the data points, which
will be automatically updated when the workbook is refreshed. Do the following:
1. Copy cell A4.
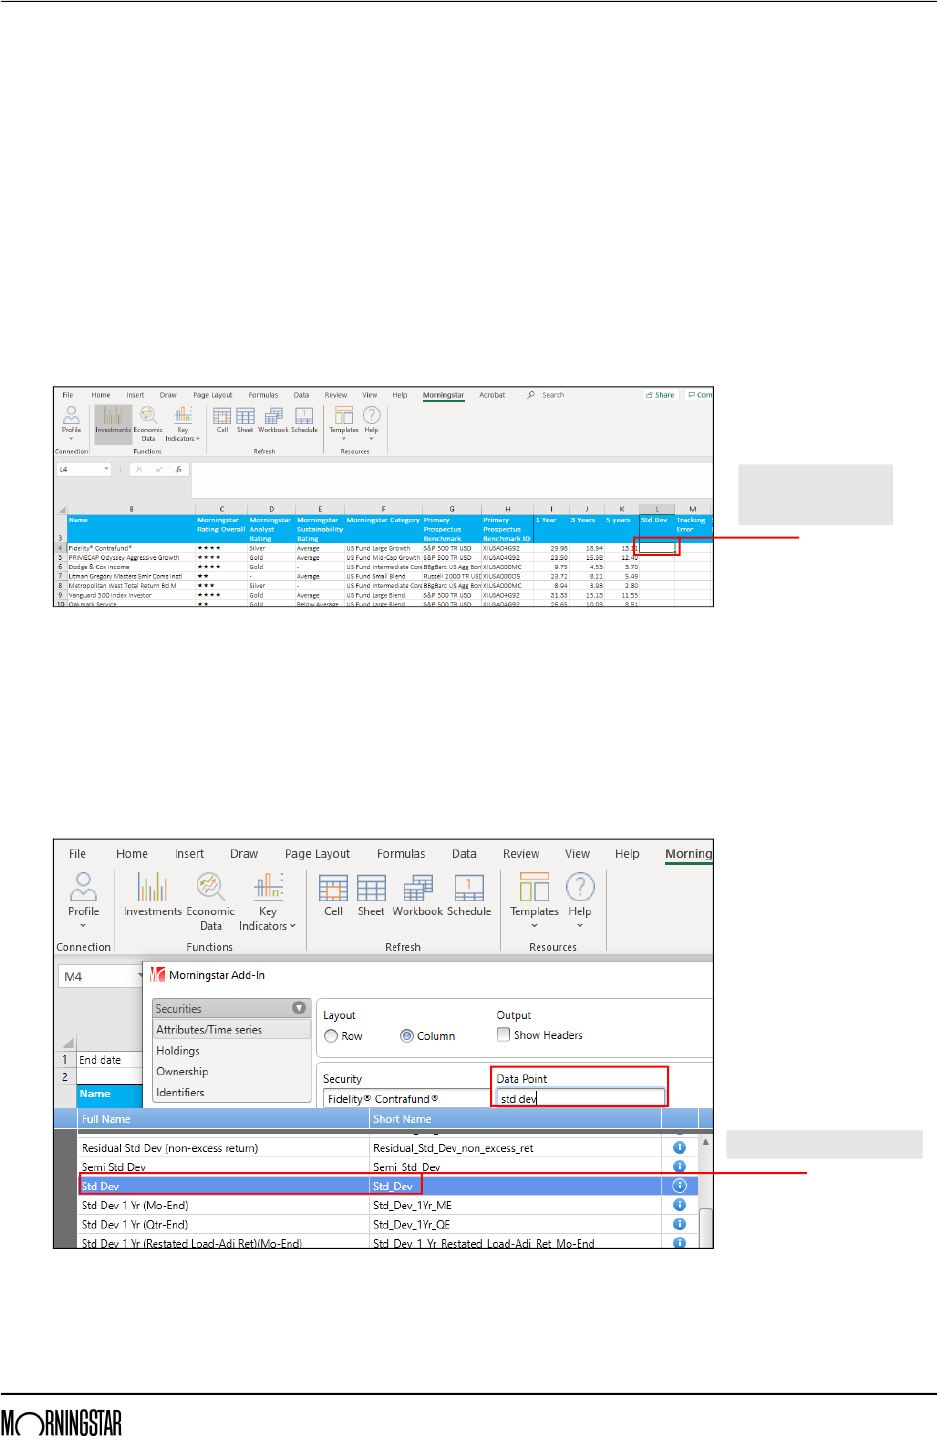
2. Select cell L4.
3. From the Morningstar tab, click Investments. The Morningstar Add-In window opens.
4. Under the Securities options, be sure Attributes/Time Series is selected.
5. Under Layout, confirm that Column is selected.
6. Under Output, ensure the Show Headers checkbox is deselected.
7. In the Security field, paste the ticker, then select the security that appears.
8. In the Data Point field, type std dev and select Std Dev from the list of results.
Additional fields are now available in the Settings section.
Be sure this cell is
selected before clicking
the Investments icon.
Be sure to select this data point.
Retrieving a Historical Series of Data Points for Investments Exercise 12: Retrieve standard deviation values
Morningstar Direct January 2020 25
© 2020 Morningstar. All Rights Reserved.
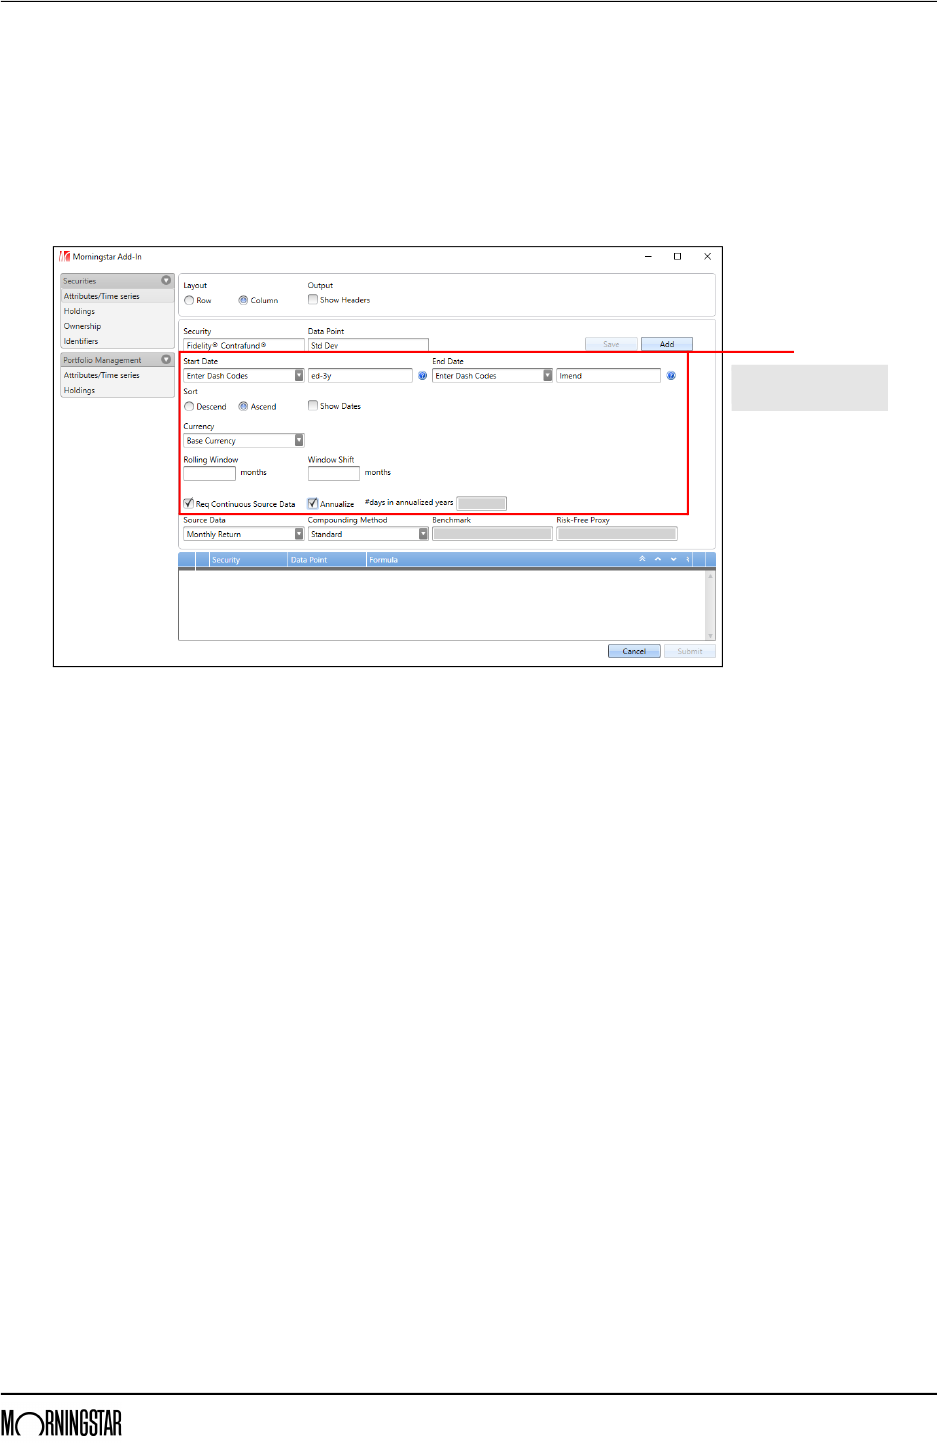
9. To set dynamic dates for the last year from the latest month end, from the Start Date
drop-down field select Enter Dash Codes.
10. In the field to the right, type ed-3y (end date – 3 years).
11. From the End Date drop-down field, select Enter Dash Codes.
12. In the field to the right, type lmend (latest month end).
13. In the bottom-right corner of the dialog box, select the Annualize checkbox.
14. Click Add. Do not yet click Submit; the other two risk statistics will be added before
returning to the worksheet.
Note the selections and
values for these fields.
Retrieving a Historical Series of Data Points for Investments Exercise 13: Add the tracking error
Morningstar Direct January 2020 26
© 2020 Morningstar. All Rights Reserved.
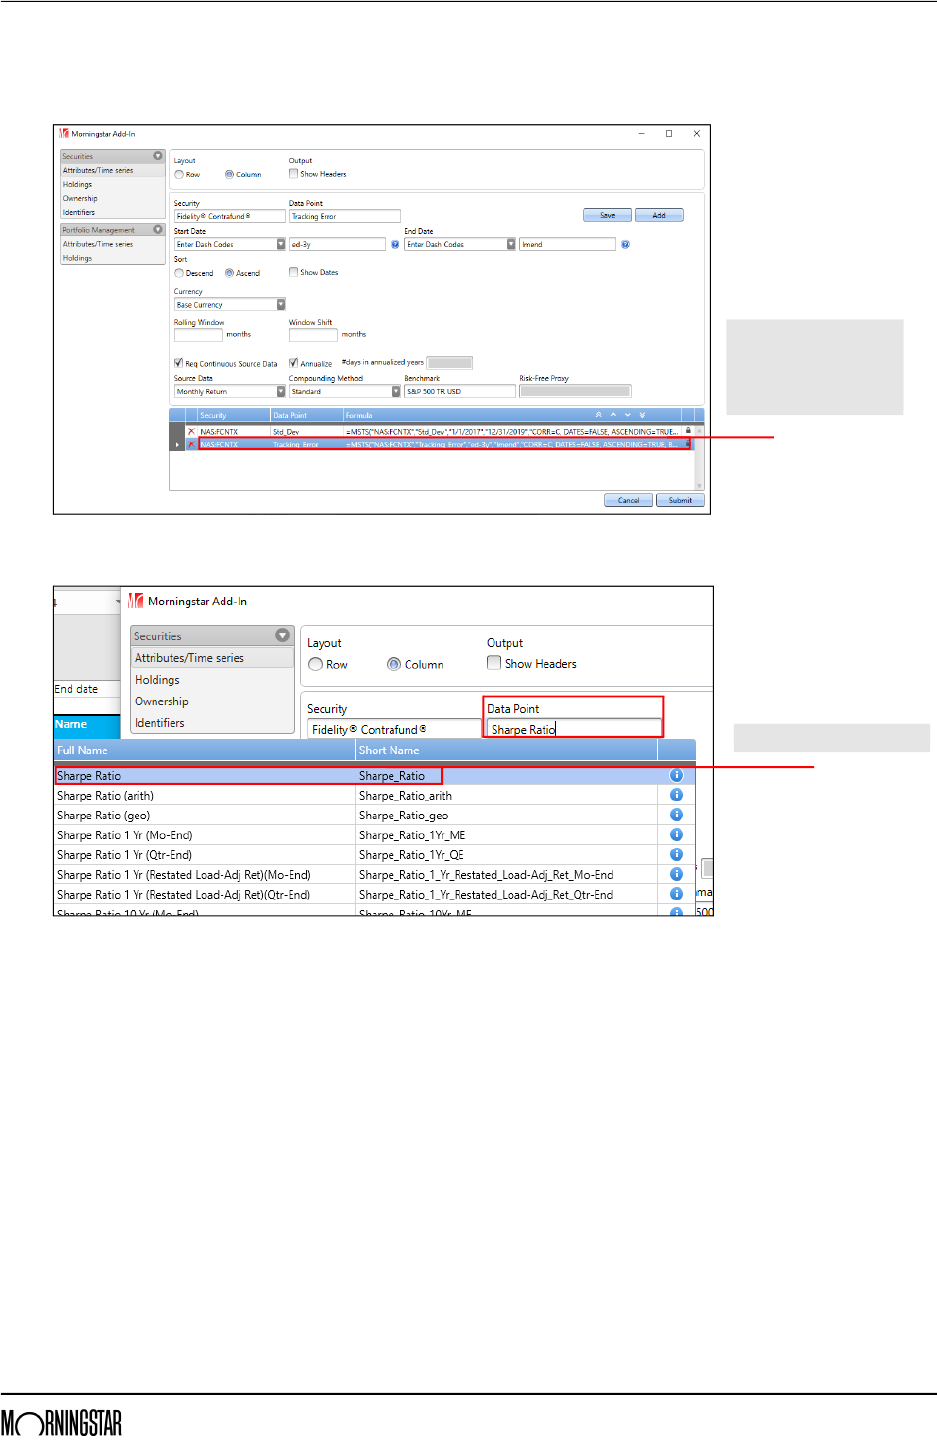
Exercise 13: Add the
tracking error
To add the 3-year tracking error data point to the Morningstar Add-In window, do
the following:
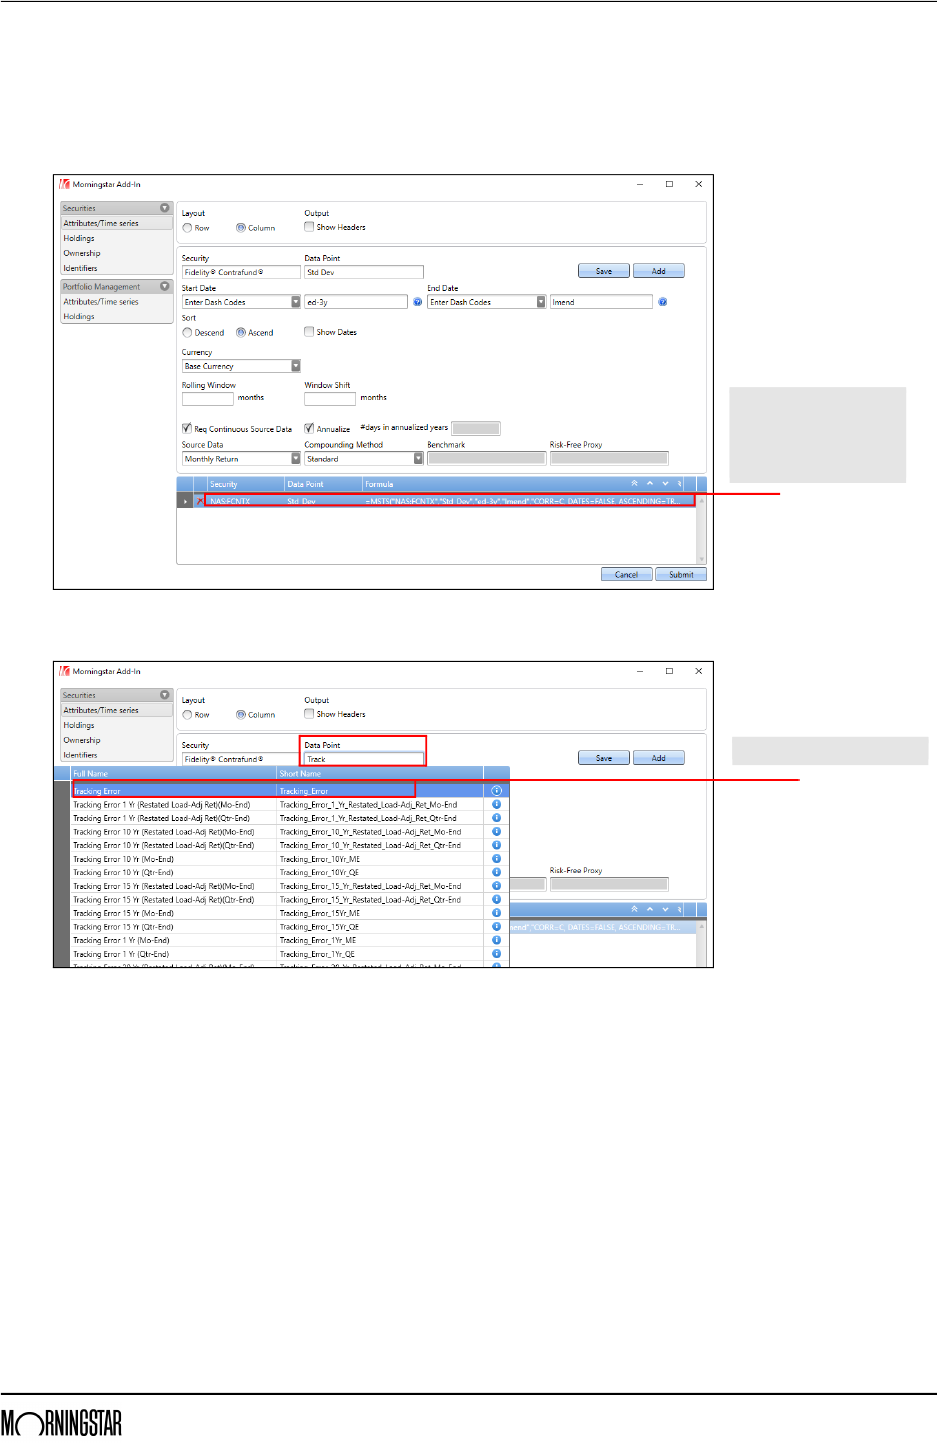
1. In the Morningstar Add-In window, click the Standard Deviation formula. The fields for
the formula appear in the window.
2. In the Data Point field, replace Std Dev with Tracking Error.
Click this formula to see its
content populate in the
fields within the window; be
careful not to click the red X
to the left of the row.
Be sure to select this data point.
Retrieving a Historical Series of Data Points for Investments Exercise 13: Add the tracking error
Morningstar Direct January 2020 27
© 2020 Morningstar. All Rights Reserved.
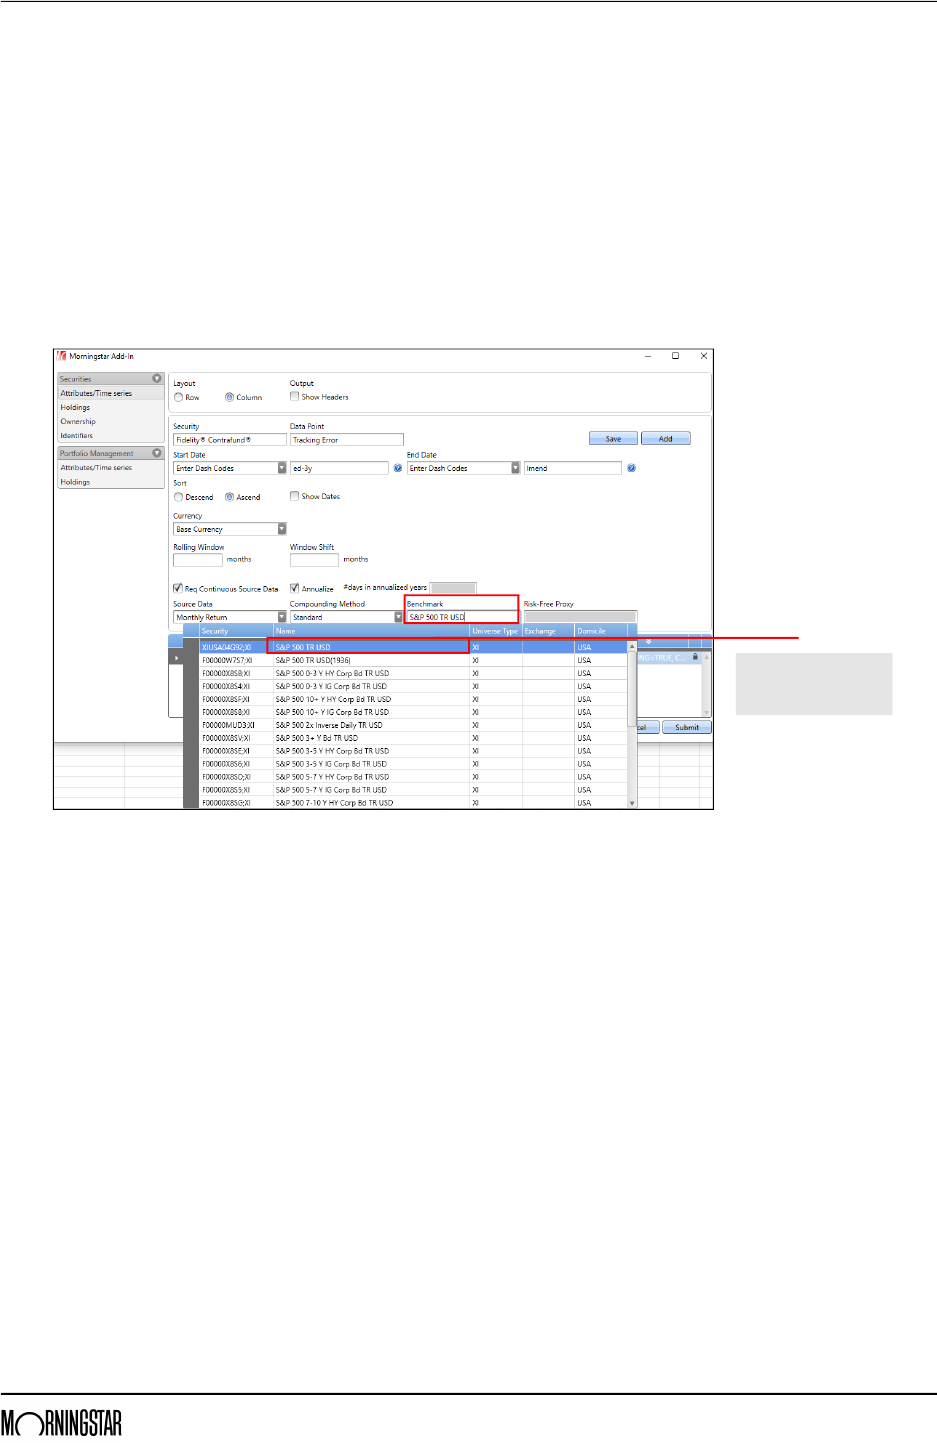
3. To set dynamic dates for the last year from the latest month end, from the Start Date
drop-down field select Enter Dash Codes.
4. In the field to the right, type ed-3y (end date – 3 years).
5. From the End Date drop-down field, select Enter Dash Codes.
6. In the field to the right, type lmend (latest month end).
7. In the bottom-right corner of the dialog box, select the Annualize checkbox.
8. In the Benchmark field, type S&P 500 TR USD, then select that index.
Note: In Exercise 15 on page 30, you will see how to change the reference for this data
point’s calculation.
9. Click Add. Do not yet click Submit; Sharpe ratio will be added before returning to the
worksheet.
Select this particular
index; it will be swapped
out in a later exercise.
Retrieving a Historical Series of Data Points for Investments Exercise 14: Add the Sharpe Ratio
Morningstar Direct January 2020 28
© 2020 Morningstar. All Rights Reserved.
Exercise 14: Add the
Sharpe Ratio
To add the 3-year Sharpe Ratio, do the following:
1. In the Morningstar Add-In window, click the tracking error formula.
2. In the Data Point field, replace Tracking Error with Sharpe Ratio.
Click this formula to see its
content populate in the
fields within the window; be
careful not to click the red X
to the left of the row.
Be sure to select this data point.
Retrieving a Historical Series of Data Points for Investments Exercise 14: Add the Sharpe Ratio
Morningstar Direct January 2020 29
© 2020 Morningstar. All Rights Reserved.
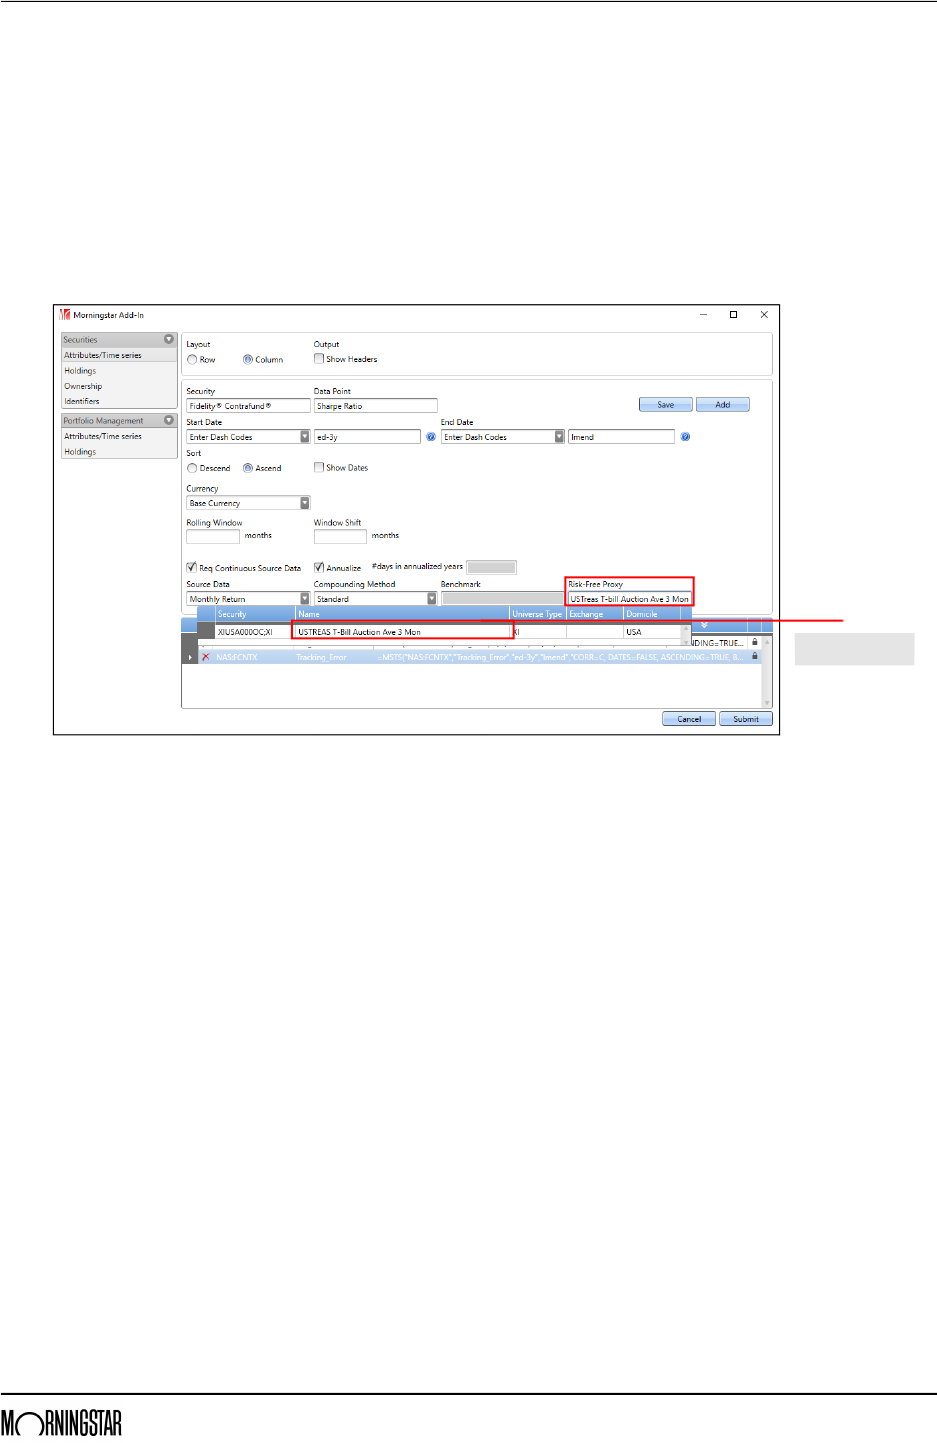
3. To set dynamic dates for the last year from the latest month end, from the Start Date
drop-down field select Enter Dash Codes.
4. In the field to the right, type ed-3y (end date – 3 years).
5. From the End Date drop-down field, select Enter Dash Codes.
6. In the field to the right, type lmend (latest month end).
7. In the bottom-right corner of the dialog box, select the Annualize checkbox.
8. In the Risk-Free Proxy field, type USTREAS T-bill Auction Ave 3 Mon, then select
that option.
9. Click Add, then click Submit.
Select this proxy.
Retrieving a Historical Series of Data Points for Investments Exercise 15: Link formulas to a reference cell
Morningstar Direct January 2020 30
© 2020 Morningstar. All Rights Reserved.
Exercise 15: Link
formulas to a
reference cell
The three risk statistics now have a value for the first row, but the following important steps still
need to be taken:
1. The formulas need to be modified to point to a reference cell.
2. The formulas need to be copied to all rows in a column.
3. The Tracking Error formula needs to be changed so it looks to the Primary Prospectus
Benchmark ID cell for each row’s calculation, rather than simply using the S&P 500 for
all investments.
The first two items should be familiar from previous exercises. To address the last item,
this exercise shows users how to insert a reference within a part of a formula with
multiple parameters contained within the same set of quotation marks. Specifically,
quotation marks and ampersands (&) are used to offset the column and row
designation to effect this change within a formula.
To make these three changes, do the following:
1. Select cell L4.
2. In the Formula bar, change “NAS:FCNTX” to $A4, then press <ENTER>.
3. Click-and-drag the formula down the list to apply them to all rows in column L.
4. If necessary, click Cell to recalculate the values.
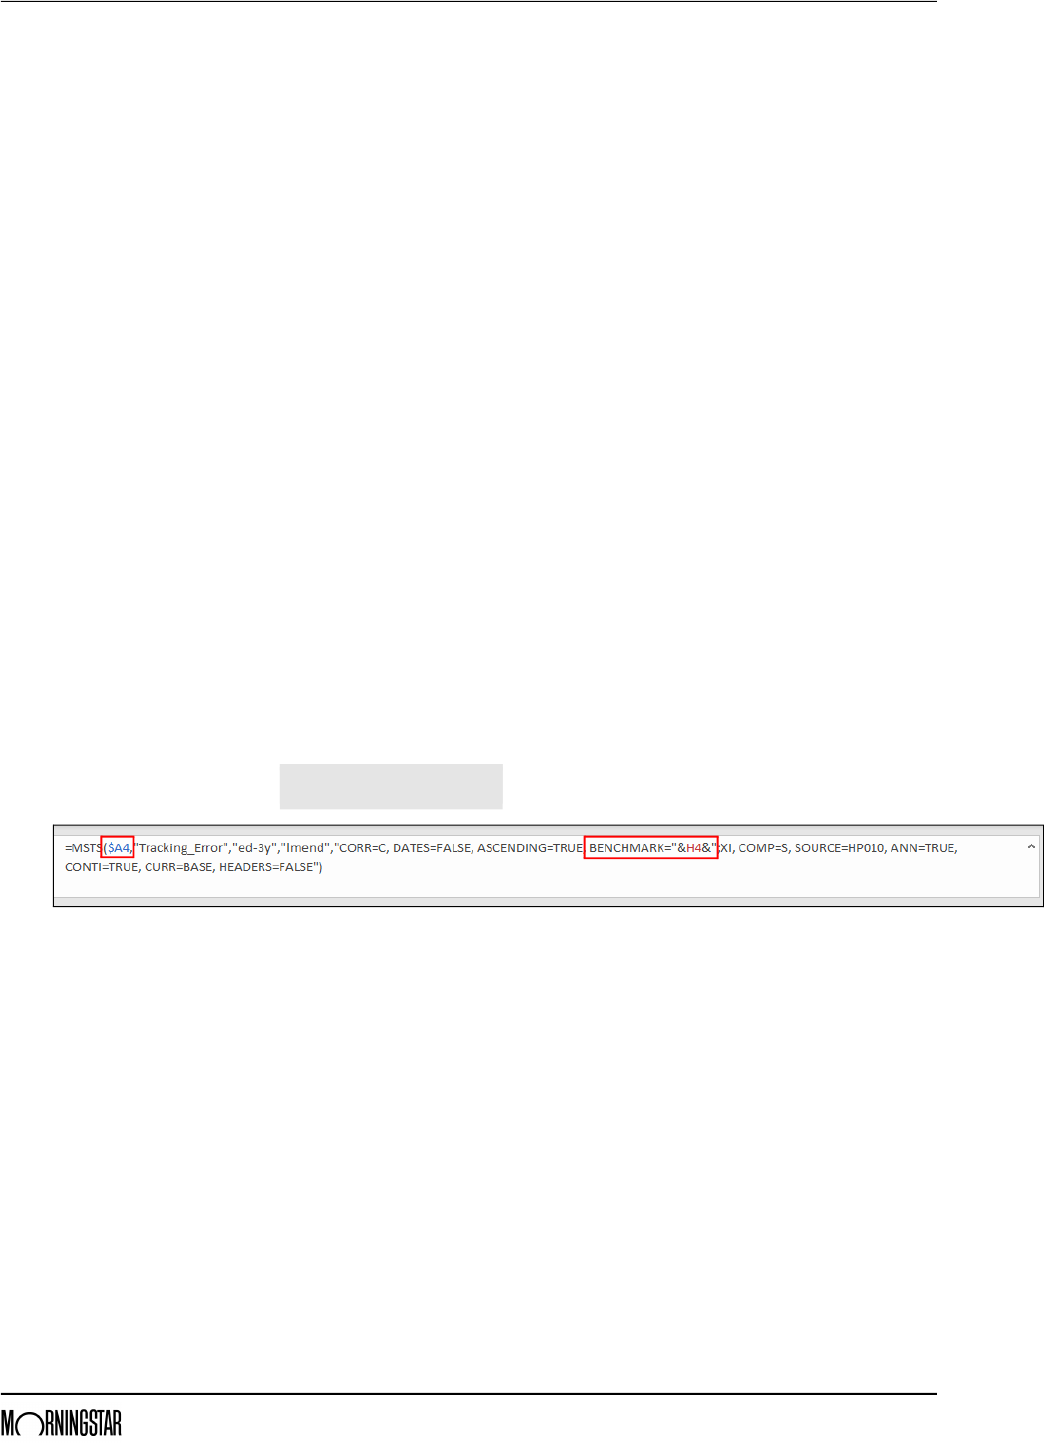
5. Select cell M4.
6. In the Formula bar, change “NAS:FCNTX” to $A4, then press <ENTER>.
7. In the Formula bar, do the following:
A. Change “NAS:FCNTX” to $A4
B. Change BENCHMARK=XIUSA04G92 to BENCHMARK=”&H4&”
C. Press <ENTER>.
8. Click-and-drag the formula down the list to apply them to all rows in column M.
9. If necessary, click Cell to recalculate the values.
10. Select cell N4.
11. Click-and-drag the formula down the list to apply them to all rows in column N.
12. If necessary, click Cell to recalculate the values.
13. Save the workbook.
Note the two parts of the formula
to change, and how to change them.
Retrieving a Historical Series of Data Points for Investments Exercise 16: Retrieve Historical Series data
Morningstar Direct January 2020 31
© 2020 Morningstar. All Rights Reserved.
Exercise 16: Retrieve
Historical Series data
The MSTS formula also allows users to extract a historical series of data, such as
historical prices, returns, Morningstar Ratings, and so on. To extract the historical
returns for the list of funds, do the following:
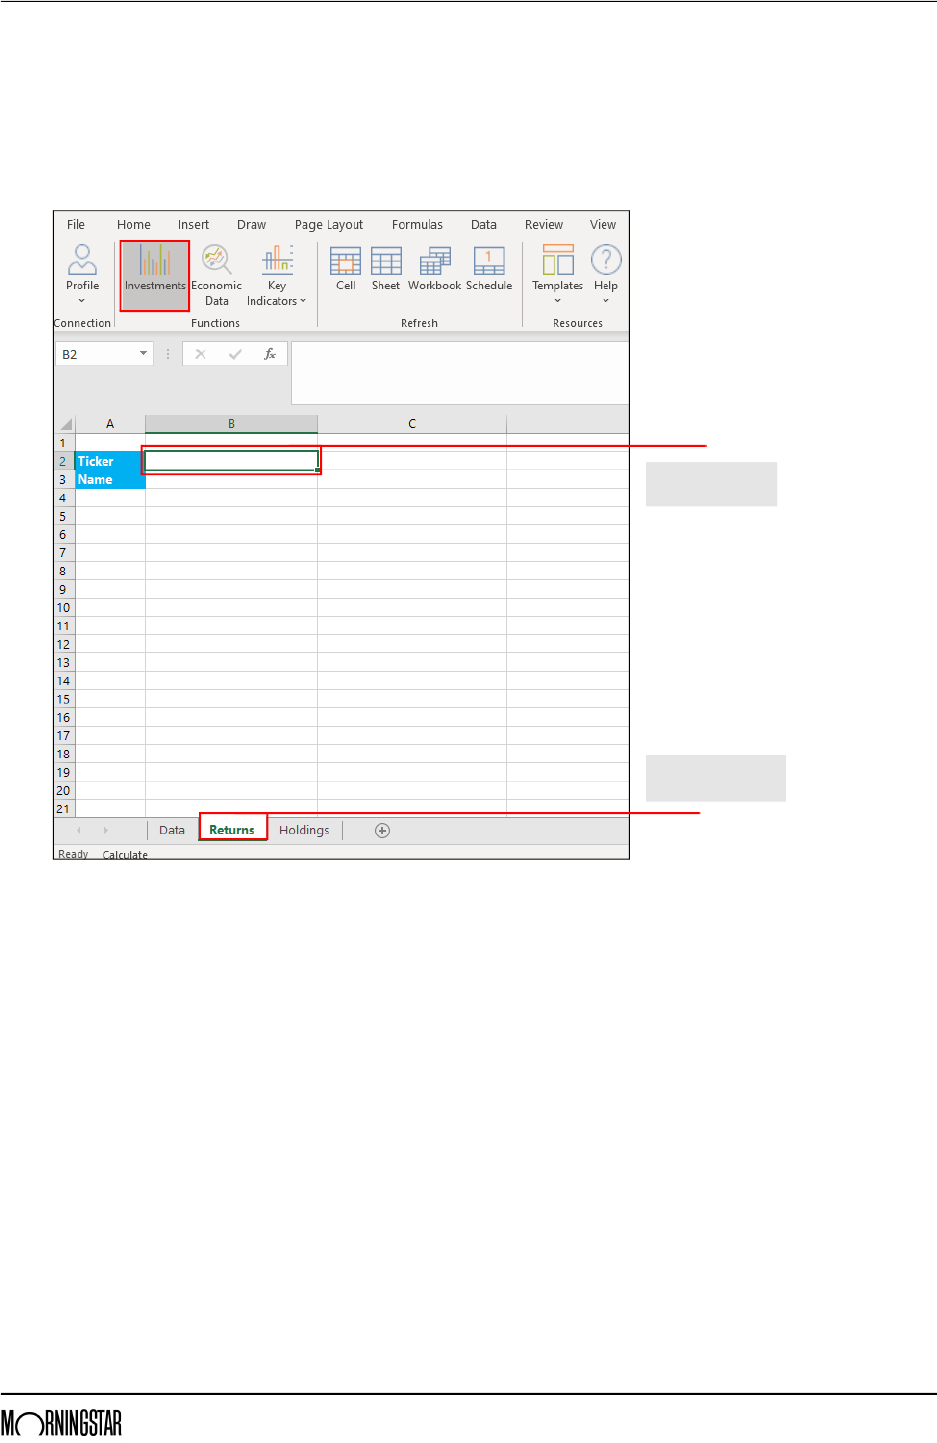
1. Select the Returns tab.
2. Select cell B2, then click Investments from the Morningstar tab.
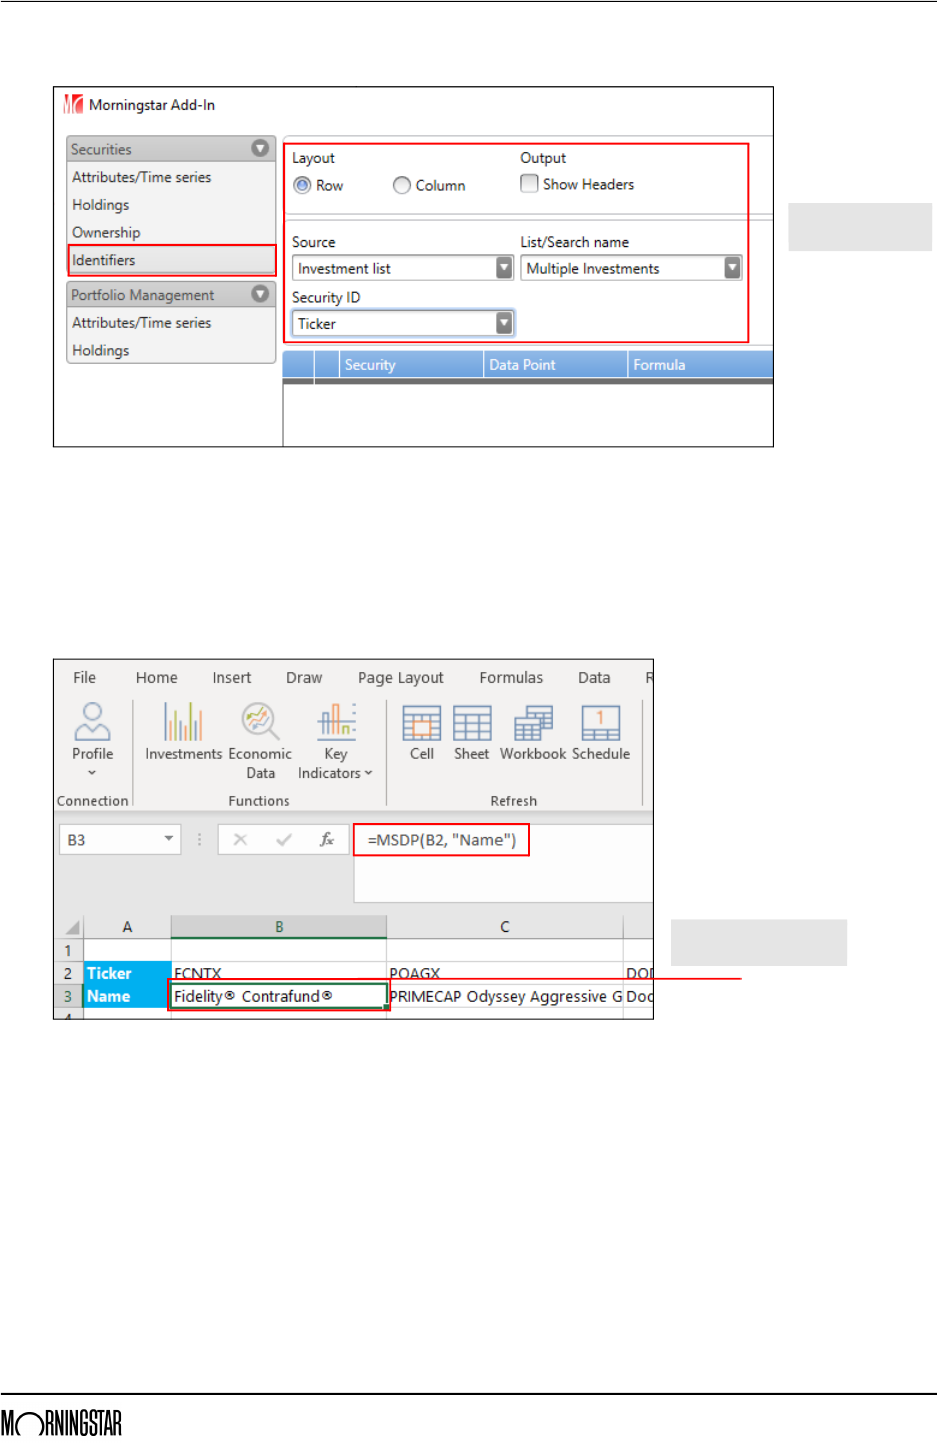
3. Click Identifiers.
4. Under Layout, select Row.
5. Under Output, deselect the Show Headers checkbox.
6. From the Source drop-down field, be sure Investment Lists is selected.
7. From the List/Search name drop-down field, select Multiple Investments.
Select this cell, then
click Investments.
Be sure this
worksheet is selected.
Retrieving a Historical Series of Data Points for Investments Exercise 16: Retrieve Historical Series data
Morningstar Direct January 2020 32
© 2020 Morningstar. All Rights Reserved.
8. Under Settings > Security ID, select Ticker.
9. Click Add, then Submit. The tickers for the members of the list appear in a row.
10. To to add the name underneath each fund, do the following:
A. Select cell B3.
B. In the cell, type =MSDP(B3,”Name”), then press <ENTER>.
C. Click-and-drag this formula to the last cell in the row to the right.
D. If needed, click Cell to recalculate.
Be sure to mirror the
selections shown here.
Type the formula directly
into the cell (or Formula bar).
Retrieving a Historical Series of Data Points for Investments Exercise 16: Retrieve Historical Series data
Morningstar Direct January 2020 33
© 2020 Morningstar. All Rights Reserved.
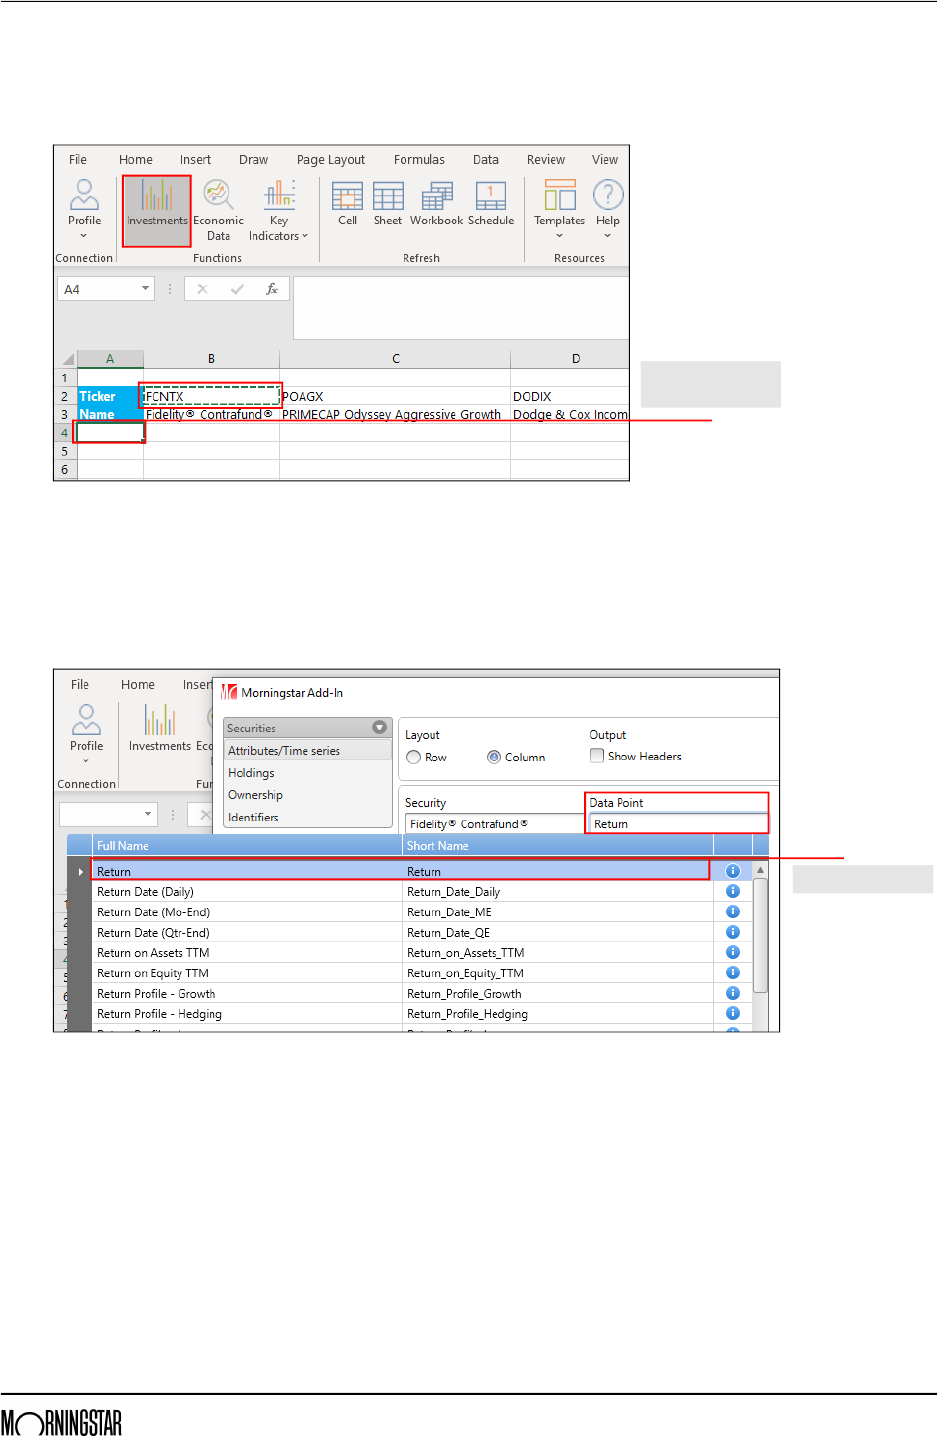
11. To see daily returns for the first investment over the past year, start by copying the ticker
in cell B2.
12. Select cell A4, then click Investments.
13. Attributes/Time Series should be selected, as should the option for Column. The
checkbox for Show Headers should be deselected.
14. Paste the ticker into the Security field, then click the security name when it appears to
select it.
15. In the Data Point field, type Return then select that data point.
Select this cell before
clicking Investments.
Select this data point.
Retrieving a Historical Series of Data Points for Investments Exercise 16: Retrieve Historical Series data
Morningstar Direct January 2020 34
© 2020 Morningstar. All Rights Reserved.
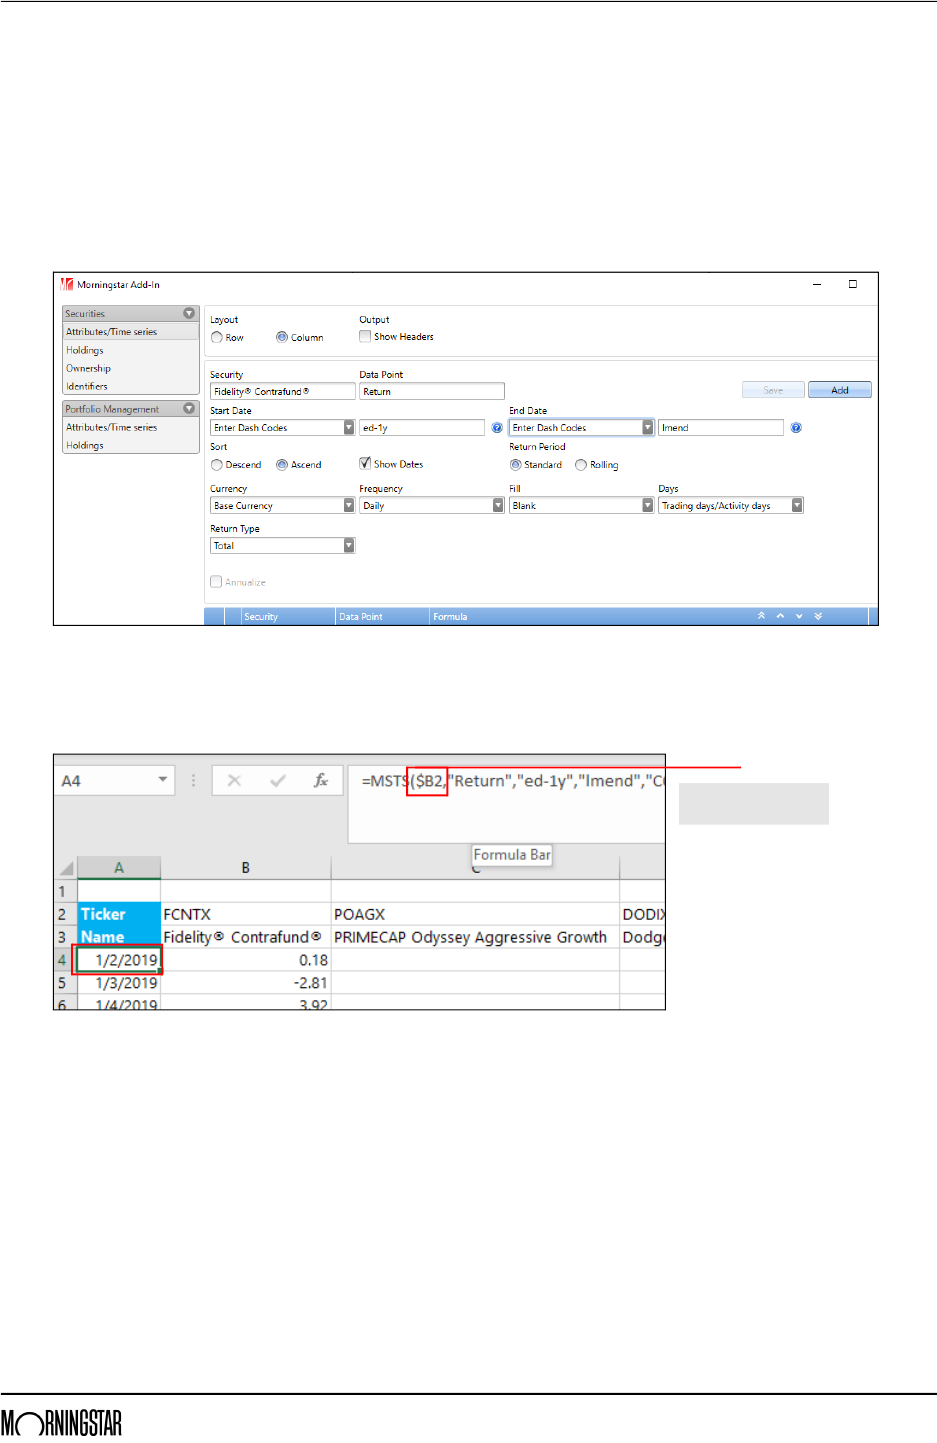
16. Start by using the Frequency field to select Daily.
17. From the Start Date field, select Enter Dash Codes and type ed-1y.
18. From the End Date field, select Enter Dash Codes and type lmend.
19. Select Show Dates.
20. Click Add, then click Submit.
21. Cell A4 should be selected. In the Formula bar, replace the ticker with $B2.
Replace the ticker
with this reference link.
Retrieving a Historical Series of Data Points for Investments Exercise 16: Retrieve Historical Series data
Morningstar Direct January 2020 35
© 2020 Morningstar. All Rights Reserved.
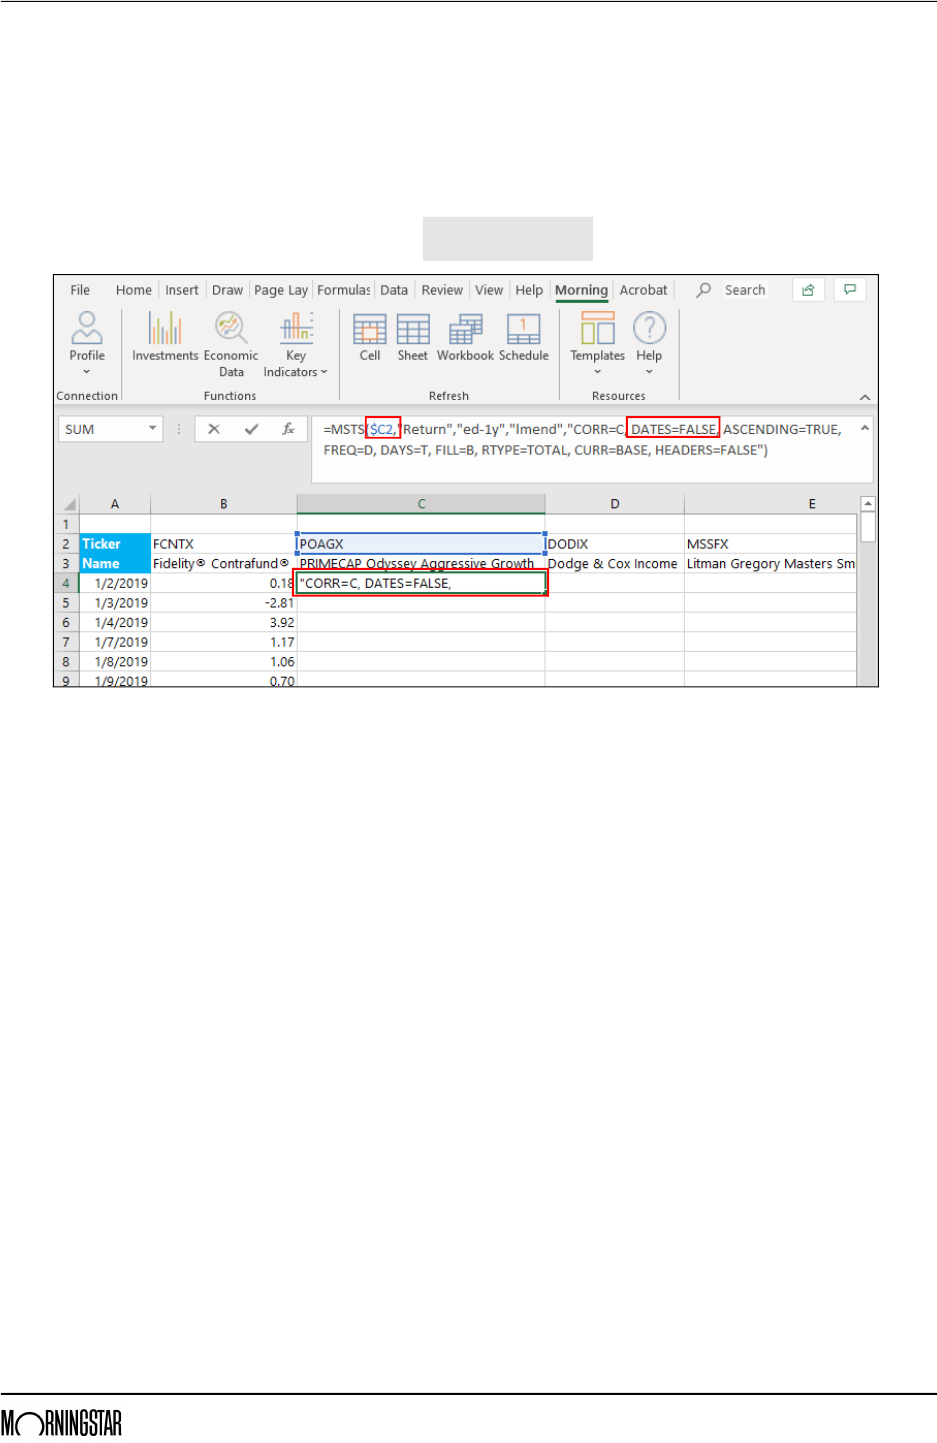
22. To modify and apply the same formula to the second fund, do the following:
A. Copy cell A4.
B. Paste the value in cell C4.
C. In the formula bar, change $B2 to $C2 for the identifier, and modify the setting
DATES = FALSE. This removes the dates (which are already displayed in column A).
D. Press <ENTER>.
23. Click-and-drag this formula to the right, to the last cell in the row.
24. If needed, click Cell to recalculate the spreadsheet.
25. Save the workbook.
Note the changes to make
for the formula in this cell.
Retrieving a Portfolio’s Holdings Overview
Morningstar Direct January 2020 36
© 2020 Morningstar. All Rights Reserved.
Retrieving a Portfolio’s Holdings
OverviewThe MSHOLDING formula is designed to retrieve holdings of portfolios. It requires at
least the following parameters to retrieve the latest holdings:
g Portfolio IDs (for example, Ticker, ISIN, CUSIP, or SecID), and
g Position IDs to define how you would like to see the holdings. For example, you
could elect to see the Ticker, ISIN, CUSIP, or SecID of the holdings.
Exercise 17: Retrieve
portfolio holdings
for a fund using the
MSHOLDING formula
To retrieve portfolio holdings for a fund, do the following:
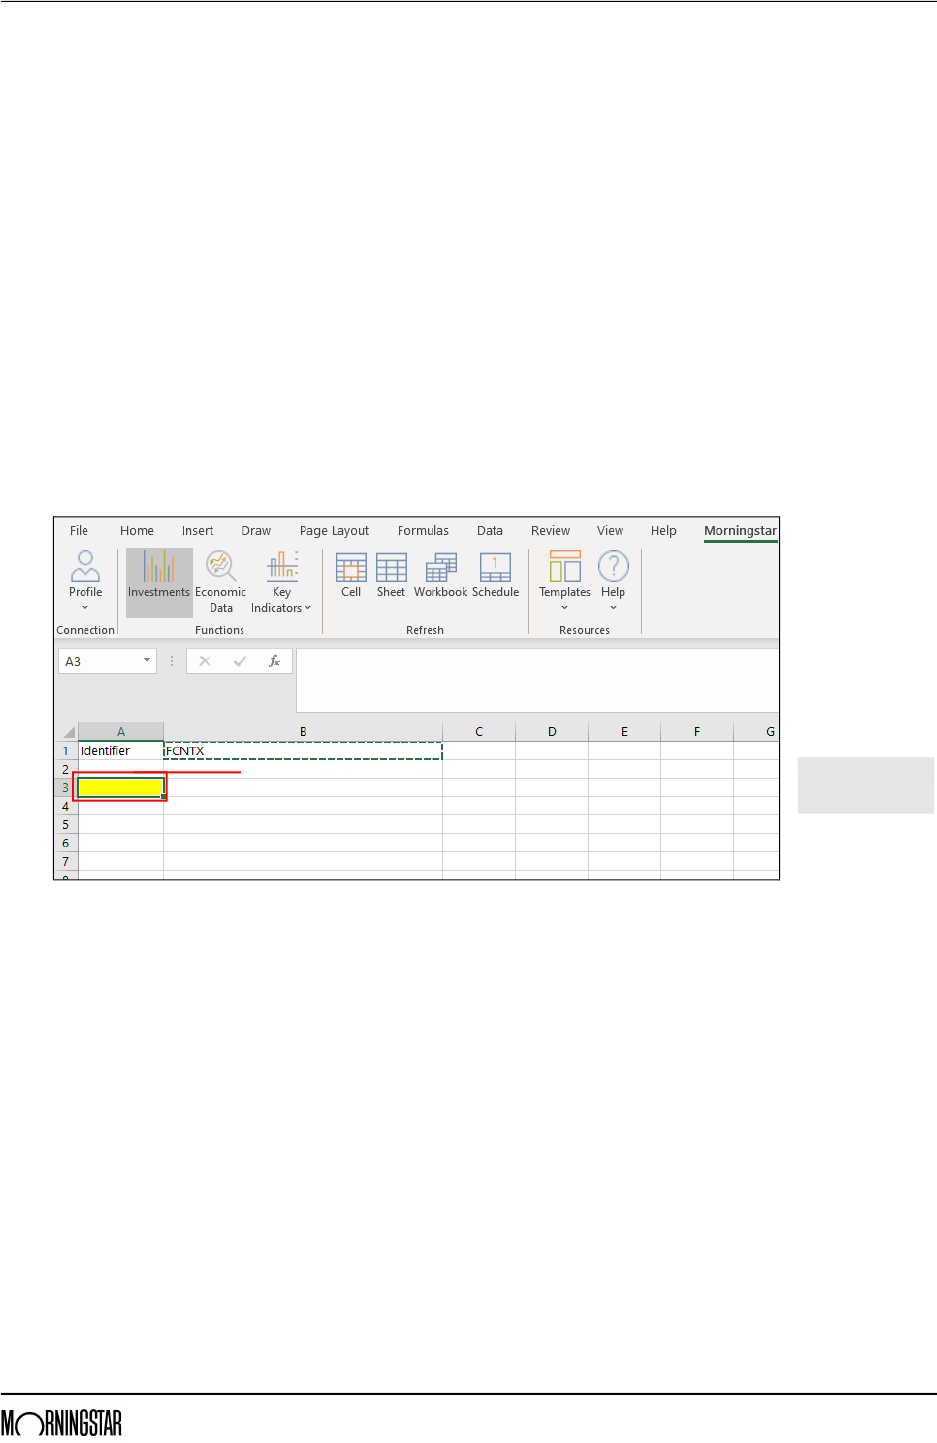
1. In the Excel file provided, select the Holdings worksheet. Notice the ticker in cell B1.
2. Copy cell B1.
3. Select cell A3, where the data will display.
4. From the Morningstar toolbar, click Investments.
5. Under the Securities heading, select Holdings.
Callout

Retrieving a Portfolio’s Holdings
Exercise 17: Retrieve portfolio holdings for a fund using the MSHOLDING
formula
Morningstar Direct January 2020 37
© 2020 Morningstar. All Rights Reserved.
6. In the Security field, paste the ticker, then select the security when it appears.
7. The option for Column should be selected, and the check box for Show Headers should
also be selected.
8. From the Position ID drop-down field, select Ticker.
9. From the Data type section, the option for Weight (%) should be selected.
10. Leave all other settings as is and click Add, then click Submit.
Select the fund
when it appears.
Retrieving a Portfolio’s Holdings Exercise 18: Retrieve only the top 10 holdings for a fund
Morningstar Direct January 2020 38
© 2020 Morningstar. All Rights Reserved.
Exercise 18: Retrieve only
the top 10 holdings
for a fund
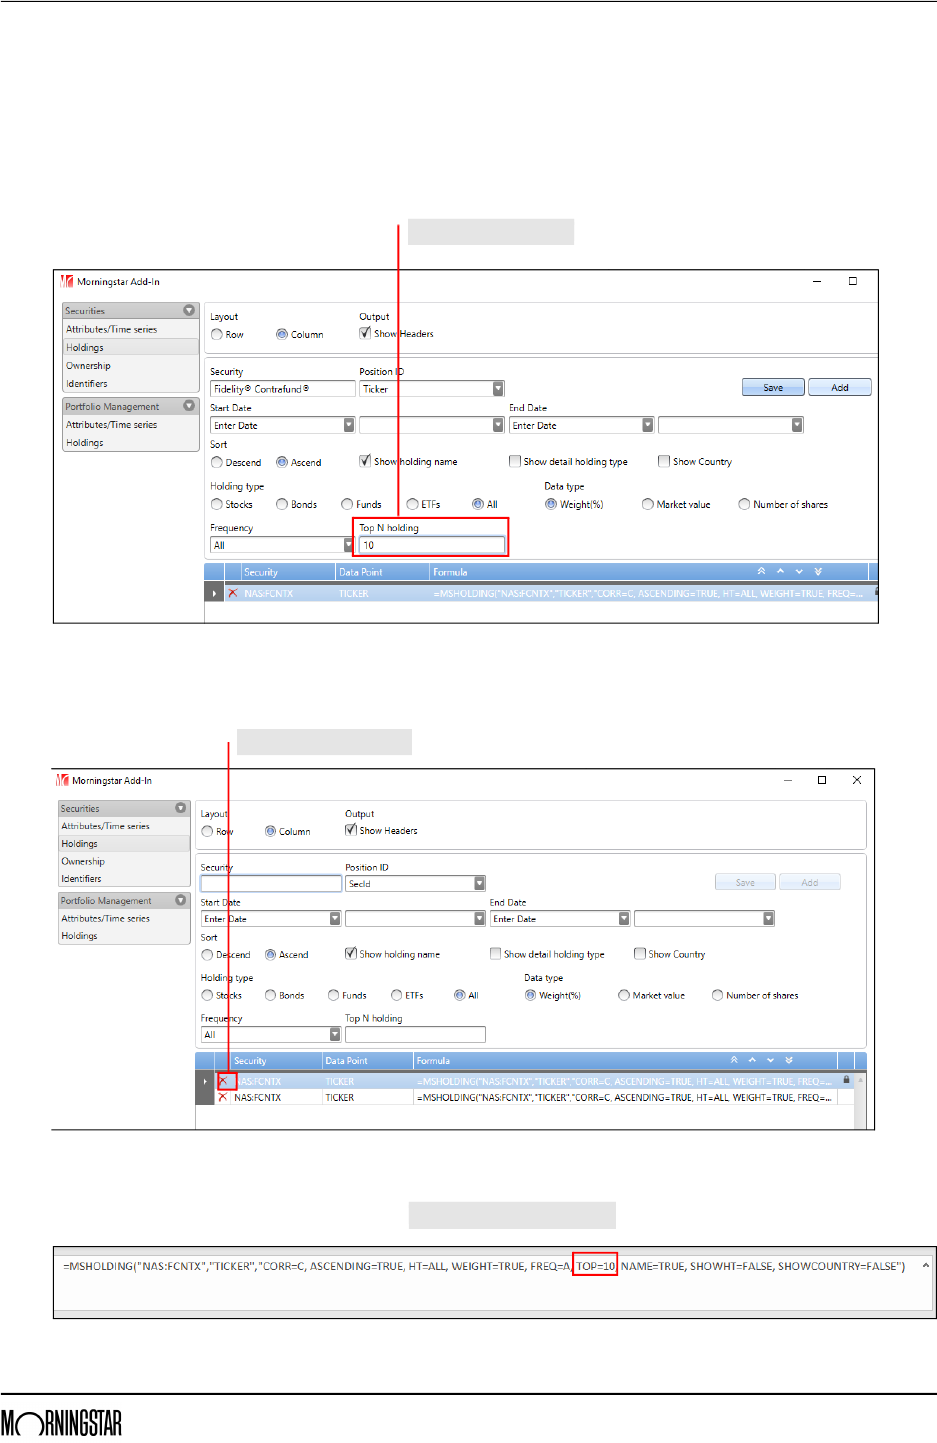
The MSHOLDING formula can easily be modified to see only the top 10 positions. To do
so, do the following:
1. Cell A3 should be selected.
2. From the Morningstar toolbar, click Investments.
3. In the Top N Holdings field, type 10.
4. Click Add.
5. To the left of the top row, click X to delete the first formula.
6. Click Submit. Notice how top=10 has been added to the formula.
Note the entry in this field.
Click here to delete this row.
Note this addition to the formula.

Retrieving a Portfolio’s Holdings Exercise 19: Retrieve historical positions for a fund
Morningstar Direct January 2020 39
© 2020 Morningstar. All Rights Reserved.
Exercise 19: Retrieve
historical positions
for a fund
Amending the formula further allows users to retrieve historical positions for a fund,
rather than merely seeing current positions. To see past positions, do the following:
1. Cell A3 should be selected.
2. From the Morningstar toolbar, click Investments.
3. From the Start Date field, select Enter Dash Codes, then, type ed-1y.
4. From the End Date field, select Enter Dash Codes, then type lmend.
5. Click Add.
6. Delete the top formula.
7. Click Submit.
8. In the Formula bar for cell A3, replace the ticker a link to cell $B1.
9. Save the workbook.
Update the values for the date fields.
By setting a reference (to cell B1) within the formula, this
worksheet can be used as a template. Typing a different
ticker in cell B1 will retrieve data for that new security.
Retrieving Ownership Information for an Investment Overview
Morningstar Direct January 2020 40
© 2020 Morningstar. All Rights Reserved.
Retrieving Ownership Information for an Investment
OverviewThe MSOWNER formula retrieves ownership data for investments. This formula can be
used, for instance, to identify funds investing in a specific security (for example, a
stock, open-end fund, or ETF) over time and the market value of that investment.
Using this formula automatically includes the following columns of data for the owners
of the investment:
g Name
g SecId, and
g Position Market Value.
Users merely need to decide which data point to show (for instance, Portfolio
Weight%, or Shares), and over what time period. To avoid seeing too many rows, users
can also limit the results to only the top N number of owners for the investment.
Exercise 20: Retrieve
ownership data
for a stock
To retrieve the historical portfolio weights of managed investments owning Kraft Heinz
over the past year, do the following:
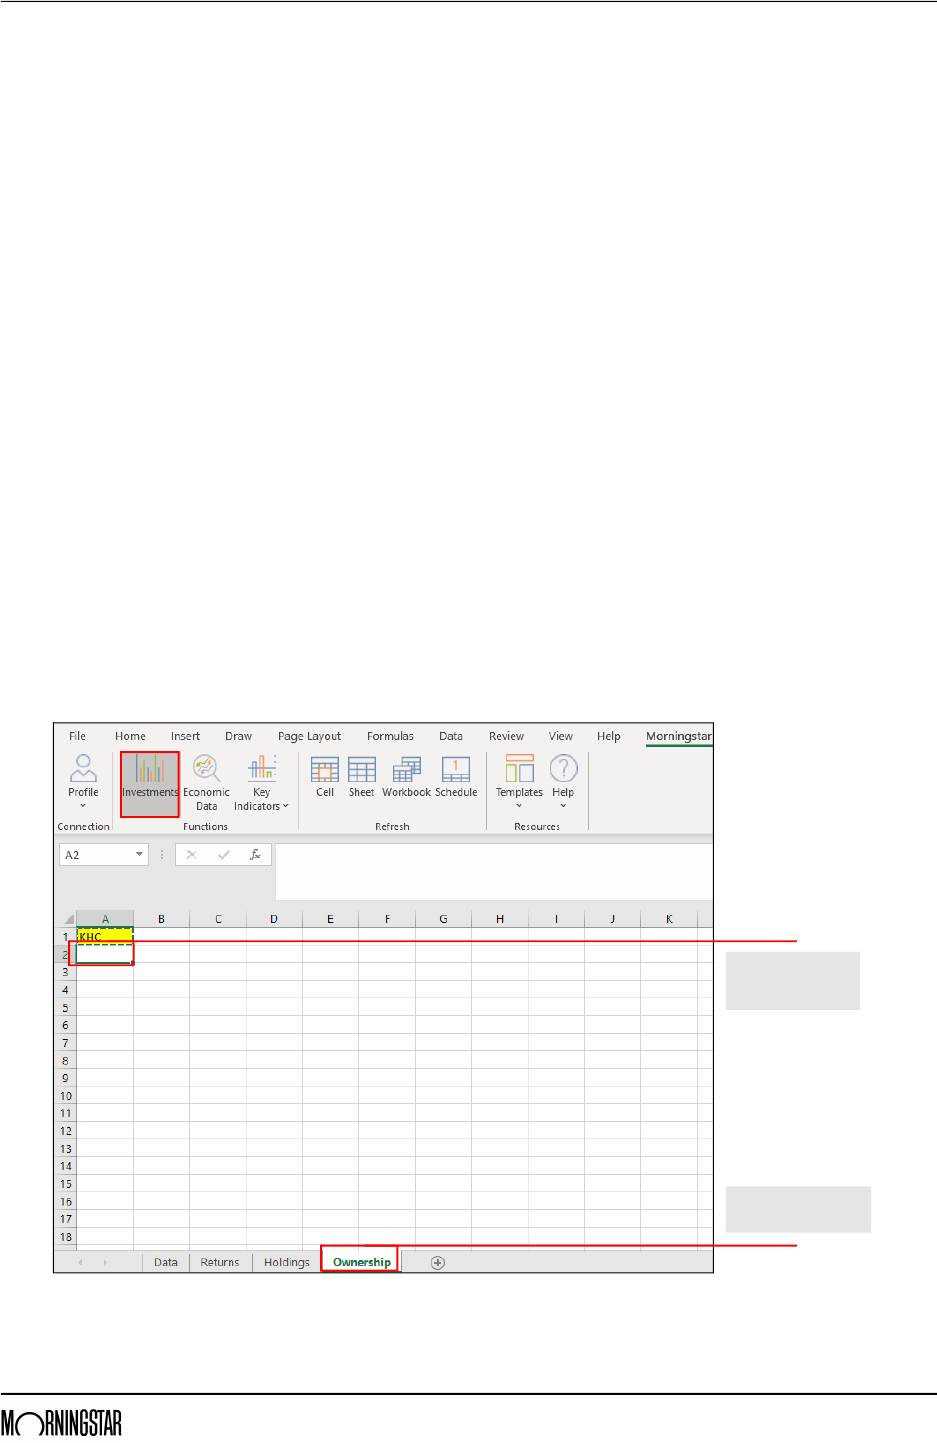
1. In the template provided, select the Owners worksheet. Note the ticker in cell A1.
2. Copy cell A1.
3. Select cell A2, where the data will display.
4. From the Morningstar toolbar, click Investments.
Be sure this
worksheet is selected.
Note the cell
to select before
clicking Investments.
Retrieving Ownership Information for an Investment Exercise 20: Retrieve ownership data for a stock
Morningstar Direct January 2020 41
© 2020 Morningstar. All Rights Reserved.
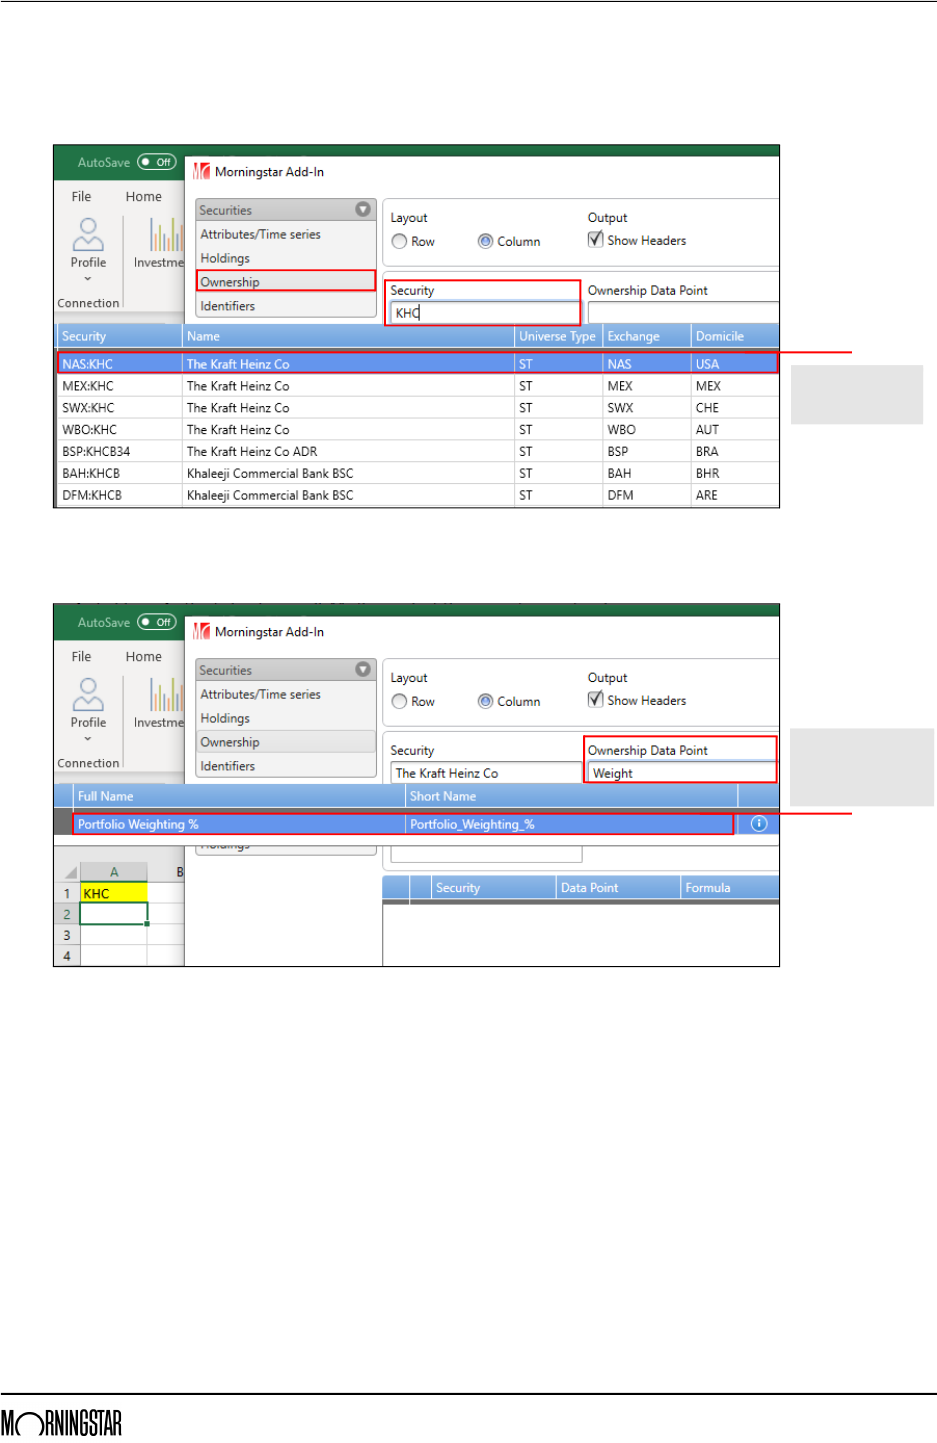
5. Select the option for Ownership.
6. In the Security field, paste the ticker from cell A1, then select the correct security when
its name appears.
7. In the Ownership Data Point field, type Portfolio Weighting %, then select it when
it appears.
8. From the Start Date field select Enter Dash Codes, then type ed-1y.
9. From the End Date field, select Enter Dash Codes, then type lmend.
10. Click Add, then click Submit.
11. Save the workbook.
Be sure to select the
security from the
correct exchange.
Typing even a portion
of a data point’s name
can allow it to be
found and selected.

Retrieving Ownership Information for an Investment A short note on using Dash Codes
Morningstar Direct January 2020 42
© 2020 Morningstar. All Rights Reserved.
A short note on
using Dash Codes
MSTS formulas can handle both static and dynamic dates. Entering a date in formulas
keeps them static. Using dynamic codes ensures they update when the calendar rolls
to a new month, quarter, or year, depending on the data point settings.
The following codes can be used for end dates:
For start dates, use ed-[frequency]. The frequency can be defined in days, weeks,
months, quarters, etc. To define one week, use either w1 or 1w. The letter used for
those frequencies are based on the English language (d for day, w for week, m for
month, and so on).
The following table offers a few examples of the dash codes to use for a variety of
time periods:
Name Dash Code
Last market close lmktclose
Last week end lwend
Last month end lmend
Last quarter end lqend
Last semi-year end lsyend
Last year end lyend
To cover this time period... Enter this dash code for the Start Date... And this dash code for the End Date...
One year prior to
the latest month end
ed-1y lmend
Year-to-date, up to
the latest month end
ed-x0
-x0 always reverts to the start of the year
lmend
Month-to-date through
the latest market close
ed-m0
-m0 always reverts to the start of the month
lmktclose
