
Creating an XML Data
Mapping Configuration
Connect DataMapper Walkthrough

3
Creating an XML Data Mapping Configuration
Creating an XML Data Mapping Configuration
Connect DataMapper Walkthrough
Software version 1.5
OBJECTIF LUNE Inc
2030 Pie-IX, Suite 500
Montréal, QC, Canada, H1V 2C8
www.objectiflune.com
© 2016 Objectif Lune Incorporated. All rights reserved.

4
Walkthrough
Creating an XML Data Mapper configuration
Table of Contents
Introduction ..................................................................................................................................... 5
Creating a configuration .................................................................................................................. 6
1. Open the XML file ................................................................................................................ 6
2. Identify records ................................................................................................................... 6
3. Save the file ......................................................................................................................... 7
Extracting data ................................................................................................................................. 9
4. Create an Extract step ......................................................................................................... 9
5. Add extra fields to an Extraction step ................................................................................. 9
6. Extract line items using a Repeat step .............................................................................. 10
Renaming steps, fields and detail tables ....................................................................................... 13
7. Rename Extractions steps ................................................................................................. 13
8. Rename fields .................................................................................................................... 13
9. Rename a detail table ........................................................................................................ 14
Changing the data type of fields.................................................................................................... 16
10. Set the default data format ............................................................................................. 7
11. Set a field’s data type to Date ....................................................................................... 16
12. Set a field’s type to Integer ........................................................................................... 17
13. Select a field and set its data type to Currency ............................................................. 17
Fine-tuning using JavaScript .......................................................................................................... 18
14. Post function: capitalize country ................................................................................... 18
15. Split a field and keep one part of it ............................................................................... 18
16. Add a concatenated field............................................................................................... 19
What’s next? .................................................................................................................................. 21
5
Walkthrough
Creating an XML Data Mapper configuration
Introduction
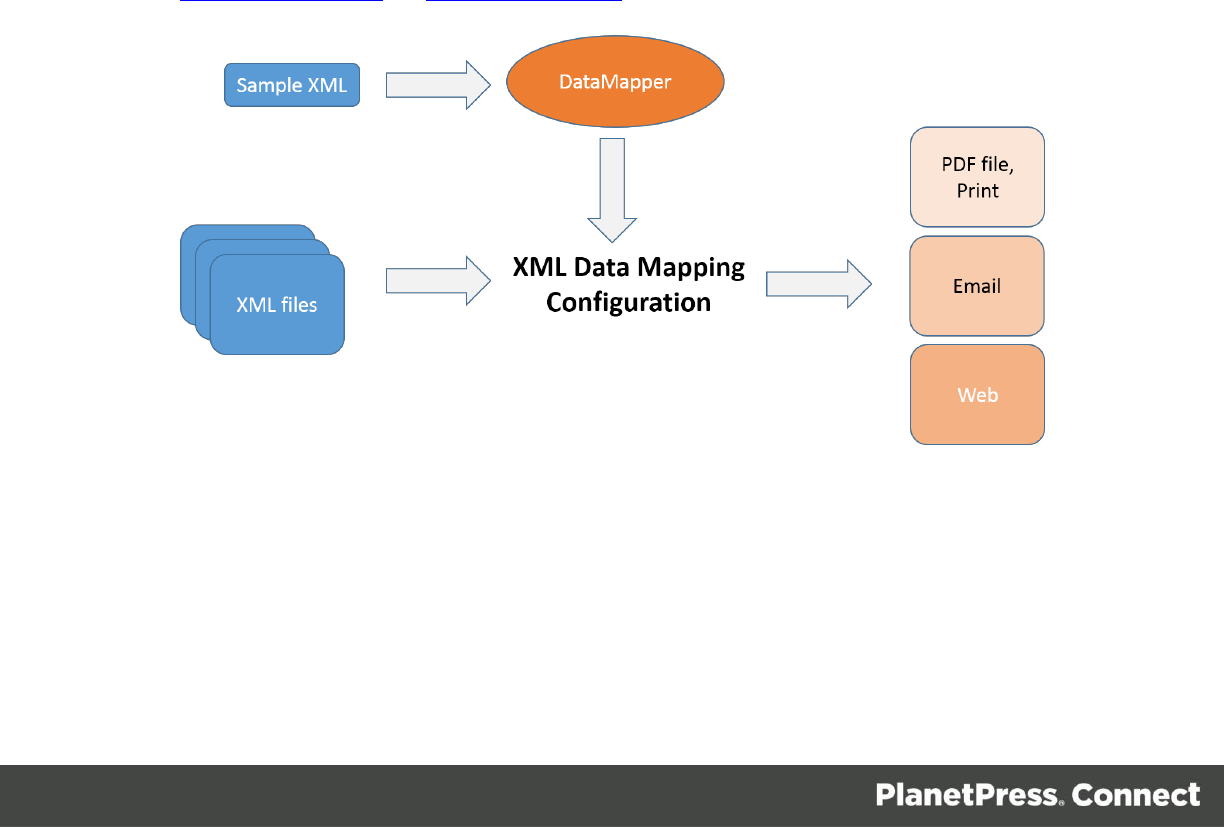
Connect’s DataMapper lets you extract data from a variety of files. This walkthrough guides you
through the process of creating a Data Mapping Configuration for an XML file. This Data
Mapping Configuration enables the DataMapper to extract data from all XML files with the same
structure. The Data Mapping Configuration can then be used to add variable data to Connect
Designer templates.
This tutorial introduces you to a big part of the basic functionality of the DataMapper. You will
learn to create a Data Mapping Configuration by opening a file and defining records in it. Then
you will extract the data by adding extraction steps and detail tables to the configuration. You
will also learn how to rename fields and detail tables, and how to fine-tune the data for use in
the Designer.
After completing this walkthrough, you’ll have a basic knowledge of how to create a Data
Mapping Configuration for XML files. However, this walkthrough describes only one way to do
things. It shows how to extract data using toolbar buttons, for example, whereas it would also
be possible to do that via drag-and-drop, the menu, or the shortcut menu.
So, go on and explore! To discover new ways and enhance your skills, please visit
learn.objectiflune.com and help.objectiflune.com.
6
Walkthrough
Creating an XML Data Mapper configuration
Creating a configuration
The first step towards a Data Mapping Configuration is to open a source file and help the
DataMapper to identify records. In this exercise you will open an XML file and set the record
boundaries.
1. Open the XML file
1. Go to the Welcome screen: start Connect Designer, or, if it is already running, use the
Home icon at the top right to go to the Welcome screen.
2. On the left, under Use the DataMapper to… choose Create a New Configuration.
3. Under From a file choose XML.
There is also a Wizard for XML files. Save trying that for later; it automates a number of
the steps that this walkthrough demonstrates.
4. Select the sample file: olsg-data.XML.
2. Identify records
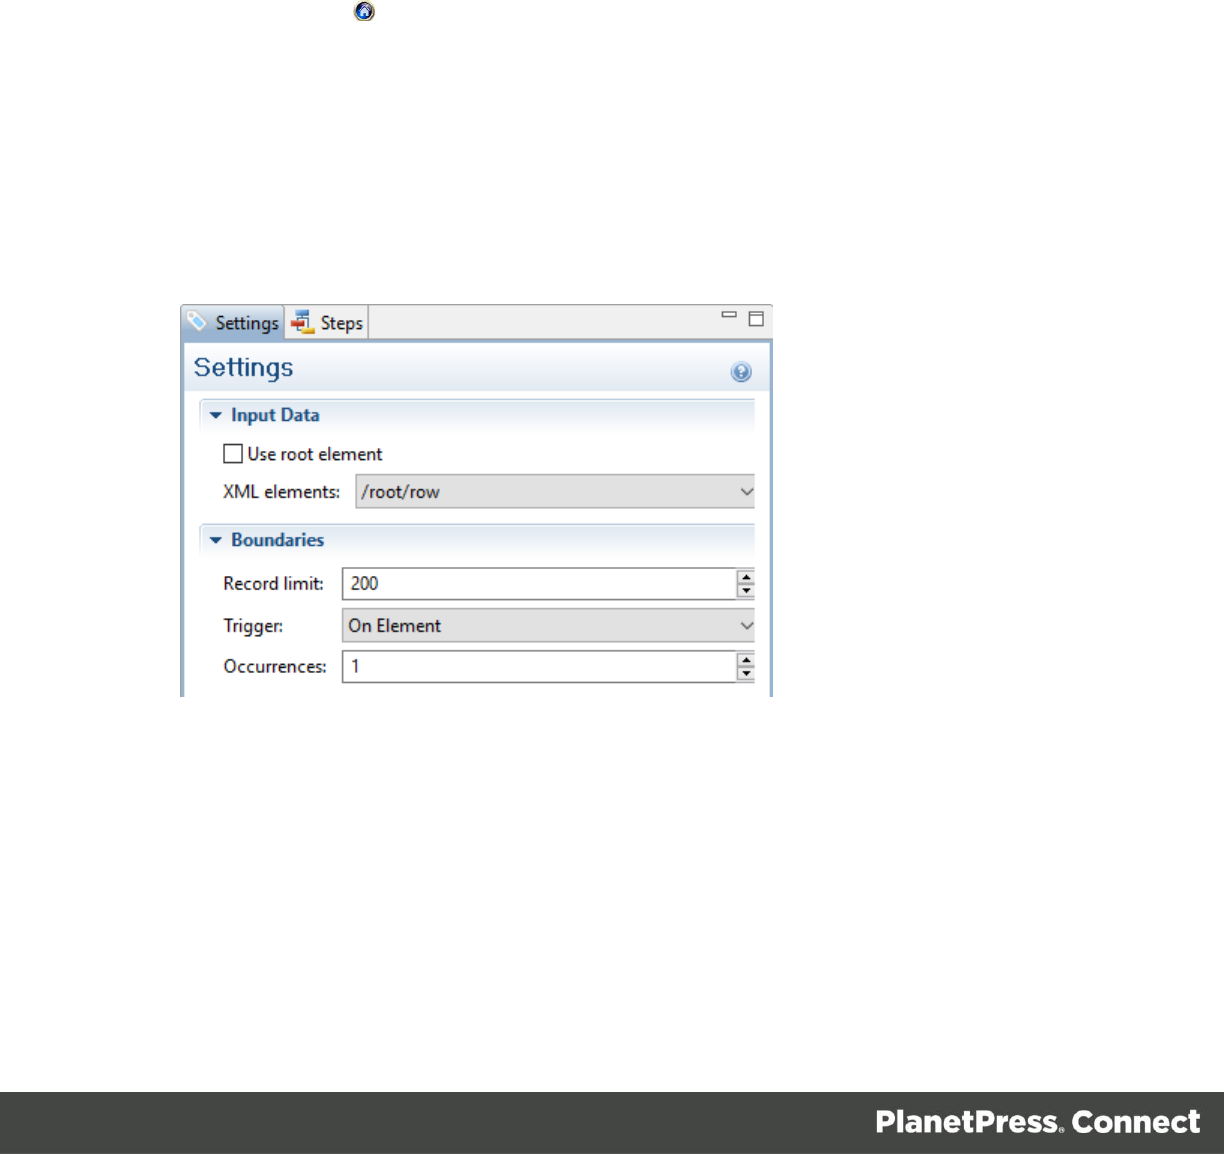
Take a look at the Settings pane on the left.
The Input Data and Boundaries settings determine what identifies a record in the source file.
For this file, the correct settings are:
XML elements: /root/row.
Trigger: On element
Occurrences: 1
This means that every time a new <row> element occurs, the DataMapper is triggered to start a
new record. Setting Occurrences to 2 would make two <row> elements go in one record.
7
Walkthrough
Creating an XML Data Mapper configuration
The Record Limit limits the number of records that can be browsed in the Data model pane and
that will be saved as a sample within the Data Mapping Configuration.
Note
The Record Limit does not limit the amount of records that can be extracted from an XML file
using this Data Mapping Configuration in Connect Workflow.
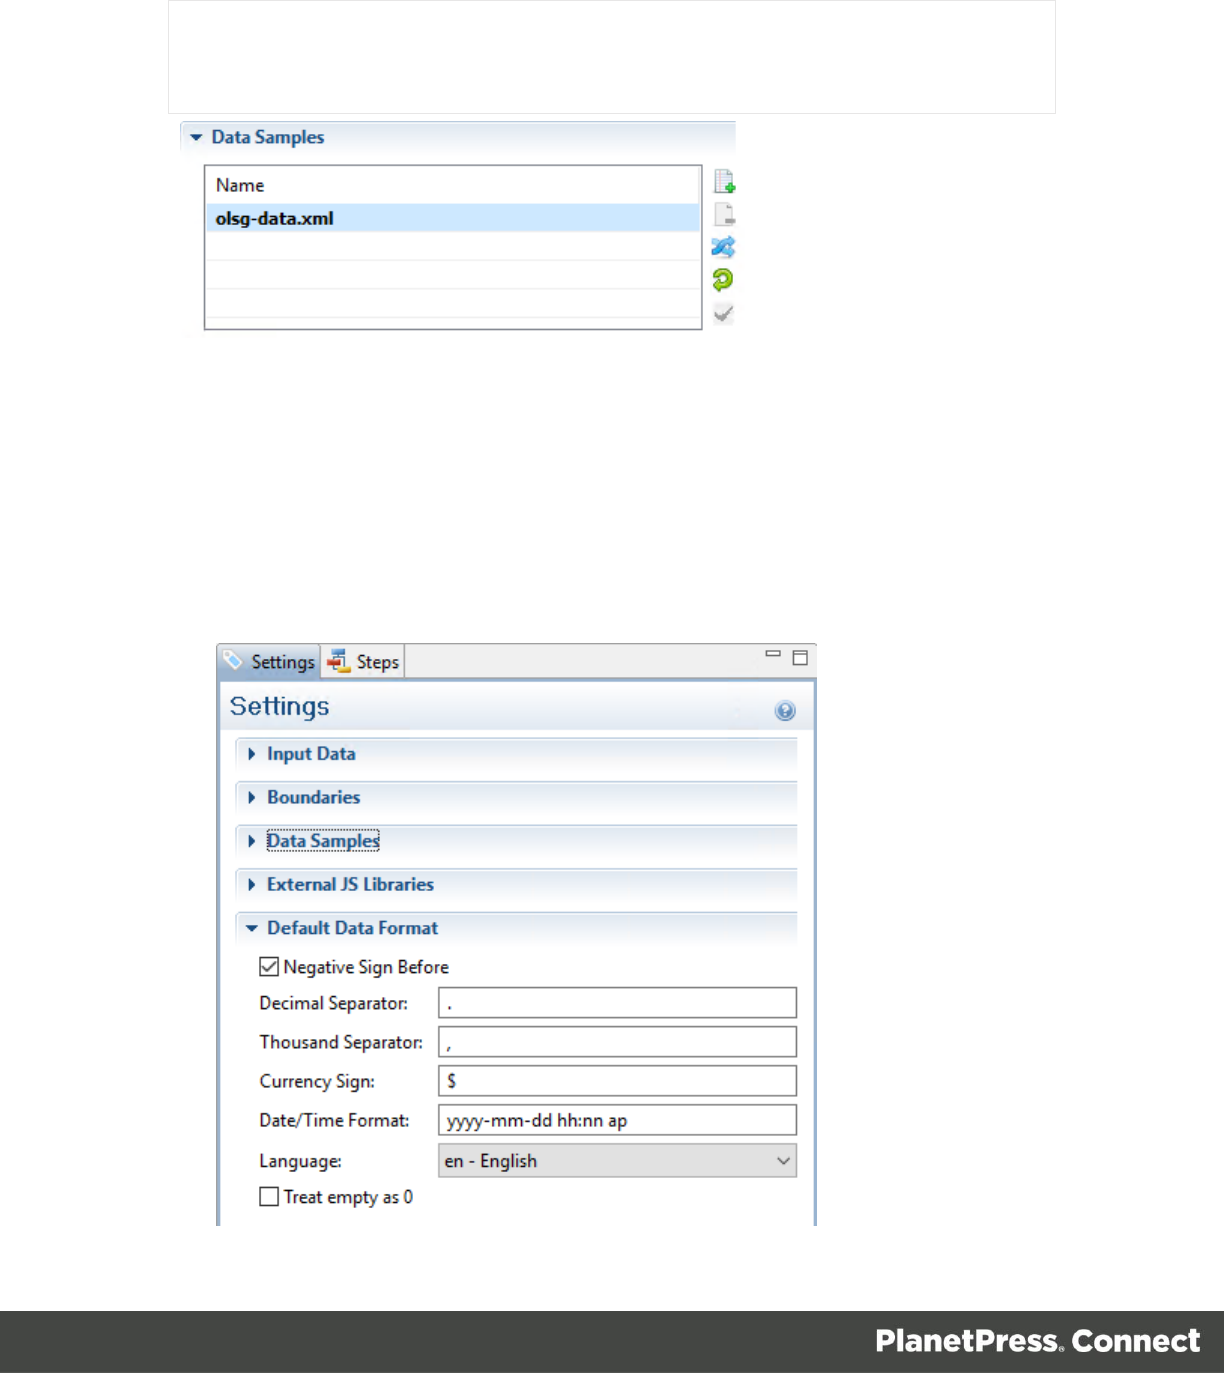
The XML file has been added to the Data Samples. Via the menu File > Add data you could add
more samples if you’d need to. For this tutorial one sample is sufficient.
3. Set the default data format
By setting the default data format you’re telling the DataMapper what format it can expect
when it has to read a field as a date or a number from the source file.
1. Below Data Samples on the Settings pane, there is a heading Default Data Format. Click
this heading.

8
Walkthrough
Creating an XML Data Mapper configuration
Note
The initial default settings for the Default Data Format can be set via the menu: Window >
Preferences > Datamapper > Datamapper default format.
2. Both separators look fine. Leave them as they are.
3. In olsg-data.XML, amounts of money do not have a currency sign. Remove the currency
sign.
4. The dates in the source data don’t look the same, but let’s say that the default format
for dates is like that of the first date in the record. Change the Date/Time format to:
dd/mm/yyyy.
4. Save the file
The DataMapper does not automatically save the configuration, so now that the initial settings
are done, it’s a good idea to save the file.
1. Select File > Save as, and give the Data Mapping Configuration a name.
2. Press Ctrl+S every now and then to save the file while working on the Data Mapping
Configuration.

9
Walkthrough
Creating an XML Data Mapper configuration
Extracting data
The next step is to extract data. Open the Steps pane, next to the Settings tab. Here you can see
two flags, representing the preprocessor step and the postprocessor step. With these you could,
among other things, define variables and modify the source file before extracting data
(preprocessor step) or modify the output file after extracting data (postprocessor step). But in
this case, as in most cases, you can immediately start extracting data.
5. Create an Extract step
At the heart of this Data Mapping Configuration are an Extract step and a Repeat step. First
you’ll add the Extract step.
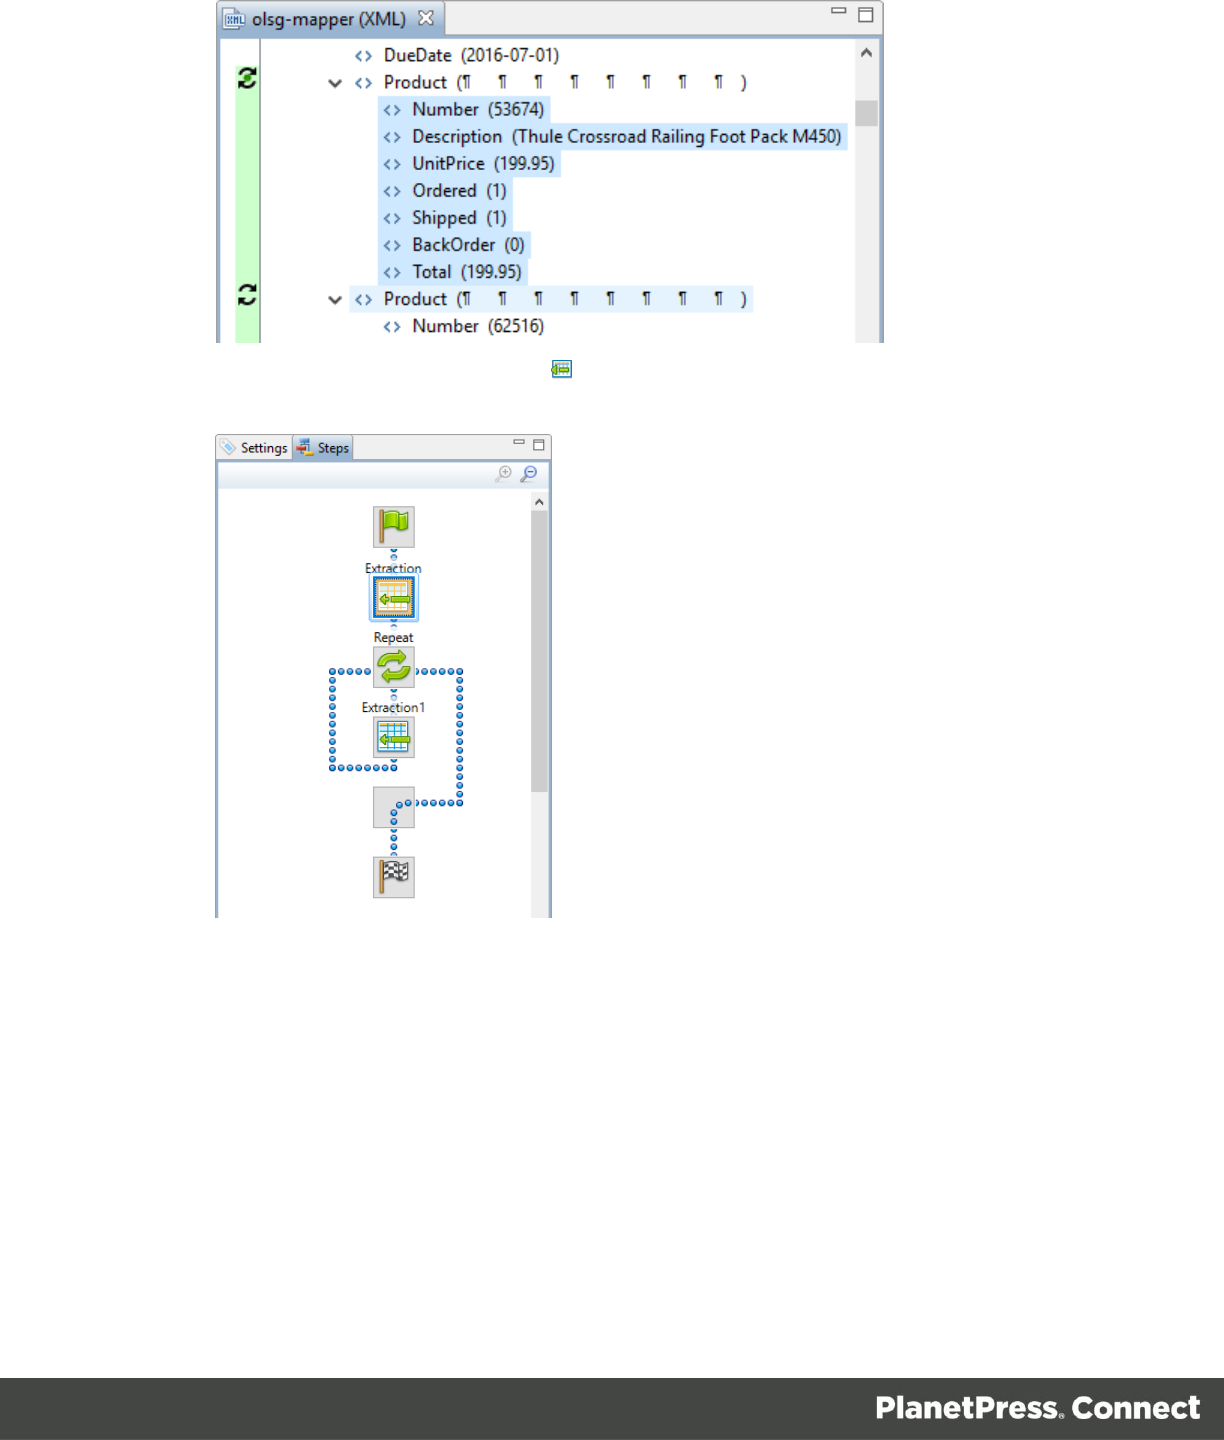
1. In the first row element, select the elements from Number up to and including DueDate.
(E.g. Hold the Shift key, click Number and then click DueDate.)
2. Click the Add Extract Step button . This adds an Extraction step to the Steps pane,
between the Preprocessor step and the Postprocessor step.
3. Take a look at the Data model pane at the right. You can now browse the resulting
records.
6. Add extra fields to an Extraction step
At the bottom of each row element, below the products, there’s some more information that
needs to be extracted. You could create a new Extraction step for that, but it’s better to add it to
the existing Extraction step: the fewer Extraction steps, the faster the Data Mapping
Configuration will be.
1. Click the Extraction step on the Steps pane to select it.
10
Walkthrough
Creating an XML Data Mapper configuration
2. In the XML viewer (in the middle) scroll down past all <product> elements. Select the
elements SubTotal, TaxTotal and Total. (Hold the Ctrl key while clicking the fields.)
3. Click the Add Extract Field button to add the fields to the existing Extraction step,
instead of creating a new Extraction step.
Tip: To create the fastest possible Data Mapping Configuration, add as few Extraction steps as
possible.
7. Extract line items using a Repeat step
When the number of a certain type of element in a record can vary, like the number of products
in a row in this XML file, they have to go in a detail table.
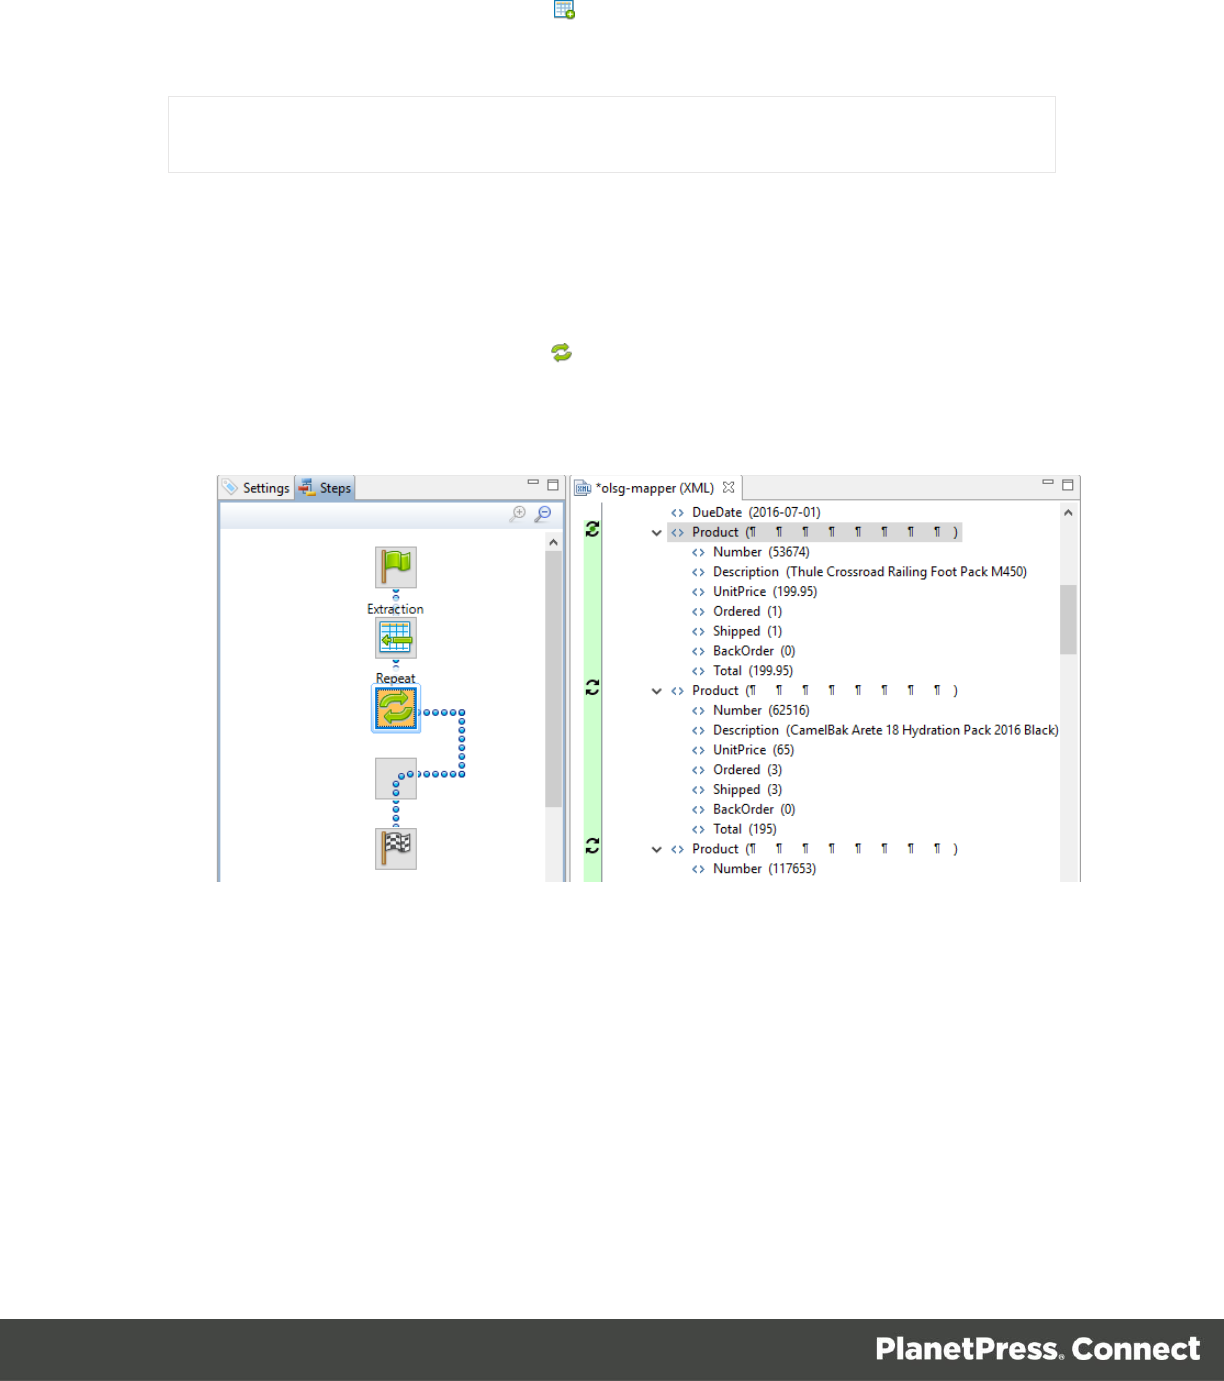
1. Click the first Product element.
2. Click the Add Repeat Step button . In the left margin of the XML viewer you will see a
green line. (If you don’t, there is probably only one product in the current record.
Browse some more records via the Data model pane.) The Add Repeat Step icon
appears before each product.
3. Select all elements inside the first Product element: while pressing the Shift key, click
Number, and then click Total.
11
Walkthrough
Creating an XML Data Mapper configuration
4. Click the Add Extract Step button .
On the Steps pane, a new Extraction step has appeared within the Repeat step.
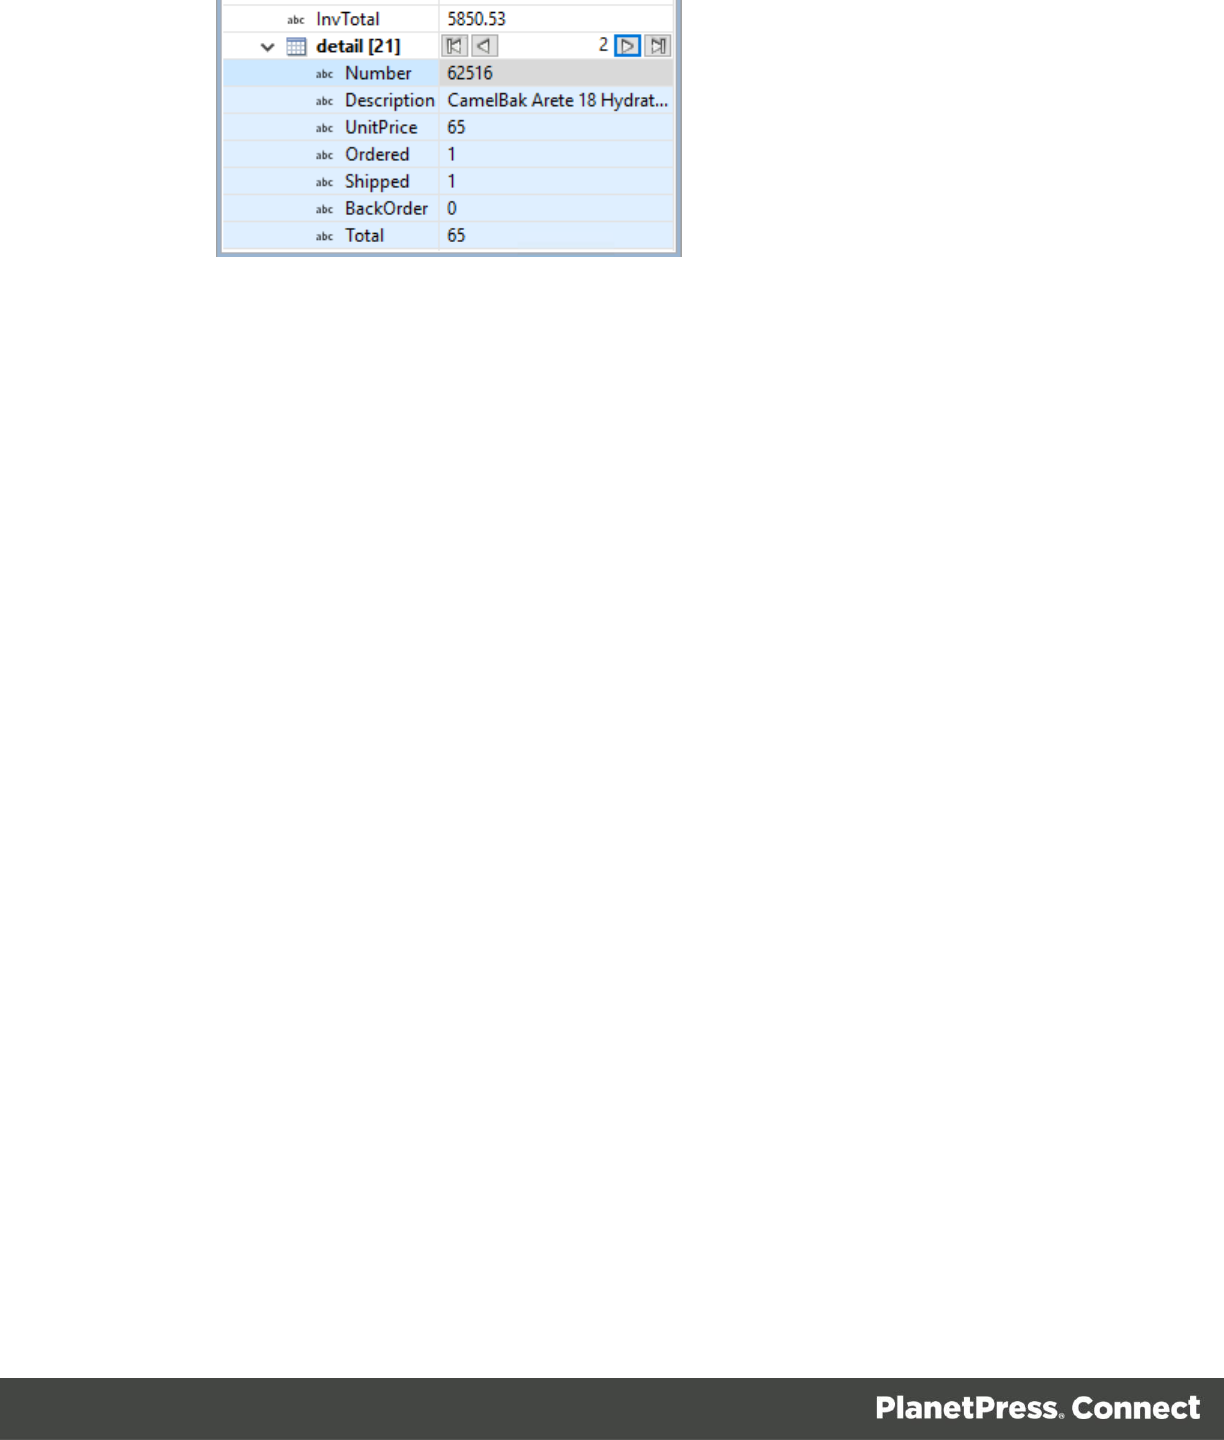
5. A detail table has been added on the Data model pane. Try browsing the products that
belong to one record.
12
Walkthrough
Creating an XML Data Mapper configuration

13
Walkthrough
Creating an XML Data Mapper configuration
Renaming steps, fields and detail tables
8. Rename Extractions steps
With only two Extraction steps, this Data Mapping Configuration is fairly simple. Extraction steps
in bigger and more complex Data Mapping Configuration need clear names to help you keep
track of what each step in the Data Mapping Configuration does. This exercise shows how to
rename Extraction steps.
1. On the Steps pane, click the Extraction1 step inside the Repeat step.
2. On the Step Properties pane (below the XML viewer), click Description and rename the
repeat step, for example to ExtractProducts.
9. Rename fields
The field names in the Data Model pane (at the right) will also be visible in the Designer. Field
names like Number and Number2 can be confusing when you are creating a template with
variable data. In this exercise you will rename those fields and one of the fields in the detail
table.
The first Number field actually contains an invoice number. Rename the field so that the field
name makes this clear:
1. On the Data Model pane, click the Number field (or any other field in the same
Extraction step).
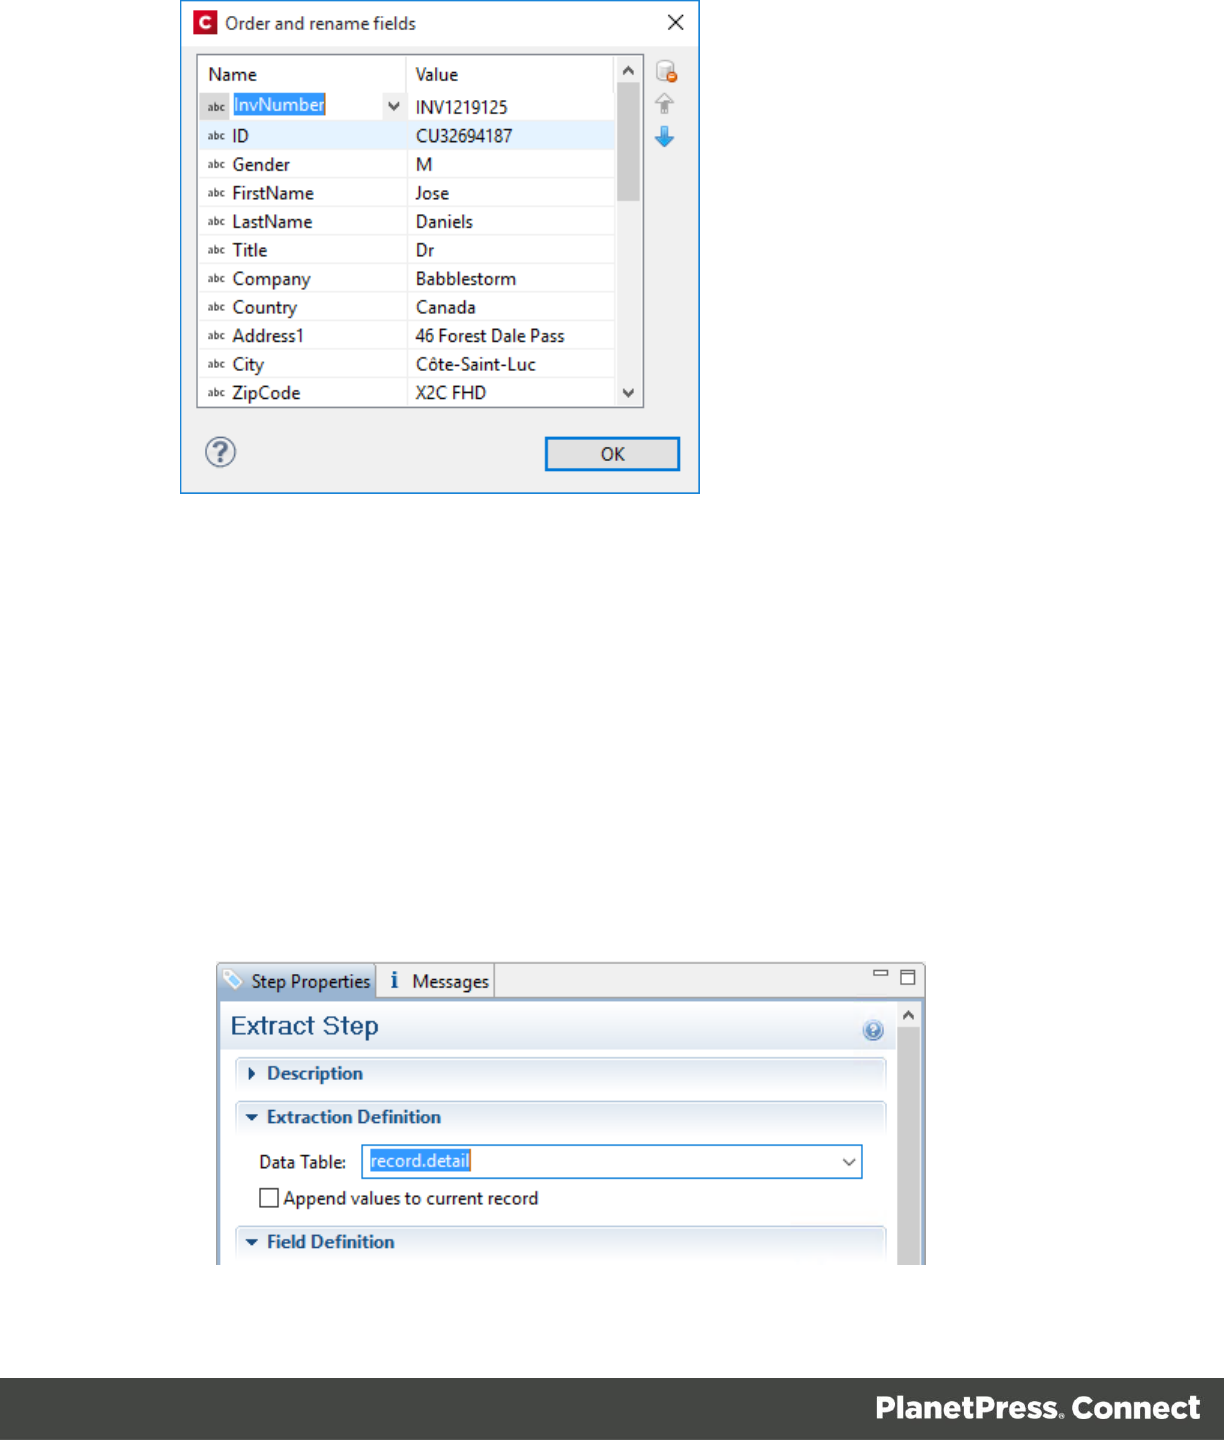
2. On the Step Properties pane, click the Order and Rename Fields button .
3. In the dialog that appears, click the field Number and rename it to InvNumber.
14
Walkthrough
Creating an XML Data Mapper configuration
Next, rename the Number2 field in the detail table to make clear that that field contains a
product number:
1. On the Data model pane, click a field in detail (the detail table).
2. On the Step Properties pane, click Order and Rename Fields.
3. Rename the field Number2 to ProdNumber.
10. Rename a detail table
Renaming detail tables is especially useful when there are more detail tables in one record, or
when a detail table contains another detail table. For this detail table, ‘products’ would be a
better name.
1. On the Data model pane, click one of the fields in detail (the detail table).
2. On the Step Properties pane, click Extraction Definition.

15
Walkthrough
Creating an XML Data Mapper configuration
3. Rename the detail table from record.detail to record.products.
Note
A detail table’s name should always begin with ‘record.’.
4. Click somewhere else on the Step Properties pane to update the data model. You will
see the new name appear.
16
Walkthrough
Creating an XML Data Mapper configuration
Changing the data type of fields
In addition to renaming them, fields need to be prepared for use in Connect Designer templates
by setting their data type.
You have already set a default data format. This has had no effect on the extracted data,
because by default, all fields are extracted as Strings (text). But for dates, numbers and
currencies, other data types are available. Select a data type for these fields to make it easier to
use them in a template.
11. Set a field’s data type to Date
Two fields in the Data Model actually contain a date. Set their data type accordingly, so they can
be interpreted and processed as such in the DataMapper and in templates.
1. On the Data model pane, click Date.
2. On the Step Properties pane, under Field Definition, set the Type to Date.
3. Repeat this procedure for the DueDate field.
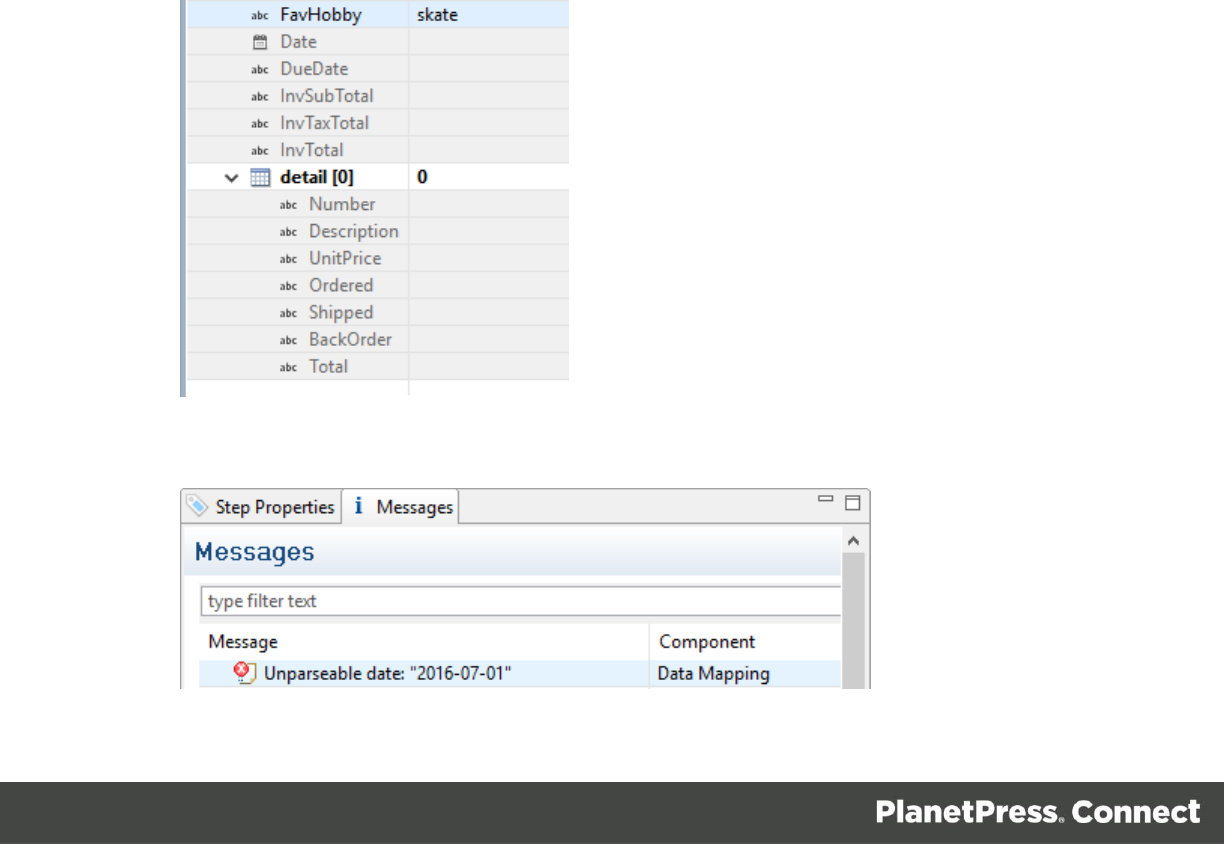
You will have noticed that something has gone wrong: the fields following the Date field in the
Data model pane are grayed out.
The Messages pane also indicates that there was an error: the DataMapper could not interpret
the input data correctly:
17
Walkthrough
Creating an XML Data Mapper configuration
The DataMapper could not parse the date, because it expected the date to be formatted
different. The problem can be solved by setting a date format for this field.
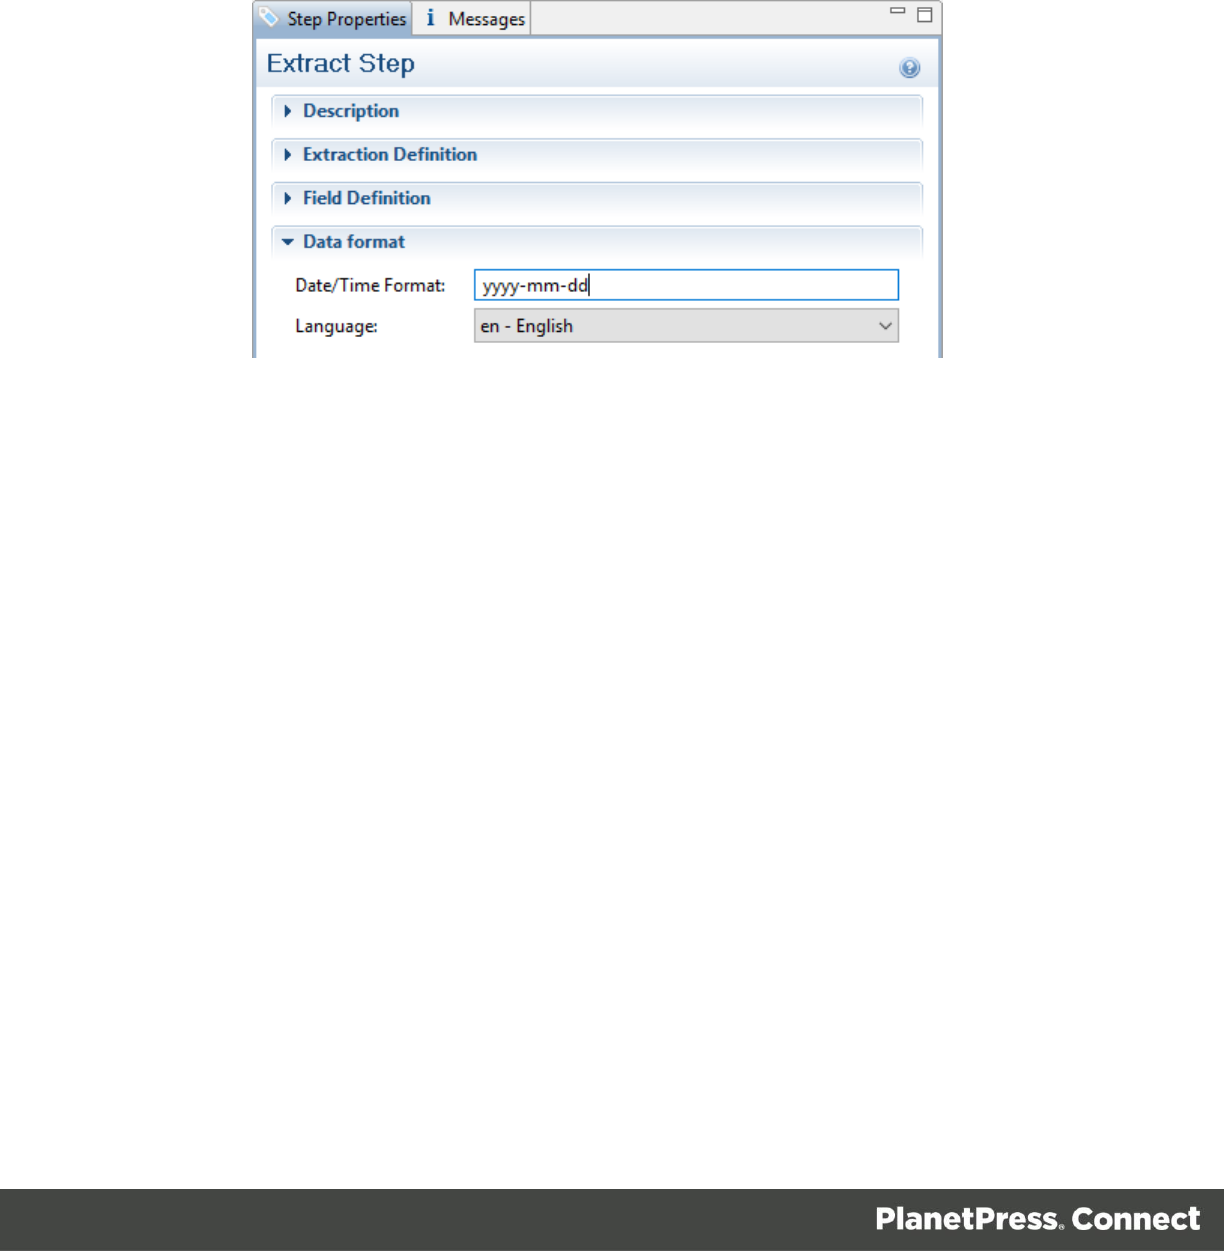
4. On the Step Properties pane, click Data format. Here you can change the format of the
input data for the selected field.
5. In the input data for this date the year comes first, then the month, and then the day,
and they are all separated by ‘- ‘. Change the format to yyyy-mm-dd.
12. Set a field’s type to Integer
Integers are whole numbers. In olsg-data.XML, there are a few elements that actually contain
an integer. Set the data type of the respective fields in the data model accordingly.
1. On the Data model pane, select Ordered.
2. On the Step Properties pane, under Field Definition, set the Type to Integer.
3. Repeat this procedure for Shipped and Backorder.
13. Select a field and set its data type to Currency
In olsg-data.XML, there is also a number of elements that contain an amount of money. Set the
data type of the respective fields in the data model to Currency.
1. On the Data model pane, click SubTotal.
2. On the Step Properties pane, under Field Definition, set the Type to Currency.
3. Repeat this procedure for TaxTotal and Total and for the currency fields in the detail
table.
18
Walkthrough
Creating an XML Data Mapper configuration
Fine-tuning using JavaScript
This lesson explains how to fine-tune a record set according to your needs.
For this, understanding JavaScript is an advantage, but don’t be scared: you won’t need to write
any code yourself.
14. Post function: capitalize country
What if the extracted data is correct, but you’d like the data to be a little different: in capitals for
example? Then you could use the Post function. Code typed in the Post function field on the
Step Properties pane will be executed after (hence: ‘post’) the extraction of the selected field, on
the extracted data. In this exercise you will capitalize the letters of the Country field.
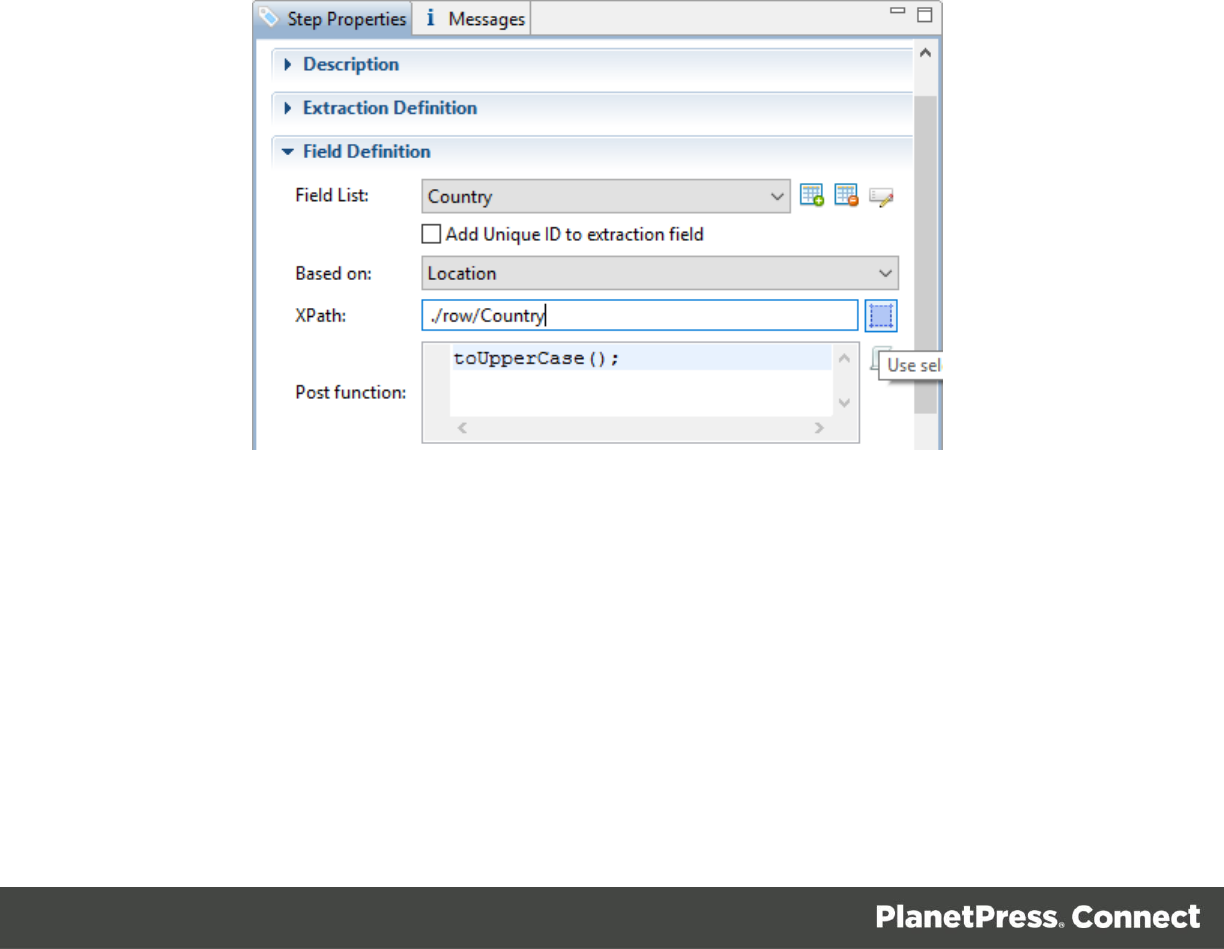
1. On the Data model pane, click Country.
2. On the Step Properties pane, in the Post function field, type toUpperCase();
This is a standard JavaScript function to capitalize the letters of a String (a text).
3. Click somewhere else on the Step Properties pane and check the result on the Data
model pane.
15. Split a field and keep one part of it
Sometimes you will want to keep only one part of the information that has been extracted to a
field, and remove the rest. In olsg-data.XML, the Membership level is
‘membershiplevel:bronze’, ‘membershiplevel:silver’, or ‘membershiplevel:gold’. The word
‘membershiplevel’ is superfluous. In this exercise you will remove it from the data field.
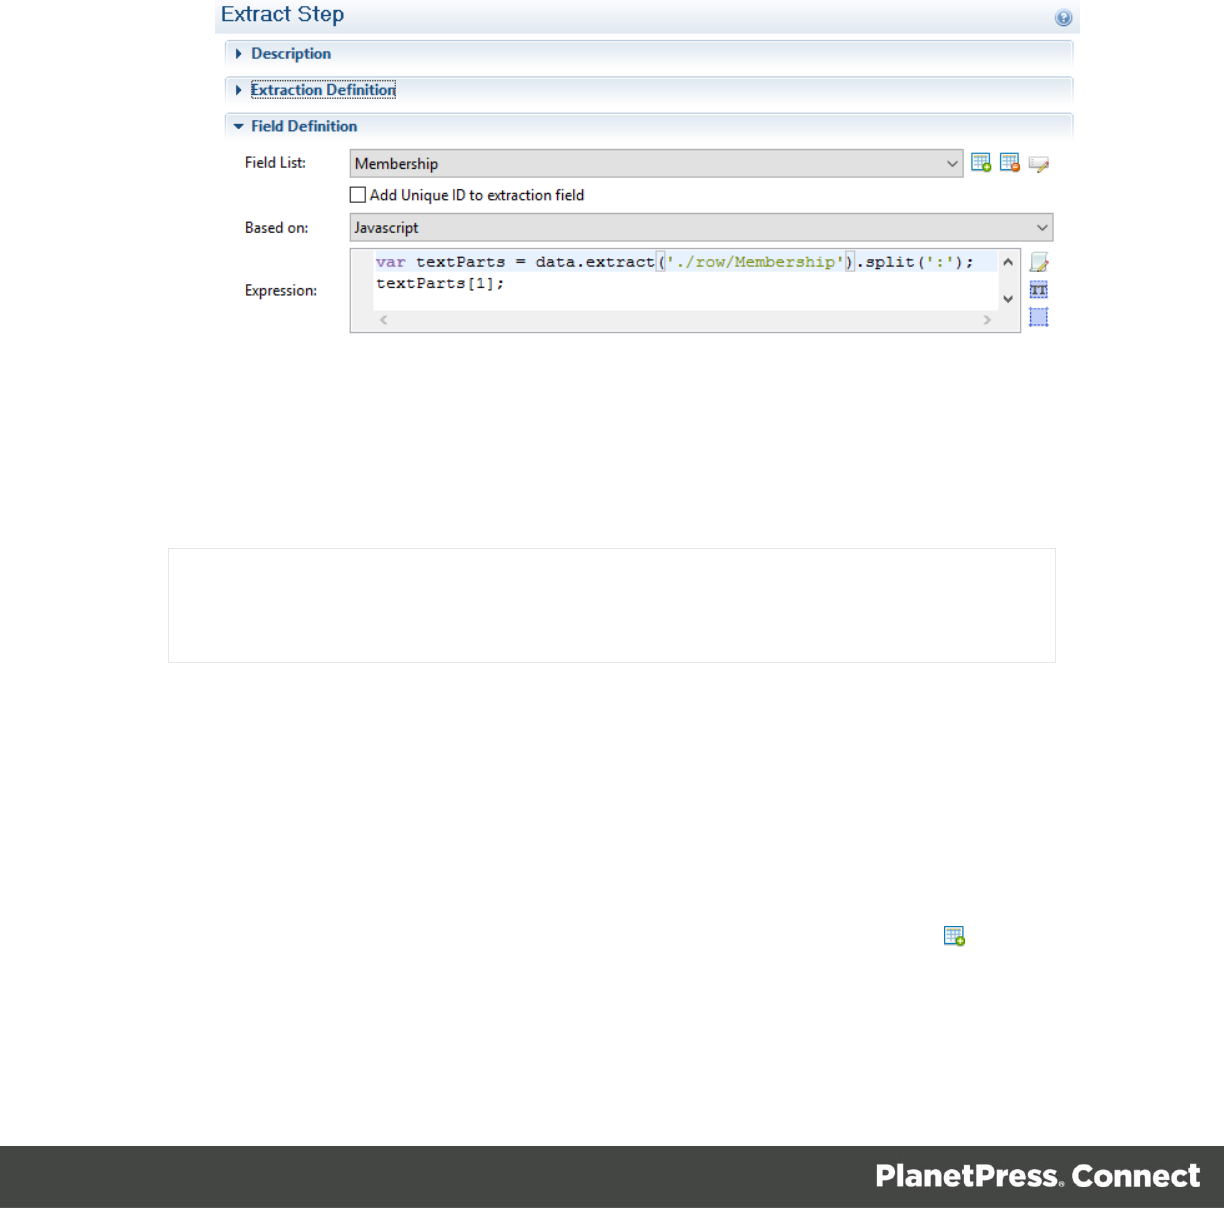
1. On the Data model pane, click Membership.
2. On the Step Properties pane, change Based on from Location to Javascript.
3. The Expression field now shows this line of code:
19
Walkthrough
Creating an XML Data Mapper configuration
data.extract('./row/Membership');
This is the code that normally extracts data from a specific location, in this case, the data
found in the Membership element in a row element.
Replace this line by the following code:
var textParts = data.extract('./row/Membership')
.split(':');
textParts[1];
This code extracts the data and then splits the resulting text in two parts, using a colon
(‘:’) as the separator.
The parts of the text are stored in a list variable called textParts. The first item in this list
is membershiplevel, the second item is the level itself. To get the second item from the
list, you need to use textParts[1]; because the list is a JavaScript array and
JavaScript arrays always start counting at 0.
Note
The last line of code is essential: the value of the variable at the end of the code becomes the
value of the data field.
4. Take a look at the result on the Data model pane: the Membership field now only
contains the membership level itself. The word ‘membershiplevel’ and the colon have
been removed from the data field.
16. Add a concatenated field
It can be very useful to add a field that isn’t filled directly via an extraction. In this exercise you
will add a field that combines information from two data fields.
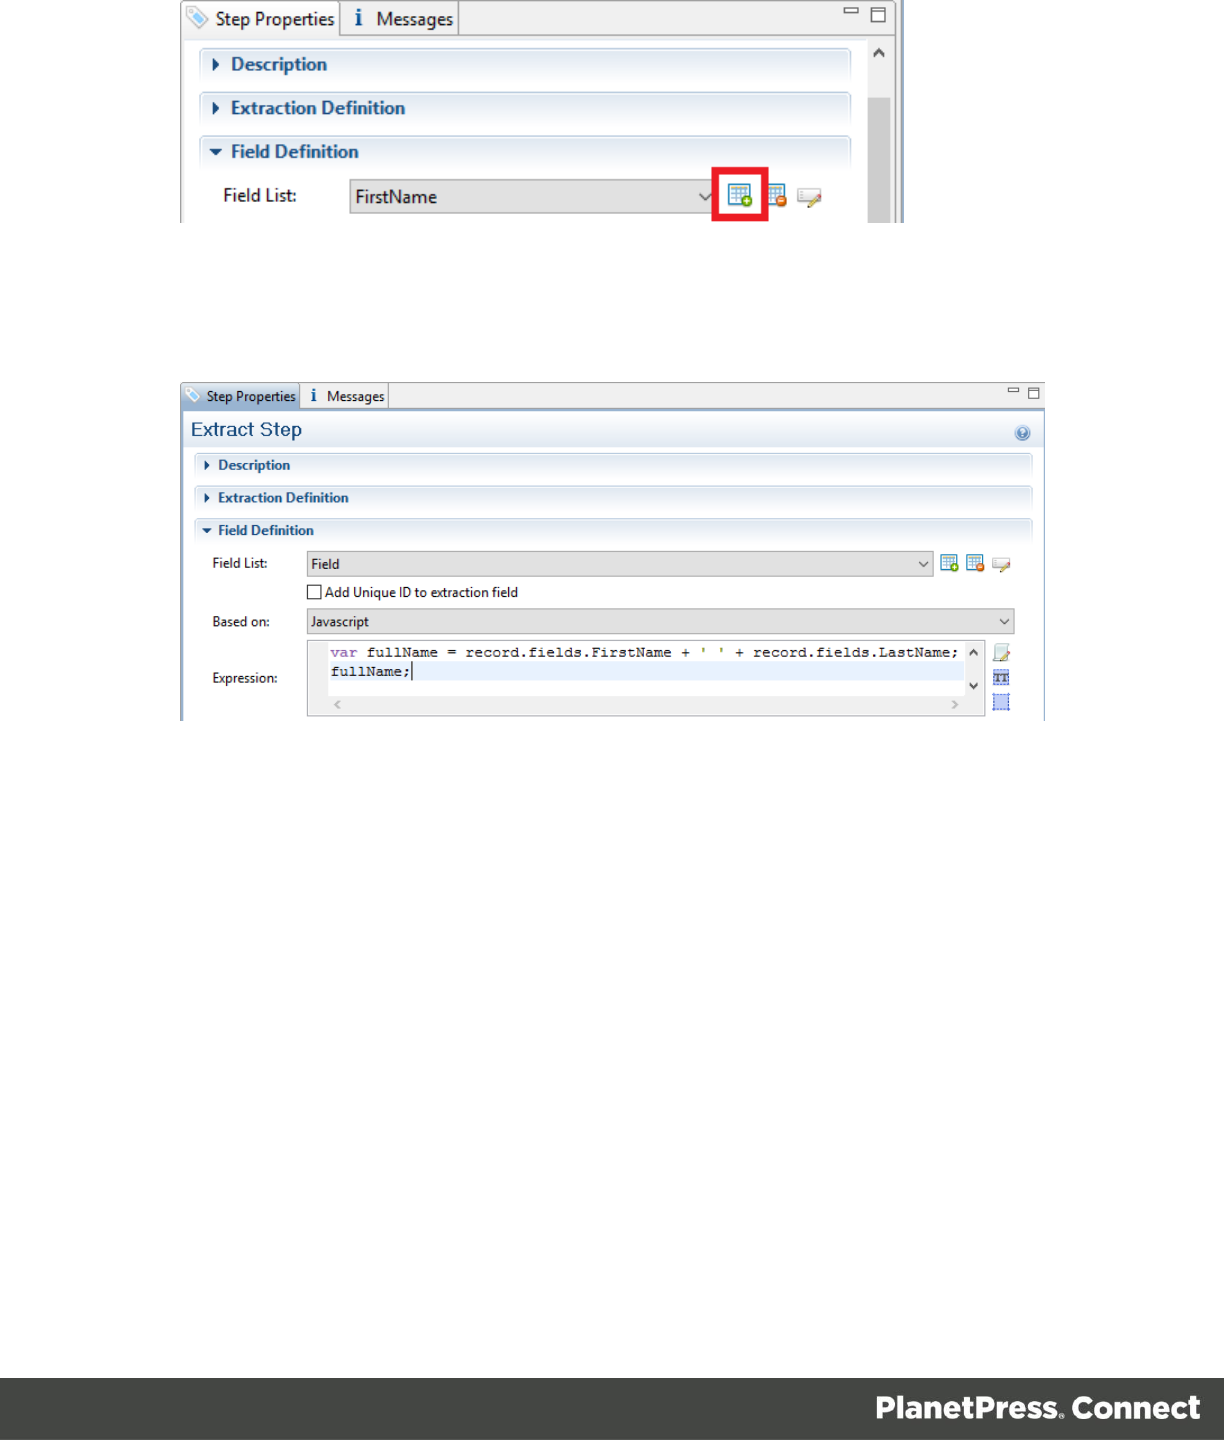
1. On the Steps pane, click the first Extraction step.
2. On the Step Properties pane, under Field Definition, click the Add field button .
20
Walkthrough
Creating an XML Data Mapper configuration
3. In Expression type this code:
var fullName = record.fields.FirstName + ' ' +
record.fields.LastName;
fullName;
4. Click another field in the Step Properties pane. Now you will see the result on the Data
model pane.
5. Rename the new field to FullName.

21
Walkthrough
Creating an XML Data Mapper configuration
What’s next?
The Data Mapping Configuration is now ready. It can be used to extract data from any XML file
that has the same structure as olsg-data.xml.
Its data model can be used in the Connect Designer, to create templates with variable data. To
do this, you have to have the Data Mapping Configuration and a Connect Designer template
open at the same time. The sample data will be visible in the Data model pane in the Connect
Designer.
Alternatively you could export the Data Model from the DataMapper and import it in the
DataMapper again when extracting data from other types of files, or in the Connect Designer
when creating a template. The exported Data Model doesn’t contain the data sample so in these
cases the sample data will not be visible.
To get an introduction to the Connect Designer, please proceed with the OLSG Invoice
Walkthrough or the OLSG Mobile Letter Walkthrough, depending on your needs.
